If you go check the PowerShell Gallery you will find a great module in the top 100 downloads called PSWindowsUpdate. This is one of my favorite modules because it fits a specific need that many organizations have, which is orchestrating the deployment of Windows updates. There are many great cmdlets in this module, but the one I will focus on today is Invoke-WUInstall, used to install Windows updates remotely.
Since PSWindowsUpdate is not installed on Windows by default, we have to first install the module. Luckily, we can do this easily from the PowerShell Gallery. Note I am using an older version from July 2017 (1.5.2.6).
One different aspect of using Invoke-WUInstall is that it does not use traditional PowerShell remoting methods to perform Windows update installs. When you look at the source code, it actually creates and immediately runs a scheduled task on the remote machine under the SYSTEM account.
In this command we see Get-WUInstall, which is the command PSWindowsUpdate uses to install updates, usually from your Windows Server Update Services (WSUS) server. Get-WUInstall simply uses a COM object for Windows updates to perform the tasks needed. Notice also the use of the -AcceptAll parameter, which means it will automatically accept any updates to install.
One nice feature of Invoke-WUInstall is that it actually installs the PSWindowsUpdate module on the remote machine (if it isn't there already). This is great when you are using the module on a new machine, or when you decide to use it for the first time.
As you can see, the scheduled task is going to run ipmo PSWindowsUpdate; Get-WUInstall -AcceptAll -AutoReboot | Out-File C:\PSWindowsUpdate.log. Using Out-File will ensure the logs of downloading and installing updates are visible so we can check against them later.
Install updates on multiple machines
The true power of Invoke-WUInstall is when you have to install updates on many machines at once. This is very easy to do, all you need is to add machines to the ‑ComputerName parameter, which then processes them in a loop (not in parallel unfortunately).
VERBOSE: Populating RepositorySourceLocation property for module PSWindowsUpdate.
VERBOSE: Loading module from path 'C:\Program Files\WindowsPowerShell\Modules\PSWindowsUpdate\1.5.2.6\PSWindowsUpdate.psm1'.
VERBOSE: Create schedule service object
VERBOSE: Performing the operation "Invoke WUInstall" on target "Test-1".
Finding errors
One great reason to output to a log on the remote machine is to confirm that no errors installing updates on these remote machines occurred. With some simple PowerShell, we can query these log files and search for failures.
Here is what a typical log looks like after using Get-WUInstall -AcceptAll | Out-File C:\ PSWindowsUpdate.log:
Invoke WUInstall log
It includes the status of the update, its KB number, size, and title—all great information to have handy when installing updates.
Using Invoke-Command, Get-Item, and Select-String, we can use a quick technique to easily work through any computers used with Invoke-WUInstall and find Windows updates that failed to install:
NEW: Big PowerShell cheat sheet for your office wall
>> Select-Object -Property line } | Select-Object -Property Line,PSComputerName
Line PSComputerName
---- --------------
4 Failed KB4103712 30 MB 2018-05 Security Only Quality Update for Windo... Test-1
Conclusion
While there are other solutions for managing Windows update deployment, PSWindowsUpdate provides a Windows admin a free and very powerful tool to manage updates. With some simple PowerShell scripting, an admin can orchestrate updates across the enterprise in conjunction with WSUS as well.
The Add-Computer cmdlet adds the local computer or remote computers to a domain or workgroup, or moves them from one domain to another. It also creates a domain account if the computer is added to the domain without an account.
You can use the parameters of this cmdlet to specify an organizational unit (OU) and domain controller or to perform an unsecure join.
To get the results of the command, use the Verbose and PassThru parameters.
Examples
Example 1: Add a local computer to a domain then restart the computer
PowerShell
Add-Computer -DomainName Domain01 -Restart
This command adds the local computer to the Domain01 domain and then restarts the computer to make the change effective.
Example 2: Add a local computer to a workgroup
PowerShell
Add-Computer -WorkgroupName WORKGROUP-A
This command adds the local computer to the Workgroup-A workgroup.
This command adds the Server01 computer to the Domain02 domain. It uses the LocalCredential parameter to specify a user account that has permission to connect to the Server01 computer. It uses the Credential parameter to specify a user account that has permission to join computers to the domain. It uses the Restart parameter to restart the computer after the join operation completes and the Force parameter to suppress user confirmation messages.
Example 6: Move a group of computers to a new domain
This command moves the Server01 and Server02 computers, and the local computer, from Domain01 to Domain02.
It uses the LocalCredential parameter to specify a user account that has permission to connect to the three affected computers. It uses the UnjoinDomainCredential parameter to specify a user account that has permission to unjoin the computers from the Domain01 domain and the Credential parameter to specify a user account that has permission to join the computers to the Domain02 domain. It uses the Restart parameter to restart all three computers after the move is complete.
Example 7: Move a computer to a new domain and change the name of the computer
This command moves the Server01 computer to the Domain02 and changes the machine name to Server044.
The command uses the credential of the current user to connect to the Server01 computer and unjoin it from its current domain. It uses the Credential parameter to specify a user account that has permission to join the computer to the Domain02 domain.
Example 8: Add computers listed in a file to a new domain
This command adds the computers that are listed in the Servers.txt file to the Domain02 domain. It uses the Options parameter to specify the Win9xUpgrade option. The Restart parameter restarts all the newly added computers after the join operation completes.
Example 9: Add a computer to a domain using predefined computer credentials
This first command should be run by an administrator from a computer that is already joined to domain Domain03:
PowerShell
$newADComputerSplat = @{
Name = "Server02"
AccountPassword = (ConvertTo-SecureString -String'TempJoinPA$$' -AsPlainText -Force)
}
New-ADComputer @newADComputerSplat
# Then this command is run from `Server02` which is not yet domain-joined:$joinCred = New-Object pscredential -ArgumentList ([pscustomobject]@{
UserName = $null
Password = (ConvertTo-SecureString -String'TempJoinPA$$' -AsPlainText -Force)[0]
})
$addComputerSplat = @{
DomainName = "Domain03"
Options = 'UnsecuredJoin', 'PasswordPass'
Credential = $joinCred
}
Add-Computer @addComputerSplat
This combination of commands creates a new computer account with a predefined name and temporary join password in a domain using an existing domain-joined computer. Then separately, a computer with the predefined name joins the domain using only the computer name and the temporary join password. The predefined password is only used to support the join operation and is replaced as part of normal computer account procedures after the computer completes the join.
Example 10: Add a Computer to a domain with a new name
Using this combination of commands avoids multiple reboots and multiple writes to Active Directory writes for the same object when the computer joins the domain with the new name.
Specifies the computers to add to a domain or workgroup. The default is the local computer.
Type the NetBIOS name, an Internet Protocol (IP) address, or a fully qualified domain name of each of the remote computers. To specify the local computer, type the computer name, a dot (.), or "localhost".
This parameter does not rely on Windows PowerShell remoting. You can use the ComputerName parameter of Add-Computer even if your computer is not configured to run remote commands.
This parameter is introduced in Windows PowerShell 3.0.
Specifies a user account that has permission to join the computers to a new domain. The default is the current user.
Type a user name, such as "User01" or "Domain01\User01", or enter a PSCredential object, such as one generated by the Get-Credential cmdlet. If you type a user name, you will be prompted for a password.
To specify a user account that has permission to remove the computer from its current domain, use the UnjoinDomainCredential parameter. To specify a user account that has permission to connect to a remote computer, use the LocalCredential parameter.
Specifies a user account that has permission to connect to the computers that are specified by the ComputerName parameter. The default is the current user.
Type a user name, such as "User01" or "Domain01\User01", or enter a PSCredential object, such as one generated by the Get-Credential cmdlet. If you type a user name, you will be prompted for a password.
To specify a user account that has permission to add the computers to a new domain, use the Credential parameter. To specify a user account that has permission to remove the computers from their current domain, use the UnjoinDomainCredential parameter.
This parameter is introduced in Windows PowerShell 3.0.
Specifies advanced options for the Add-Computer join operation. Enter one or more values in a comma-separated string.
The acceptable values for this parameter are:
AccountCreate: Creates a domain account. The Add-Computer cmdlet automatically creates a domain account when it adds a computer to a domain. This option is included for completeness.
Win9XUpgrade: Indicates that the join operation is part of a Windows operating system upgrade.
UnsecuredJoin: Performs an unsecured join. To request an unsecured join, use the Unsecure parameter or this option. If you want to pass a machine password, then you must use this option in combination with PasswordPass option.
PasswordPass: Sets the machine password to the value of the Credential(DomainCredential) parameter after performing an unsecured join. This option also indicates that the value of the Credential (DomainCredential) parameter is a machine password, not a user password. This option is valid only when the UnsecuredJoin option is specified. When using this option, the credential provided to the -Credential parameter must have a null username.
JoinWithNewName: Renames the computer name in the new domain to the name specified by the NewName parameter. When you use the NewName parameter, this option is set automatically. This option is designed to be used with the Rename-Computer cmdlet. If you use the Rename-Computer cmdlet to rename the computer, but do not restart the computer to make the change effective, you can use this parameter to join the computer to a domain with its new name.
JoinReadOnly: Uses an existing machine account to join the computer to a read-only domain controller. The machine account must be added to the allowed list for password replication policy and the account password must be replicated to the read-only domain controller prior to the join operation.
Specifies an organizational unit (OU) for the domain account. Enter the full distinguished name of the OU in quotation marks. The default value is the default OU for machine objects in the domain.
Specifies the name of a domain controller that adds the computer to the domain. Enter the name in FQDN format. By default, no domain controller is specified.
Beginning in August 2024, security hardening for domain join requires that you use the FQDN of the domain controller. For example: DC1.contoso.com. For more information, see NetJoin Domain Join Hardning Changes.
Specifies a user account that has permission to remove the computers from their current domains. The default is the current user.
Type a user name, such as "User01" or "Domain01\User01", or enter a PSCredential object, such as one generated by the Get-Credential cmdlet. If you type a user name, you will be prompted for a password.
Use this parameter when you are moving computers to a different domain. To specify a user account that has permission to join the new domain, use the Credential parameter. To specify a user account that has permission to connect to a remote computer, use the LocalCredential parameter.
This parameter is introduced in Windows PowerShell 3.0.
When you use the PassThru parameter, Add-Computer returns a ComputerChangeInfo object. Otherwise, this cmdlet does not generate any output.
Notes
In Windows PowerShell 2.0, the Server parameter of Add-Computer fails even when the server is present. In Windows PowerShell 3.0, the implementation of the Server parameter is changed so that it works reliably.
The source for this content can be found on GitHub, where you can also create and review issues and pull requests. For more information, see our contributor guide.
PowerShell feedback
PowerShell is an open source project. Select a link to provide feedback:
The Registry Editor is one of the most complex aspects of recent Windows operating systems. Even for computing maestros with years of experience with Windows, accessing it is akin to walking barefoot across a minefield, as one false step can easily break your OS. That said, it can help you out when you're troubleshooting weird issues on your Windows 11 machine.
Not only that, there are a bunch of modifications you can make inside the Registry Editor to enhance your computing experience. In this article, we’ve compiled a list of the eleven best tricks that you can pull off inside the Registry Editor for a better Windows experience.
Be sure to back up your important files and create a Restore Point before you attempt the suggestions mentioned in the article. Although we’ve verified all the methods on the latest version of Windows 11, it’s still possible to mess things up if you’re not careful. We also recommend exercising extreme caution when you navigate the Registry Editor because even a single mistake can brick your OS.
11Enable Verbose mode
You might not be able to read all the outputs on a fast SSD
Designed for those who love tinkering and troubleshooting, the Verbose mode on Windows 11 displays dynamic information on the PC’s status during startup and shutdown. By default, it’s disabled on the OS, though you can enable it via the Registry Editor.
Head to the Computer\HKEY_LOCAL_MACHINE\SOFTWARE\Microsoft\Windows\CurrentVersion\Policies\System location inside the Registry Editor.
Right-click on the blank area and create a new DWORD (32-bit) Value called verbosestatus.
Open this integer and change its Value data to 1.
10Disable the Weather/News icon in the Taskbar
It can get rather distracting at times
Among other utilities, Windows 11 includes the option to check the weather and the news widgets from the taskbar. But if you find it annoying, then it’s possible to disable the icon and its pop-up screen using the Registry Editor.
Head to Computer\HKEY_LOCAL_MACHINE\SOFTWARE\Policies\Microsoft.
Just like the previous section, create a new key (called Dsh) by right-clicking on the Microsoft variable and choosing Key.
Inside Dsh, create a new DWORD integer called AllowNewsAndInterests.
Assign a value of 0 to it before restarting your system.
9Modify the Taskbar alignment
For those who want the classic alignment
Besides changing the layout of the Start menu, Windows 11 brought noticeable changes to the Taskbar, many of which weren’t (and still aren’t) appreciated by the community. So, if you’re someone who dislikes the alignment of the new Taskbar, you can change a registry key in the Registry Editor to make it more bearable.
Once you’ve opened the Registry Editor, navigate to the Computer\HKEY_CURRENT_USER\Software\Microsoft\Windows\CurrentVersion\Explorer\Advanced\ location.
Create a new DWORD (32-bit) Value called TaskbarAl, which lets you change the alignment of the taskbar.
Set the value to 0 to bring the taskbar to the leftmost corner of the screen, similar to older Windows operating systems.
8Disable Network Throttling
To remove the shackles on your network speed
Just like power throttling, Windows 11 has another limiter on the network side. While the network throttling parameter in Windows 11 doesn’t typically affect daily usage, it can cause some issues for tasks that require minimal latency and high Internet speeds. So, you can disable it via the Registry Editor to avoid any OS-created bottlenecks to your network's performance.
Navigate to Computer\HKEY_LOCAL_MACHINE\SOFTWARE\Microsoft\Windows NT\CurrentVersion\Multimedia\SystemProfile inside the registry.
Set ffffffff as the Value data for NetworkThrottlingIndex.
7Reduce resource allocation to background tasks
To prioritize your games and hardware-intensive apps
Although Windows 11 diverts most resources to resource-intensive tasks, it leaves a small percentage of CPU cores, memory, storage, and other specs available for background tasks. The default value assigned to it is 20%, which shouldn’t be an issue for most users. But if you’re on an exceptionally low-powered system, it might be a good idea to turn this value down a notch to get some extra frames while gaming.
Just like the last time, enter the Computer\HKEY_LOCAL_MACHINE\SOFTWARE\Microsoft\Windows NT\CurrentVersion\Multimedia\SystemProfile directory.
Double-click on the DWORD Value called SystemResponsiveness and reduce its value from 20 to 10.
6Hasten the shutdown process
'Cause nobody wants a PC that takes minutes to shut down
When you click on the shutdown option in Windows 11, the OS sends a request to the pending processes to wrap things up before it forcibly terminates them. This is usually defined by the WaitToKillServiceTimeout inside the Registry Editor. By default, it’s set to five seconds, though you can reduce it to two seconds to decrease the shutdown times.
Once you're inside the Registry Editor, open the Computer\HKEY_LOCAL_MACHINE\SYSTEM\CurrentControlSet\Control location.
Change the value of the WaitToKillServiceTimeout string to 2000 from 5000.
5Restore Windows 10 context menu
Resurrecting the best context menu in Windows 11
The reworded context menu in Windows 11 was a terrible addition to the OS, as it got rid of many useful options. Sure, the newer menu looks less cluttered, but it’s quite lacking in the functionality department. While Microsoft lets you access the good ol’ context menu from Windows 10, clicking the See more options button or holding Shift when opening the menu can get rather annoying.
Luckily, the Registry Editor can help you permanently replace the new context menu with the old one:
Head to the Computer\HKEY_CURRENT_USER\Software\Classes\CLSID inside the Registry Editor.
Right-click on the CLSID directory and create a new key named {86ca1aa0-34aa-4e8b-a509-50c905bae2a2}.
Again, create another key called InprocServer32 inside the previous key.
Open the (Default) variable and, without making any modification whatsoever, hit OK.
The old right-click menu will be back when you restart the PC.
4Add custom apps to the context menu
I can't be the only person who has benchmarking tools pinned on the context menu, right?
While we’re on the subject of the context menu, you have noticed a couple of apps, including the Display Settings, Terminal, and Visual Studio, appear on the menu by default. Interestingly, you can even pin some of your favorite apps on the menu with the help of the Windows Registry tool.
Since the procedure is a bit complex, we have a dedicated guide on the subject. But here's the short version:
Head to the Computer\HKEY_CLASSES_ROOT\Directory\Background\shell directory and create a new key with the same name as the app you wish to add.
Make a new String inside the key and call it Icon before adding the path of the executable file of the app under the Value data field.
Finally, create a new key called Command inside the original key and, once again, set the path of the application's .exe file as the Value data.
Power throttling is a feature built into Windows that lowers CPU energy consumption. Besides increasing the battery life of your system, it can also lead to a reduction in the idle temps of the processor. Unfortunately, this setting can reduce the performance of your PC in certain scenarios. So, it’s a good idea to disable the feature via the Registry Editor if the performance isn’t to your liking. To do so,
Go to the Computer\HKEY_LOCAL_MACHINE\SYSTEM\CurrentControlSet\Control\Power directory and create a new key called PowerThrottling.
Make a new DWORD (32-bit) Value called PowerThrottlingOff inside the PowerThrottling key and assign it a value of 1.
2Get rid of Bing suggestions from the Start menu
For those who want an uncluttered Start menu
Despite packing a robust set of features, Bing is still not as popular as Google. Many moons ago, Microsoft integrated Bing into the Search bar of the Start menu to popularize the search engine. However, many users (including myself) aren’t fans of this functionality.
If you want to eradicate Bing from the Start menu,
Open the Computer\HKEY_CURRENT_USER\Software\Policies\Microsoft\Windows\ location within the Registry Editor.
Inside Explorer, make a new DWORD (32-bit) Value element called DisableSearchBoxSuggestions and assign it a value of 1.
1Disable Windows Copilot
Copilot, going dark!
With Microsoft going all-out in the field of AI, it’s no surprise that the Redmond-based giant has Windows Copilot to Windows 11. Although Microsoft’s AI assistant has its fair share of advantages over competitors, not everyone wants a chatbot built into their operating systems.
So, you can disable this functionality in the Windows Registry by following these steps:
Once again, enter the Computer\HKEY_CURRENT_USER\Software\Policies\Microsoft\Windows\ directory.
Right-click on Windows and create a new key called WindowsCopilot.
Inside WindowsCopilot, create a DWORD Value called TurnOffWindowsCopilot and set 1 as its Value data.
Registry Editor: Highly useful, but just as dangerous for newcomers
Besides these eleven tweaks, there are just as many customization options available in the Registry Editor. However, not all of them are helpful for the average user. For instance, you can disable the Windows Update functionality alongside the Windows Security app. Despite my disdain for Microsoft’s broken updates, I don’t recommend turning them off, as doing so can deprive you of the essential security patches. Likewise, unless you have an industry-grade antivirus that conflicts with Windows Security, it’s a good idea to leave the settings related to the app untouched.
If you’re looking for other modifications to fine-tune Windows 11 to your liking, the OS has a plethora of other utilities. From productivity tweaks to settings that can improve your FPS, you’d be surprised at how much you can customize Microsoft’s flagship OS.
1.4. Task Bar File Explorer shortcuts stopped working after Windows 11 update
Task Bar File Explorer shortcuts stopped working after Windows 11 update
I installed the 22H2 update on 22nd September 2022 and my File Explorer in the Task Bar stopped working correctly.
When I right-click the File Explorer icon, a list opens that shows pinned and recent items. None of them work anymore with a left-click, except the This PC shortcut. Nothing happens upon clicking them. The whole list just disappears. They only open if I right-click on them and click Open, which is tedious.
You can try unpinning it then opening File Explorer and pinning it again. There's technically nothing you can do about something like that besides unpinning, etc to affect it and see if that helps.
Its a UI issue or upgrade issue. But, always possible that File Explorer's registry stuff got messed up and a clean Windows installation or further update attempts will fix it. There's a lot of stuff there that can cause odd issues like that.
I tried unpinning and pinning it back. Last week I also tried removing all File Explorer shortcuts from the registry and adding them again. No luck in either case.
1) If this was cased by Feature Update 22H2, you can roll it back for 10 days in Settings > System > Recovery or from the WinRE Repair Mode or bootable media using the Uninstall Updates button: https://www.elevenforum.com/t/boot-to-advanced-...
2) Right click Start button to open Task Manager, show More Details, then choose Processes tab, scroll down to Windows Processes, then further down almost to the bottom to Windows Explorer. Right click to Restart Explorer, then Restart PC.
3) Then try all of these fixes for File Explorer not working in Windows 11:
4) Update your drivers from the PC maker's Support Downloads webpage for your exact model. While there check for the latest Chipset, BIOS, Sound, Network, USB3, Bluetooth and all other drivers to compare with the version/date installled for that device in Device Manager reached by right clicking the Start Menu.
5) Expedite install of all Windows Updates in Settings > Update & Security > Windows Update > Check for Updates, including needed restarts, then go back to check again until no more are offered.
Then go into Microsoft Store app > My Library > Get Updates and expedite all Store app Updates, too, until no more are offered.
8) Download, install and run a full scan with free Malwarebyes from https://www.malwarebytes.com/mwb-download/ after enabling Root Kit scan in Scan Settings. Clean Up anything it finds and then run again. Turn off Real Time trial in Control panel to keep as on-demand scanner.
10) If that doesn't fix it then you can do a Windows 11 Repair Upgrade which reinstalls Windows while saving your files and apps in place, brings it up to the latest version by the most stable method, takes about an hour and resolves most problems: https://www.elevenforum.com/t/repair-install-wi...
Feel free to ask back any questions. Based on the results you post back I may have other suggestions if necessary.
______________________________________________
Standard Disclaimer: There are links to non-Microsoft websites. The pages appear to be providing accurate, safe information. Watch out for ads on the sites that may advertise products frequently classified as a PUP (Potentially Unwanted Products). Thoroughly research any product advertised on the sites before you decide to download and install it.
____________________________ Retired 2023, thirteen year daily forums volunteer, Windows MVP 2010-2020
I reinstalled Windows while keeping files and apps, and the problem still persists. I feel that only a clean install would solve it which I'm not really ready to go through as I have a lot of projects going on.
I installed the 22H2 update on 22nd September 2022 and my File Explorer in the Task Bar stopped working correctly.
When I right-click the File Explorer icon, a list opens that shows pinned and recent items. None of them work anymore with a left-click, except the This PC shortcut. Nothing happens upon clicking them. The whole list just disappears. They only open if I right-click on them and click Open, which is tedious.
My last try works with the following steps: - Unpin it from taskbar and open it again from search
- Right click it on taskbar, then right click file explorer and click properties
1.5. Help with resettting multi-factor authentication (MFA) for a Microsoft business admin account
Help with resettting multi-factor authentication (MFA) for a Microsoft business admin account
Hello,
I recently accidentally deleted the Multi-factor authentication (MFA) account linked to my small busines'Microsoft admin account on the Microsft Authenticator app . So I can no longer access my admin account because I need the MFA and the MFA account is deleted. Unfortunately, I can't reset the MFA for this account because it's the only admin account, so I'm stuck. I understand that someone at Microsoft needs to rest the MFA for this account for me, as mentioned here: Microsoft Community link.
Unfortunately, I can't use this online support https://support.microsoft.com/en-us/contactus/, for business accounts because again I need to be logged in as the Microsoft admin and I can't access this account...
I am stuck in this vicious circle, unable to run my business, and can't find any support from Microsoft.
Can anyone help me with this critical issue?
Thanks!
Good day. Thank you for posting to Microsoft Community.
I'm sorry to hear that you're having trouble accessing your Office 365 account due to the loss of your multi-factor authentication details.
Basically, to reset your Authenticator app, you need to follow these steps with the admin credentials:
Go to the Microsoft 365 admin center and sign in with your admin credentials.
Click on Users > Active users.
Select your user account and click on Reset multi-factor authentication under More settings.
Follow the prompts to reset your multi-factor authentication.
However, with respect to your inquiry concerning the ability to access the only administrator account, please understand that this is an especially sensitive issue involving your account and password details; therefore, it's not suitable to discuss it in this publicly accessible Microsoft forum.
Click the I don’t have a product key option if you are doing a reinstallation. If Windows 11 was already activated after the installation, reactivation would happen automatically.
Select the edition of “Windows 11” that your license key activates (if applicable).
Check the I accept the license terms option.
Click the Next button.
Select the Custom: Install Windows only (advanced) option.
Select each partition in the hard drive you want to install Windows 11 21H2 and click the Delete button. (Usually, the “Drive 0” is the drive that contains all the installation files.)
Warning: Deleting a partition also deletes all data on the drive. Also, it is not required to delete the partitions from a secondary hard drive.
Select the hard drive (Drive 0 Unallocated Space) to install Windows 11.
Click the Next button.
Select your region setting after the installation on the first page of the out-of-the-box experience (OOBE).
Click the Yes button.
Select your keyboard layout setting.
Click the Yes button.
Click the Skip button if you do not need to configure a second layout.
On the “Oops, you’ve lost internet connection” or “Let’s connect you to a network” page, use the Shift + F10 keyboard shortcut.
In Command Prompt, type the OOBE\BYPASSNRO command to bypass network requirements on Windows 11 and press Enter.
The computer will restart automatically and the out-of-box experience (OOBE) will start again.
Quick note: You will need to select the region and keyboard settings one more time to get to the network connection page.
Click the I don’t have internet option.
Click the Continue with limited setup option.
Click the Accept button (if applicable).
Confirm the name of the default local account on Windows 11.
Click the Next button.
Create a password for the account.
Click the Next button.
Confirm the account password.
Click the Next button.
Select and complete the three security questions to recover the account.
Click the Next button.
Choose your privacy settings.
Click the Next button.
Click the Next button again.
Click the Accept button.
Once you complete the steps, Windows 11 (version 22H2 or 21H2) will continue the installation on the computer.
1.7. How to Bypass Windows 11's TPM, CPU and RAM Requirements
How to Bypass Windows 11's TPM, CPU and RAM Requirements
Use simple utilities to install Windows 11 on any PC.
(Image credit: Tom's Hardware)
Microsoft has some strict hardware requirements that your PC must meet to install Windows 11, including TPM 2.0 support. This means that not only older computers, but virtual machines will refuse to upgrade from Windows 10, giving you a message that "this PC doesn't currently meet Windows 11 system requirements."
Fortunately, there are several simple ways you can get bypass Windows 11's TPM, RAM and other requirements. If you're doing a clean install with a Windows 11 ISO, you can edit the registry in the middle of the setup process and tell it to skip requirement checks. We'll show you how to modify the registry in the first section below.
If you don't want to have to modify the registry mid-install, you can create a Windows 11 USB install disk that will bypass Windows 11's TPM requirement, and its need for 8GB of RAM and a supported CPU. Using a free tool called Rufus and at least a 16GB Flash drive, you can either perform an in-place upgrade of Windows 10 to 11 or a Windows 11 clean install while getting around these minimums. In the second section of our tutorial below, we'll show you how to use Rufus to create a requirement-free Windows 11 install disc.
If you have Windows 10 or an earlier build of Windows 11 installed on a PC that didn't meet the requirements (perhaps a VM), you try to update to a new build with Windows Update and you get the "doesn't meet requirements" error message, there's a workaround for that. As we'll detail in the third section below, a script from AveYo's Media Creation tool github page will allow you to bypass Windows 11's TPM requirement even with Windows Update.
RECOMMENDED VIDEOS FOR YOU...
How To Choose An SSD
1 second of 15 secondsVolume 0%
01:51
PLAY SOUND
Note that Microsoft also has also created an official registry hack to bypass TPM 2.0 and CPU requirements for an in-place upgrade. However, this method still requires at least TPM 1.2 so, if you have no TPM at all, it's worthless. We'll talk about this at the bottom, in case you want to try it.
How to Bypass Windows 11's TPM Requirement Using Registry Hacks
If you just have a regular Windows 11 install disk or ISO, you can bypass the Windows TPM and RAM requirements by making some registry changes during the install. Note that this method only works on a clean install and does not allow you to bypass the requirement for at least a dual-core CPU.
1. Boot off of your Windows 11 install disk. If you don't have one, see our story on how to download Windows 11. The first screen should ask you to choose the language of your install (which will probably be correct).
(Image credit: Tom's Hardware)
2. Hit SHIFT + F10 to launch the command prompt.
(Image credit: Tom's Hardware)
3. Type regedit and hit Enter to launch registry editor.
(Image credit: Tom's Hardware)
4. Navigate to HKEY_LOCAL_MACHINE\SYSTEM\Setup.
(Image credit: Tom's Hardware)
5. Create a new registry key under Setup and name it LabConfig. To create a registry key, right click in the right window pane and select New->Key. Then enter the key name.
(Image credit: Tom's Hardware)
6. WIthin LabConfig, create DWORDs values called BypassTPMCheck and BypassSecureBoot and set each to 1. To create a new DWORD value, right click in the right window and select new DWORD (32-bit) Value then name the key, double click to open it and set it to 1.
(Image credit: Tom's Hardware)
If you also want to bypass the RAM requirement, add a DWORD values for BypassRAMCheck.
7. Close regedit and the command prompt.
You should be able to continue with your Windows 11 installation as normal.
How to Bypass Windows 11's TPM Requirement Using Rufus
With Rufus, a free utility, you can create a Windows 11 install disk on a USB Flash drive with settings that disable the TPM, RAM and CPU requirements. You can either boot off of this USB Flash drive to do a clean Windows 11 install or run the setup file off of the drive from within Windows 10 to do an in-place upgrade.
For most people, this method is ideal, but there are a couple of disadvantages. First, it requires a 16GB or larger USB Flash drive. Second, because it's on a Flash drive, it's more difficult to use for installing Windows 11 on a virtual machine where an ISO file would be ideal.
1. Download the latest version of Rufusand install it on your machine. At the time of writing the latest version is 3.19 which includes the Extended Windows 11 Image support.
2. Insert a blank 16GB or larger USB stick then open Rufus.
3. Select the USB device that you want to install Windows 11 to.
(Image credit: Tom's Hardware)
4. Ensure that Boot Selection shows “Disk or ISO image” and click DOWNLOAD.
(Image credit: Tom's Hardware)
5. Select Windows 11 and click Continue.
(Image credit: Tom's Hardware)
6. Select the latest release and click Continue.
(Image credit: Tom's Hardware)
7. Select the edition and click Continue.
(Image credit: Tom's Hardware)
8. Select your preferred language and click Continue.
(Image credit: Tom's Hardware)
9. Select the architecture (most likely x64) and click Download. A new window will open asking where to save the ISO image. Save it to your Downloads folder. You can also download the image using a browser if you wish.
(Image credit: Tom's Hardware)
The download will take several minutes to complete.
(Image credit: Tom's Hardware)
10. Click on the Image option drop down and select Extended Windows 11 Installation to disable TPM, Secure Boot and the 8GB of RAM requirement.
(Image credit: Tom's Hardware)
11. Double check that the correct drive has been selected and click on Start to begin the installation.
(Image credit: Tom's Hardware)
The write process can take some time, depending on the USB drive being used, but when done the drive can be removed and used to install Windows 11 on an older computer or even in a virtual machine.
12. Install or upgrade to Windows 11. Run setup on the USB drive, if you ware doing an in-place install from an existing Windows 10 installation. Boot off of the drive if you are doing a clean install. Note that you may need to disable secure boot in your BIOS (see how to enter your BIOS) if it gives you a problem.
(Image credit: Tom's Hardware)
How to Bypass Windows 11 TPM Check From Windows Update
If you want to use Windows Update rather than creating an install disk, you'll need a method that runs in Windows and fools the updater into thinking you meet the requirements. This may be more important if you are trying to use Windows Update to upgrade to a new build of Windows 11, perhaps an Insider Build, on a computer that already bypassed the requirement.
For example, when we joined the Windows Insider program on one of our Windows 11 VMs (which clearly did not have TPM), we got the dreaded "Your PC doesn't meet the requirements" error. But using AveYo's Media Creation Tool workaround script solved the problem. Here's how to make it happen.
2. Click the "Copy raw contents" button in the upper right corner of the code box.
(Image credit: Tom's Hardware)
3. Create a new file on your desktop and name it skip_tpm_check.cmd. Make sure that you are able to view file extensions and the file extension is really .cmd, not .txt or else it won't run.
(Image credit: Tom's Hardware)
4. Open skip_tpm.cmd for editing, using notepad or another text editor.
5. Paste in the code you copied from github.
(Image credit: Tom's Hardware)
6. Save and run the skip_tpm.cmd file.
7. Click Yes if prompted by User Account Control.
(Image credit: Tom's Hardware)
You will now see a message saying "Skip TPM on Dynamic Update" has been installed. If you run the program again, it will disable the utility.
(Image credit: Tom's Hardware)
Windows Update should now be able to either update your existing Windows 11 Build or even perhaps upgrade you from Windows 10 to 11.
How to Bypass Windows 11 TPM the Official Microsoft Way
Knowing that some users will want to install Windows 11 on systems that don't meet all of its hardware requirements, Microsoft has provided a registry hack that loosens them up somewhat. Using this hack, you can install on a system that has at least TPM 1.2 and has an unsupported CPU. That said, we recommend the scripts above because they don't require you to have TPM of any kind.
1. Open Regedit.
(Image credit: Tom's Hardware)
2. Navigate to HKEY_LOCAL_MACHINE\SYSTEM\Setup\MoSetup.
(Image credit: Tom's Hardware)
3. Create a DWORD (32-bit) Value called AllowUpgradesWithUnsupportedTPMOrCPU if it doesn't already exist.
4. Set AllowUpgradesWithUnsupportedTPMOrCPU to 1.
(Image credit: Tom's Hardware)
5. Close regedit and restart your PC. You should now be able to upgrade to Windows 11 from within Windows 10 by using installation media (provided you created it).
For example, to copy a file named yearly-report.mov from c:\reports to a file share \\marketing\videos while enabling multi-threading for higher performance (with the /mt parameter) and the ability to restart the transfer in case it's interrupted (with the /z parameter), type:
Specifies the file or files to be copied. Wildcard characters (* or ?) are supported. If you don't specify this parameter, *.* is used as the default value.
<options>
Specifies the options to use with the robocopy command, including copy, file, retry, logging, and job options.
Copy options
Option
Description
/s
Copies subdirectories. This option automatically excludes empty directories.
/e
Copies subdirectories. This option automatically includes empty directories.
/lev:<n>
Copies only the top n levels of the source directory tree.
/z
Copies files in restartable mode. In restartable mode, should a file copy be interrupted, Robocopy can pick up where it left off rather than recopying the entire file.
/b
Copies files in backup mode. Backup mode allows Robocopy to override file and folder permission settings (ACLs). This allows you to copy files you might otherwise not have access to, assuming it's being run under an account with sufficient privileges.
/zb
Copies files in restartable mode. If file access is denied, switches to backup mode.
/j
Copies using unbuffered I/O (recommended for large files).
/efsraw
Copies all encrypted files in EFS RAW mode.
/copy:<copyflags>
Specifies which file properties to copy. The valid values for this option are:
D - Data
A - Attributes
T - Time stamps
S - NTFS access control list (ACL)
O - Owner information
U - Auditing information
The default value for this option is DAT (data, attributes, and time stamps).
/dcopy:<copyflags>
Specifies what to copy in directories. The valid values for this option are:
D - Data
A - Attributes
T - Time stamps
The default value for this option is DA (data and attributes).
/sec
Copies files with security (equivalent to /copy:DATS).
/copyall
Copies all file information (equivalent to /copy:DATSOU).
/nocopy
Copies no file information (useful with /purge).
/secfix
Fixes file security on all files, even skipped ones.
/timfix
Fixes file times on all files, even skipped ones.
/purge
Deletes destination files and directories that no longer exist in the source. Using this option with the /e option and a destination directory, allows the destination directory security settings to not be overwritten.
/mir
Mirrors a directory tree (equivalent to /e plus /purge). Using this option with the /e option and a destination directory, overwrites the destination directory security settings.
/mov
Moves files, and deletes them from the source after they are copied.
/move
Moves files and directories, and deletes them from the source after they are copied.
/a+:[RASHCNET]
Adds the specified attributes to copied files. The valid values for this option are:
R - Read only
A - Archive
S - System
H - Hidden
C - Compressed
N - Not content indexed
E - Encrypted
T - Temporary
/a-:[RASHCNET]
Removes the specified attributes from copied files. The valid values for this option are:
R - Read only
A - Archive
S - System
H - Hidden
C - Compressed
N - Not content indexed
E - Encrypted
T - Temporary
/create
Creates a directory tree and zero-length files only.
/fat
Creates destination files by using 8.3 character-length FAT file names only.
/256
Turns off support for paths longer than 256 characters.
/mon:<n>
Monitors the source, and runs again when more than n changes are detected.
/mot:<m>
Monitors the source, and runs again in m minutes, if changes are detected.
/mt[:n]
Creates multi-threaded copies with n threads. n must be an integer between 1 and 128. The default value for n is 8. For better performance, redirect your output using /log option.
The /mt parameter can't be used with the /ipg and /efsraw parameters.
/rh:hhmm-hhmm
Specifies run times when new copies may be started.
/pf
Checks run times on a per-file (not per-pass) basis.
/ipg:n
Specifies the inter-packet gap to free bandwidth on slow lines.
/sj
Copies junctions (soft-links) to the destination path instead of link targets.
/sl
Don't follow symbolic links and instead create a copy of the link.
/nodcopy
Copies no directory info (the default /dcopy:DA is done).
/nooffload
Copies files without using the Windows Copy Offload mechanism.
/compress
Requests network compression during file transfer, if applicable.
Note
The /mt parameter was introduced in Windows Server 2008 R2 and its functionality applies to current versions of Windows Server.
Important
When using the /secfix copy option, specify the type of security information you want to copy, using one of these additional copy options:
/copyall
/copy:o
/copy:s
/copy:u
/sec
File selection options
Option
Description
/a
Copies only files for which the Archive attribute is set.
/m
Copies only files for which the Archive attribute is set, and resets the Archive attribute.
/ia:[RASHCNETO]
Includes only files for which any of the specified attributes are set. The valid values for this option are:
R - Read only
A - Archive
S - System
H - Hidden
C - Compressed
N - Not content indexed
E - Encrypted
T - Temporary
O - Offline
/xa:[RASHCNETO]
Excludes files for which any of the specified attributes are set. The valid values for this option are:
R - Read only
A - Archive
S - System
H - Hidden
C - Compressed
N - Not content indexed
E - Encrypted
T - Temporary
O - Offline
/xf <filename>[ ...]
Excludes files that match the specified names or paths. Wildcard characters (* and ?) are supported.
/xd <directory>[ ...]
Excludes directories that match the specified names and paths.
/xc
Excludes existing files with the same timestamp, but different file sizes.
/xn
Source directory files newer than the destination are excluded from the copy.
/xo
Source directory files older than the destination are excluded from the copy.
/xx
Excludes extra files and directories present in the destination but not the source. Excluding extra files will not delete files from the destination.
/xl
Excludes "lonely" files and directories present in the source but not the destination. Excluding lonely files prevents any new files from being added to the destination.
/im
Include modified files (differing change times).
/is
Includes the same files. Same files are identical in name, size, times, and all attributes.
/it
Includes "tweaked" files. Tweaked files have the same name, size, and times, but different attributes.
/xc
Excludes existing files with the same timestamp, but different file sizes.
/max:<n>
Specifies the maximum file size (to exclude files bigger than n bytes).
/min:<n>
Specifies the minimum file size (to exclude files smaller than n bytes).
/maxage:<n>
Specifies the maximum file age (to exclude files older than n days or date).
/minage:<n>
Specifies the minimum file age (exclude files newer than n days or date).
/maxlad:<n>
Specifies the maximum last access date (excludes files unused since n).
/minlad:<n>
Specifies the minimum last access date (excludes files used since n) If n is less than 1900, n specifies the number of days. Otherwise, n specifies a date in the format YYYYMMDD.
/xj
Excludes junction points, which are normally included by default.
/fft
Assumes FAT file times (two-second precision).
/dst
Compensates for one-hour DST time differences.
/xjd
Excludes junction points for directories.
/xjf
Excludes junction points for files.
Retry options
Option
Description
/r:<n>
Specifies the number of retries on failed copies. The default value of n is 1,000,000 (one million retries).
/w:<n>
Specifies the wait time between retries, in seconds. The default value of n is 30 (wait time 30 seconds).
/reg
Saves the values specified in the /r and /w options as default settings in the registry.
/tbd
Specifies that the system will wait for share names to be defined (retry error 67).
Logging options
Option
Description
/l
Specifies that files are to be listed only (and not copied, deleted, or time stamped).
/x
Reports all extra files, not just those that are selected.
/v
Produces verbose output, and shows all skipped files.
/ts
Includes source file time stamps in the output.
/fp
Includes the full path names of the files in the output.
/bytes
Prints sizes, as bytes.
/ns
Specifies that file sizes are not to be logged.
/nc
Specifies that file classes are not to be logged.
/nfl
Specifies that file names are not to be logged.
/ndl
Specifies that directory names are not to be logged.
/np
Specifies that the progress of the copying operation (the number of files or directories copied so far) will not be displayed.
/eta
Shows the estimated time of arrival (ETA) of the copied files.
/log:<logfile>
Writes the status output to the log file (overwrites the existing log file).
/log+:<logfile>
Writes the status output to the log file (appends the output to the existing log file).
/unicode
Displays the status output as Unicode text.
/unilog:<logfile>
Writes the status output to the log file as Unicode text (overwrites the existing log file).
/unilog+:<logfile>
Writes the status output to the log file as Unicode text (appends the output to the existing log file).
/tee
Writes the status output to the console window, and to the log file.
/njh
Specifies that there is no job header.
/njs
Specifies that there is no job summary.
Job options
Option
Description
/job:<jobname>
Specifies that parameters are to be derived from the named job file. To run /job:jobname, you must first run the /save:jobname parameter to create the job file.
/save:<jobname>
Specifies that parameters are to be saved to the named job file. This must be ran before running /job:jobname. All copy, retry, and logging options must be specified before this parameter.
/quit
Quits after processing command line (to view parameters).
/nosd
Indicates that no source directory is specified.
/nodd
Indicates that no destination directory is specified.
/if
Includes the specified files.
Exit (return) codes
Value
Description
0
No files were copied. No failure was encountered. No files were mismatched. The files already exist in the destination directory; therefore, the copy operation was skipped.
1
All files were copied successfully.
2
There are some additional files in the destination directory that are not present in the source directory. No files were copied.
3
Some files were copied. Additional files were present. No failure was encountered.
5
Some files were copied. Some files were mismatched. No failure was encountered.
6
Additional files and mismatched files exist. No files were copied and no failures were encountered. This means that the files already exist in the destination directory.
7
Files were copied, a file mismatch was present, and additional files were present.
8
Several files did not copy.
Note
Any value greater than 8 indicates that there was at least one failure during the copy operation.
I am looking for a way to delete all files older than 7 days in a batch file. I've searched around the web, and found some examples with hundreds of lines of code, and others that required installing extra command line utilities to accomplish the task.
Similar things can be done in BASH in just a couple lines of code. It seems that something at least remotely easy could be done for batch files in Windows. I'm looking for a solution that works in a standard Windows command prompt, without any extra utilities. Please no PowerShell or Cygwin either.
gehrcke.de/timegaps has been designed for this purpose. It even allows for a more sophisticated deletion scheme: in addition to keeping files of the last 7 days, it e.g. also allows to keep one file for each of the last 8 weeks, 12, months, 2 years.
If you don't have forfiles installed on your machine, copy it from any Windows Server 2003 to your Windows XP machine at %WinDir%\system32\. This is possible since the EXE is fully compatible between Windows Server 2003 and Windows XP.
Later versions of Windows and Windows Server have it installed by default.
For Windows 7 and newer (including Windows 10):
The syntax has changed a little. Therefore the updated command is:
forfiles /p "C:\what\ever" /s /m *.* /D -<number of days> /C "cmd /c del @path"
Note that if you want files OLDER than 10 days, you need to specify -d "-10". -ve means "older than", +ve means "newer than". You can also specify DDMMYY or -DDMMYY format as the parameter to -d.
This answer works when "older than 7 days" is defined as "modified more than 7 days ago" rather than "created more than 7 days ago". How can the latter be achieved?
ROBOCOPY C:\source C:\destination /mov /minage:7
del C:\destination /q
Move all the files (using /mov, which moves files and then deletes them as opposed to /move which moves whole filetrees which are then deleted) via robocopy to another location, and then execute a delete command on that path and you're all good.
Also if you have a directory with lots of data in it you can use /mir switch
For the most part, this is a fairly impractical answer. If I have a directory with lots of data in it, there is will not work well. I'd go with one of the answer that does it "in place"
@adamb0mb this is in no way impractical - if "destination" is on the same filesystem as "source", the move operation is quite lightweight. As robocopy is really robust, it will in fact work for any directory size, obscure file names, basically arbitrary path lengths and include directories if you need it to - something which surely cannot be said about many other Windows utilities. I would use rd /s /q c:\destination instead of the del command though or even use another robocopy /mir c:\emptydir c:\destination run to empty the directory if you expect trouble with file names.
My thoughts were more along the lines: "My files are already where I want them. I don't want to have to move them." "Deleting files is logically what you're doing, so do that. Don't overload Robocopy to do it"
I recommend this one-liner for viewing all files in C:\test older than 7 days. To delete the files, change the echo to del: forfiles /p "C:\test" /m "*.*" /c "cmd /c echo @file" /D -7
Ok was bored a bit and came up with this, which contains my version of a poor man's Linux epoch replacement limited for daily usage (no time retention):
7daysclean.cmd
@echo off
setlocal ENABLEDELAYEDEXPANSION
set day=86400
set /a year=day*365
set /a strip=day*7
set dSource=C:\temp

call :epoch %date%
set /a slice=epoch-strip

for /f "delims=" %%f in ('dir /a-d-h-s /b /s %dSource%') do (
    call :epoch %%~tf
    if !epoch! LEQ %slice% (echo DELETE %%f ^(%%~tf^)) ELSE echo keep %%f ^(%%~tf^)
)
exit /b 0

rem Args[1]: Year-Month-Day
:epoch
    setlocal ENABLEDELAYEDEXPANSION
    for /f "tokens=1,2,3 delims=-" %%d in ('echo %1') do set Years=%%d& set Months=%%e& set Days=%%f
    if "!Months:~0,1!"=="0" set Months=!Months:~1,1!
    if "!Days:~0,1!"=="0" set Days=!Days:~1,1!
    set /a Days=Days*day
    set /a _months=0
    set i=1&& for %%m in (31 28 31 30 31 30 31 31 30 31 30 31) do if !i! LSS !Months! (set /a _months=!_months! + %%m*day&& set /a i+=1)
    set /a Months=!_months!
    set /a Years=(Years-1970)*year
    set /a Epoch=Years+Months+Days
    endlocal& set Epoch=%Epoch%
    exit /b 0
USAGE
set /a strip=day*7 : Change 7 for the number of days to keep.
set dSource=C:\temp : This is the starting directory to check for files.
NOTES
This is non-destructive code, it will display what would have happened.
February: is hard-coded to 28 days. Bissextile years is a hell to add, really. if someone has an idea that would not add 10 lines of code, go ahead and post so I add it to my code.
epoch: I did not take time into consideration, as the need is to delete files older than a certain date, taking hours/minutes would have deleted files from a day that was meant for keeping.
LIMITATION
epoch takes for granted your short date format is YYYY-MM-DD. It would need to be adapted for other settings or a run-time evaluation (read sShortTime, user-bound configuration, configure proper field order in a filter and use the filter to extract the correct data from the argument).
Did I mention I hate this editor's auto-formating? it removes the blank lines and the copy-paste is a hell.
You should do /d -3 (3 days earlier) This works fine for me. So all the complicated batches could be in the trash bin. Also forfiles don't support UNC paths, so make a network connection to a specific drive.
Same error as in other answers (including the accepted one). Where did this strange habit of specifying *.* come from? Wildcard *.* does not match all files in Windows. It only matches files with . in their names. The OP never said anything about requiring . in the file name. The proper parameter is /M *, but this is the default anyway. There's no need for /M at all.
@AnT: Are you sure? I think *.* behaves exactly like * in Windows. In fact, I just tried it on my computer, and dir *.* indeed listed test file, a file with no extension.
@Andreas Rejbrand: I find it surprising as well, but treatment of *.* is inconsistent between, say, dir and -m option of forfiles. The -m *.* mask will indeed skip extensionless file names, as I stated in my comment above (try it yourself). The funny part here is that MS documentation explicitly states that -m *.* is the default. However, if you try it in real life, you'll see that the default is actually -m * - all files are iterated.
This MS documentation page - technet.microsoft.com/en-us/library/cc753551(v=ws.11).aspx - contains a large number of errors (e.g. in examples) because the author of the doc incorrectly believed that *.* mask applied to all files. My rethorical question about "this strange habit" was indeed uncalled for, since treating *.* and * as equivalent is a long-standing Windows convention. However, /m option in forfiles happens to violate that convention for some reason.
REM del_old.bat
REM usage: del_old MM-DD-YYY
for /f "tokens=*" %%a IN ('xcopy *.* /d:%1 /L /I null') do if exist %%~nxa echo %%~nxa >> FILES_TO_KEEP.TXT
for /f "tokens=*" %%a IN ('xcopy *.* /L /I /EXCLUDE:FILES_TO_KEEP.TXT null') do if exist "%%~nxa" del "%%~nxa"
This deletes files older than a given date. I'm sure it can be modified to go back seven days from the current date.
update: I notice that HerbCSO has improved on the above script. I recommend using his version instead.
cmd /c attrib -R -S -H @path && del @path can be replaced by %ComSpec% /D /C del /A /F @path to force a deletion of the found file even if it has set the read-only, hidden or system attribute. The execution of %SystemRoot%\System32\attrib.exe before the deletion of such a file is not necessary at all. The usage of environment variable ComSpec defined by default with %SystemRoot%\system32\cmd.exe makes the execution of cmd.exe faster. The usage of cmd option /D makes the execution also faster and additionally independent on the AutoRun registry value of Command Processor.
There are very often relative date/time related questions to solve with batch file. But command line interpreter cmd.exe has no function for date/time calculations. Lots of good working solutions using additional console applications or scripts have been posted already here, on other pages of Stack Overflow and on other websites.
Common for operations based on date/time is the requirement to convert a date/time string to seconds since a determined day. Very common is 1970-01-01 00:00:00 UTC. But any later day could be also used depending on the date range required to support for a specific task.
Jay posted 7daysclean.cmd containing a fast "date to seconds" solution for command line interpreter cmd.exe. But it does not take leap years correct into account. J.R. posted an add-on for taking leap day in current year into account, but ignoring the other leap years since base year, i.e. since 1970.
I use since 20 years static tables (arrays) created once with a small C function for quickly getting the number of days including leap days from 1970-01-01 in date/time conversion functions in my applications written in C/C++.
This very fast table method can be used also in batch code using FOR command. So I decided to code the batch subroutine GetSeconds which calculates the number of seconds since 1970-01-01 00:00:00 UTC for a date/time string passed to this routine.
Note: Leap seconds are not taken into account as the Windows file systems also do not support leap seconds.
First, the tables:
Days since 1970-01-01 00:00:00 UTC for each year including leap days.
Calculating the seconds for year 2039 to 2106 with epoch beginning 1970-01-01 is only possible with using an unsigned 32-bit variable, i.e. unsigned long (or unsigned int) in C/C++.
But cmd.exe use for mathematical expressions a signed 32-bit variable. Therefore the maximum value is 2147483647 (0x7FFFFFFF) which is 2038-01-19 03:14:07.
Leap year information (No/Yes) for the years 1970 to 2106.
1970 - 1989: N N Y N N N Y N N N Y N N N Y N N N Y N
1990 - 2009: N N Y N N N Y N N N Y N N N Y N N N Y N
2010 - 2029: N N Y N N N Y N N N Y N N N Y N N N Y N
2030 - 2049: N N Y N N N Y N N N Y N N N Y N N N Y N
2050 - 2069: N N Y N N N Y N N N Y N N N Y N N N Y N
2070 - 2089: N N Y N N N Y N N N Y N N N Y N N N Y N
2090 - 2106: N N Y N N N Y N N N N N N N Y N N
                                 ^ year 2100
Number of days to first day of each month in current year.
                   Jan Feb Mar Apr May Jun Jul Aug Sep Oct Nov Dec
Year with 365 days:  0  31  59  90 120 151 181 212 243 273 304 334
Year with 366 days:  0  31  60  91 121 152 182 213 244 274 305 335
Converting a date to number of seconds since 1970-01-01 is quite easy using those tables.
Attention please!
The format of date and time strings depends on Windows region and language settings. The delimiters and the order of tokens assigned to the environment variables Day, Month and Year in first FOR loop of GetSeconds must be adapted to local date/time format if necessary.
It is necessary to adapt the date string of the environment variable if date format in environment variable DATE is different to date format used by command FOR on %%~tF.
For example when %DATE% expands to Sun 02/08/2015 while %%~tF expands to 02/08/2015 07:38 PM the code below can be used with modifying line 4 to:
call :GetSeconds "%DATE:~4% %TIME%"
This results in passing to subroutine just 02/08/2015 - the date string without the 3 letters of weekday abbreviation and the separating space character.
Alternatively following could be used to pass current date in correct format:
call :GetSeconds "%DATE:~-10% %TIME%"
Now the last 10 characters from date string are passed to function GetSeconds and therefore it does not matter if date string of environment variable DATE is with or without weekday as long as day and month are always with 2 digits in expected order, i.e. in format dd/mm/yyyy or dd.mm.yyyy.
Here is the batch code with explaining comments which just outputs which file to delete and which file to keep in C:\Temp folder tree, see code of first FOR loop.
@echo off
setlocal EnableExtensions DisableDelayedExpansion
rem Get seconds since 1970-01-01 for current date and time.
call :GetSeconds "%DATE% %TIME%"
rem Subtract seconds for 7 days from seconds value.
set /A "LastWeek=Seconds-7*86400"

rem For each file in each subdirectory of C:\Temp get last modification date
rem (without seconds -> append second 0) and determine the number of seconds
rem since 1970-01-01 for this date/time. The file can be deleted if seconds
rem value is lower than the value calculated above.

for /F "delims=" %%# in ('dir /A-D-H-S /B /S "C:\Temp"') do (
    call :GetSeconds "%%~t#:0"
    set "FullFileName=%%#"
    setlocal EnableDelayedExpansion
    rem if !Seconds! LSS %LastWeek% del /F "!FullFileName!"
    if !Seconds! LEQ %LastWeek% (
        echo Delete "!FullFileName!"
    ) else (
        echo Keep   "!FullFileName!"
    )
    endlocal
)
endlocal
goto :EOF


rem No validation is made for best performance. So make sure that date
rem and hour in string is in a format supported by the code below like
rem MM/DD/YYYY hh:mm:ss or M/D/YYYY h:m:s for English US date/time.

:GetSeconds
rem If there is " AM" or " PM" in time string because of using 12 hour
rem time format, remove those 2 strings and in case of " PM" remember
rem that 12 hours must be added to the hour depending on hour value.

set "DateTime=%~1"
set "Add12Hours=0"
if not "%DateTime: AM=%" == "%DateTime%" (
    set "DateTime=%DateTime: AM=%"
) else if not "%DateTime: PM=%" == "%DateTime%" (
    set "DateTime=%DateTime: PM=%"
    set "Add12Hours=1"
)

rem Get year, month, day, hour, minute and second from first parameter.

for /F "tokens=1-6 delims=,-./: " %%A in ("%DateTime%") do (
    rem For English US date MM/DD/YYYY or M/D/YYYY
    set "Day=%%B" & set "Month=%%A" & set "Year=%%C"
    rem For German date DD.MM.YYYY or English UK date DD/MM/YYYY
    rem set "Day=%%A" & set "Month=%%B" & set "Year=%%C"
    set "Hour=%%D" & set "Minute=%%E" & set "Second=%%F"
)
rem echo Date/time is: %Year%-%Month%-%Day% %Hour%:%Minute%:%Second%

rem Remove leading zeros from the date/time values or calculation could be wrong.
if "%Month:~0,1%"  == "0" if not "%Month:~1%"  == "" set "Month=%Month:~1%"
if "%Day:~0,1%"    == "0" if not "%Day:~1%"    == "" set "Day=%Day:~1%"
if "%Hour:~0,1%"   == "0" if not "%Hour:~1%"   == "" set "Hour=%Hour:~1%"
if "%Minute:~0,1%" == "0" if not "%Minute:~1%" == "" set "Minute=%Minute:~1%"
if "%Second:~0,1%" == "0" if not "%Second:~1%" == "" set "Second=%Second:~1%"

rem Add 12 hours for time range 01:00:00 PM to 11:59:59 PM,
rem but keep the hour as is for 12:00:00 PM to 12:59:59 PM.
if %Add12Hours% == 1 if %Hour% LSS 12 set /A Hour+=12

set "DateTime="
set "Add12Hours="

rem Must use two arrays as more than 31 tokens are not supported
rem by command line interpreter cmd.exe respectively command FOR.
set /A "Index1=Year-1979"
set /A "Index2=Index1-30"

if %Index1% LEQ 30 (
    rem Get number of days to year for the years 1980 to 2009.
    for /F "tokens=%Index1% delims= " %%Y in ("3652 4018 4383 4748 5113 5479 5844 6209 6574 6940 7305 7670 8035 8401 8766 9131 9496 9862 10227 10592 10957 11323 11688 12053 12418 12784 13149 13514 13879 14245") do set "Days=%%Y"
    for /F "tokens=%Index1% delims= " %%L in ("Y N N N Y N N N Y N N N Y N N N Y N N N Y N N N Y N N N Y N") do set "LeapYear=%%L"
) else (
    rem Get number of days to year for the years 2010 to 2038.
    for /F "tokens=%Index2% delims= " %%Y in ("14610 14975 15340 15706 16071 16436 16801 17167 17532 17897 18262 18628 18993 19358 19723 20089 20454 20819 21184 21550 21915 22280 22645 23011 23376 23741 24106 24472 24837") do set "Days=%%Y"
    for /F "tokens=%Index2% delims= " %%L in ("N N Y N N N Y N N N Y N N N Y N N N Y N N N Y N N N Y N N") do set "LeapYear=%%L"
)

rem Add the days to month in year.
if "%LeapYear%" == "N" (
    for /F "tokens=%Month% delims= " %%M in ("0 31 59 90 120 151 181 212 243 273 304 334") do set /A "Days+=%%M"
) else (
    for /F "tokens=%Month% delims= " %%M in ("0 31 60 91 121 152 182 213 244 274 305 335") do set /A "Days+=%%M"
)

rem Add the complete days in month of year.
set /A "Days+=Day-1"

rem Calculate the seconds which is easy now.
set /A "Seconds=Days*86400+Hour*3600+Minute*60+Second"

rem Exit this subroutine.
goto :EOF
For optimal performance it would be best to remove all comments, i.e. all lines starting with rem after 0-4 leading spaces.
And the arrays can be made also smaller, i.e. decreasing the time range from 1980-01-01 00:00:00 to 2038-01-19 03:14:07 as currently supported by the batch code above for example to 2015-01-01 to 2019-12-31 as the code below uses which really deletes files older than 7 days in C:\Temp folder tree.
Further the batch code below is optimized for 24 hours time format.
@echo off
setlocal EnableExtensions DisableDelayedExpansion
call :GetSeconds "%DATE:~-10% %TIME%"
set /A "LastWeek=Seconds-7*86400"

for /F "delims=" %%# in ('dir /A-D-H-S /B /S "C:\Temp"') do (
    call :GetSeconds "%%~t#:0"
    set "FullFileName=%%#"
    setlocal EnableDelayedExpansion
    if !Seconds! LSS %LastWeek% del /F "!FullFileName!"
    endlocal
)
endlocal
goto :EOF

:GetSeconds
for /F "tokens=1-6 delims=,-./: " %%A in ("%~1") do (
    set "Day=%%B" & set "Month=%%A" & set "Year=%%C"
    set "Hour=%%D" & set "Minute=%%E" & set "Second=%%F"
)
if "%Month:~0,1%"  == "0" if not "%Month:~1%"  == "" set "Month=%Month:~1%"
if "%Day:~0,1%"    == "0" if not "%Day:~1%"    == "" set "Day=%Day:~1%"
if "%Hour:~0,1%"   == "0" if not "%Hour:~1%"   == "" set "Hour=%Hour:~1%"
if "%Minute:~0,1%" == "0" if not "%Minute:~1%" == "" set "Minute=%Minute:~1%"
if "%Second:~0,1%" == "0" if not "%Second:~1%" == "" set "Second=%Second:~1%"
set /A "Index=Year-2014"
for /F "tokens=%Index% delims= " %%Y in ("16436 16801 17167 17532 17897") do set "Days=%%Y"
for /F "tokens=%Index% delims= " %%L in ("N Y N N N") do set "LeapYear=%%L"
if "%LeapYear%" == "N" (
    for /F "tokens=%Month% delims= " %%M in ("0 31 59 90 120 151 181 212 243 273 304 334") do set /A "Days+=%%M"
) else (
    for /F "tokens=%Month% delims= " %%M in ("0 31 60 91 121 152 182 213 244 274 305 335") do set /A "Days+=%%M"
)
set /A "Days+=Day-1"
set /A "Seconds=Days*86400+Hour*3600+Minute*60+Second"
goto :EOF
For even more information about date and time formats and file time comparisons on Windows see my answer on Find out if file is older than 4 hours in batch file with lots of additional information about file times.
USAGE IN CMD : cscript //nologo DelOldFiles.vbs 15
15 means to delete files older than 15 days in past.
  'copy from here
    Function DeleteOlderFiles(whichfolder)
       Dim fso, f, f1, fc, n, ThresholdDate
       Set fso = CreateObject("Scripting.FileSystemObject")
       Set f = fso.GetFolder(whichfolder)
       Set fc = f.Files
       Set objArgs = WScript.Arguments
       n = 0
       If objArgs.Count=0 Then
           howmuchdaysinpast = 0
       Else
           howmuchdaysinpast = -objArgs(0)
       End If
       ThresholdDate = DateAdd("d", howmuchdaysinpast, Date)
       For Each f1 in fc
     If f1.DateLastModified<ThresholdDate Then
        Wscript.StdOut.WriteLine f1
        f1.Delete
        n = n + 1
     End If
       Next
       Wscript.StdOut.WriteLine "Deleted " & n & " file(s)."
    End Function

    If Not WScript.FullName = WScript.Path & "\cscript.exe" Then
      WScript.Echo "USAGE ONLY IN COMMAND PROMPT: cscript DelOldFiles.vbs 15" & vbCrLf & "15 means to delete files older than 15 days in past."
      WScript.Quit 0
    End If

    DeleteOlderFiles(".")
 'to here
@Kibbee it's not the same answer the syntax is different. This was a geniune attempt to help. Knowning very little of the windows command line, I spent hours of frustration getting this to work. The key bits of info for me were the fact that there's different versions (with different syntax), and that I needed to removed the spaces. Neither of these things were included in the orginal answer. (I would have commented on the answer but I don't have the privileges
Same error as in other answers (including the accepted one). Wildcard *.* in forfiles does not match all files. It only matches files with . in their names (i.e. files with extensions). The OP never said anything about requiring . in the file name. The proper parameter is /M *, but this is the default anyway. There's no need for /M at all.
IMO, JavaScript is gradually becoming a universal scripting standard: it is probably available in more products than any other scripting language (in Windows, it is available using the Windows Scripting Host). I have to clean out old files in lots of folders, so here is a JavaScript function to do that:
// run from an administrator command prompt (or from task scheduler with full rights):  wscript jscript.js
// debug with:   wscript /d /x jscript.js

var fs = WScript.CreateObject("Scripting.FileSystemObject");

clearFolder('C:\\temp\\cleanup');

function clearFolder(folderPath)
{
    // calculate date 3 days ago
    var dateNow = new Date();
    var dateTest = new Date();
    dateTest.setDate(dateNow.getDate() - 3);

    var folder = fs.GetFolder(folderPath);
    var files = folder.Files;

    for( var it = new Enumerator(files); !it.atEnd(); it.moveNext() )
    {
        var file = it.item();

        if( file.DateLastModified < dateTest)
        {
            var filename = file.name;
            var ext = filename.split('.').pop().toLowerCase();

            if (ext != 'exe' && ext != 'dll')
            {
                file.Delete(true);
            }
        }
    }

    var subfolders = new Enumerator(folder.SubFolders);
    for (; !subfolders.atEnd(); subfolders.moveNext())
    {
        clearFolder(subfolders.item().Path);
    }
}
For each folder to clear, just add another call to the clearFolder() function. This particular code also preserves exe and dll files, and cleans up subfolders as well.
How about this modification on 7daysclean.cmd to take a leap year into account?
It can be done in less than 10 lines of coding!
set /a Leap=0
if (Month GEQ 2 and ((Years%4 EQL 0 and Years%100 NEQ 0) or Years%400 EQL 0)) set /a Leap=day
set /a Months=!_months!+Leap
Edit by Mofi:
The condition above contributed by J.R. evaluates always to false because of invalid syntax.
And Month GEQ 2 is also wrong because adding 86400 seconds for one more day must be done in a leap year only for the months March to December, but not for February.
A working code to take leap day into account - in current year only - in batch file 7daysclean.cmd posted by Jay would be:
set "LeapDaySecs=0"
if %Month% LEQ 2 goto CalcMonths
set /a "LeapRule=Years%%4"
if %LeapRule% NEQ 0 goto CalcMonths
rem The other 2 rules can be ignored up to year 2100.
set /A "LeapDaySecs=day"
:CalcMonths
set /a Months=!_months!+LeapDaySecs
Might I add a humble contribution to this already valuable thread. I'm finding that other solutions might get rid of the actual error text but are ignoring the %ERRORLEVEL% which signals a fail in my application. AND I legitimately want %ERRORLEVEL% just as long as it isn't the "No files found" error.
Some Examples:
Debugging and eliminating the error specifically:
forfiles /p "[file path...]\IDOC_ARCHIVE" /s /m *.txt /d -1 /c "cmd /c del @path" 2>&1 | findstr /V /O /C:"ERROR: No files found with the specified search criteria."2>&1 | findstr ERROR&&ECHO found error||echo found success
Using a oneliner to return ERRORLEVEL success or failure:
forfiles /p "[file path...]\IDOC_ARCHIVE" /s /m *.txt /d -1 /c "cmd /c del @path" 2>&1 | findstr /V /O /C:"ERROR: No files found with the specified search criteria."2>&1 | findstr ERROR&&EXIT /B 1||EXIT /B 0
Using a oneliner to keep the ERRORLEVEL at zero for success within the context of a batchfile in the midst of other code (ver > nul resets the ERRORLEVEL):
forfiles /p "[file path...]\IDOC_ARCHIVE" /s /m *.txt /d -1 /c "cmd /c del @path" 2>&1 | findstr /V /O /C:"ERROR: No files found with the specified search criteria."2>&1 | findstr ERROR&&ECHO found error||ver > nul
For a SQL Server Agent CmdExec job step I landed on the following. I don't know if it's a bug, but the CmdExec within the step only recognizes the first line of code:
cmd /e:on /c "forfiles /p "C:\SQLADMIN\MAINTREPORTS\SQL2" /s /m *.txt /d -1 /c "cmd /c del @path" 2>&1 | findstr /V /O /C:"ERROR: No files found with the specified search criteria."2>&1 | findstr ERROR&&EXIT 1||EXIT 0"&exit %errorlevel%
Gosh, a lot of answers already. A simple and convenient route I found was to execute ROBOCOPY.EXE twice in sequential order from a single Windows command line instruction using the & parameter.
In this example it works by picking all files (.) that are older than 30 days old and moving them to the target folder. The second command does the same again with the addition of the PURGE command which means remove files in the target folder that don’t exist in the source folder. So essentially, the first command MOVES files and the second DELETES because they no longer exist in the source folder when the second command is invoked.
Consult ROBOCOPY's documentation and use the /L switch when testing.
Expanding on aku's answer, I see a lot of people asking about UNC paths. Simply mapping the unc path to a drive letter will make forfiles happy. Mapping and unmapping of drives can be done programmatically in a batch file, for example.
net use Z: /delete
net use Z: \\unc\path\to\my\folder
forfiles /p Z: /s /m *.gz /D -7 /C "cmd /c del @path"
This will delete all files with a .gz extension that are older than 7 days. If you want to make sure Z: isn't mapped to anything else before using it you could do something simple as
net use Z: \\unc\path\to\my\folder
if %errorlevel% equ 0 (
    forfiles /p Z: /s /m *.gz /D -7 /C "cmd /c del @path"
) else (
    echo "Z: is already in use, please use another drive letter!"
)
I think e.James's answer is good since it works with unmodified versions of Windows as early as Windows 2000 SP4 (and possibly earlier), but it required writing to an external file. Here is a modified version that does not create an external text file while maintaining the compatibility:
REM del_old.cmd
REM usage: del_old MM-DD-YYYY
setlocal enabledelayedexpansion
for /f "tokens=*" %%a IN ('xcopy *.* /d:%1 /L /I null') do @if exist "%%~nxa" set "excludefiles=!excludefiles!;;%%~nxa;;"
for /f "tokens=*" %%a IN ('dir /b') do @(@echo "%excludefiles%"|FINDSTR /C:";;%%a;;">nul || if exist "%%~nxa" DEL /F /Q "%%a">nul 2>&1)
To be true to the original question, here it is in a script that does ALL the math for you if you call it with the number of days as the parameter:
REM del_old_compute.cmd
REM usage: del_old_compute N
setlocal enabledelayedexpansion
set /a days=%1&set cur_y=%DATE:~10,4%&set cur_m=%DATE:~4,2%&set cur_d=%DATE:~7,2%
for /f "tokens=1 delims==" %%a in ('set cur_') do if "!%%a:~0,1!"=="0" set /a %%a=!%%a:~1,1!+0
set mo_2=28&set /a leapyear=cur_y*10/4
if %leapyear:~-1% equ 0 set mo_2=29
set mo_1=31&set mo_3=31&set mo_4=30&set mo_5=31
set mo_6=30&set mo_7=31&set mo_8=31&set mo_9=30
set mo_10=31&set mo_11=30&set mo_12=31
set /a past_y=(days/365)
set /a monthdays=days-((past_y*365)+((past_y/4)*1))&&set /a past_y=cur_y-past_y&set months=0
:setmonth
set /a minusmonth=(cur_m-1)-months
if %minusmonth% leq 0 set /a minusmonth+=12
set /a checkdays=(mo_%minusmonth%)
if %monthdays% geq %checkdays% set /a months+=1&set /a monthdays-=checkdays&goto :setmonth
set /a past_m=cur_m-months
set /a lastmonth=cur_m-1
if %lastmonth% leq 0 set /a lastmonth+=12
set /a lastmonth=mo_%lastmonth%
set /a past_d=cur_d-monthdays&set adddays=::
if %past_d% leq 0 (set /a past_m-=1&set adddays=)
if %past_m% leq 0 (set /a past_m+=12&set /a past_y-=1)
set mo_2=28&set /a leapyear=past_y*10/4
if %leapyear:~-1% equ 0 set mo_2=29
%adddays%set /a past_d+=mo_%past_m%
set d=%past_m%-%past_d%-%past_y%
for /f "tokens=*" %%a IN ('xcopy *.* /d:%d% /L /I null') do @if exist "%%~nxa" set "excludefiles=!excludefiles!;;%%~nxa;;"
for /f "tokens=*" %%a IN ('dir /b') do @(@echo "%excludefiles%"|FINDSTR /C:";;%%a;;">nul || if exist "%%~nxa" DEL /F /Q "%%a">nul 2>&1)
NOTE: The code above takes into account leap years, as well as the exact number of days in each month. The only maximum is the total number of days there have been since 0/0/0 (after that it returns negative years).
NOTE: The math only goes one way; it cannot correctly get future dates from negative input (it will try, but will likely go past the last day of the month).
ROBOCOPY works great for me. Originally suggested my Iman. But instead of moving the files/folders to a temporary directory then deleting the contents of the temporary folder, move the files to the trash!!!
This is is a few lines of my backup batch file for example:
It cleans anything older than 15 days out of my 'Temp' folder and 30 days for anything in my AutoCAD backup folder. I use variables because the line can get quite long and I can reuse them for other locations. You just need to find the dos path to your recycle bin associated with your login.
This is on a work computer for me and it works. I understand that some of you may have more restrictive rights but give it a try anyway;) Search Google for explanations on the ROBOCOPY parameters.
This has post has a new content--moving files to the recycle bin. This has not yet been been proposed with Robocopy and it fully answers the original post using a built-in single-line command. Works better than combining 'DEL' and 'RMDIR' commands because the files can be restored from the recycle bin. Hey I'm still new here--give me a break;)
You might be able to pull this off. You can take a look at this question, for a simpler example. The complexity comes, when you start comparing the dates. It may be easy to tell if the date is greater or not, but there are many situations to consider if you need to actually get the difference between two dates.
In other words - don't try to invent this, unless you really can't use the third party tools.
This one did it for me. It works with a date and you can substract the wanted amount in years to go back in time:
@echo off

set m=%date:~-7,2%
set /A m
set dateYear=%date:~-4,4%
set /A dateYear -= 2
set DATE_DIR=%date:~-10,2%.%m%.%dateYear%

forfiles /p "C:\your\path\here\" /s /m *.* /d -%DATE_DIR% /c "cmd /c del @path /F"

pause
the /F in the cmd /c del @path /F forces the specific file to be deleted in some the cases the file can be read-only.
the dateYear is the year Variable and there you can change the substract to your own needs
@echo off

::::::::::::::::::::::
set "_DIR=C:\Users\npocmaka\Downloads"
set "_DAYS=-5"
::::::::::::::::::::::

for /f "tokens=* delims=" %%# in ('FileTimeFilterJS.bat  "%_DIR%" -dd %_DAYS%') do (
    echo deleting  "%%~f#"
    echo del /q /f "%%~f#"
)
The script will allow you to use measurements like days, minutes ,seconds or hours. To choose weather to filter the files by time of creation, access or modification To list files before or after a certain date (or between two dates) To choose if to show files or dirs (or both) To be recursive or not
There may be some situations where you lost an administrator password on Windows and don’t have any other administrative access to the computer. In these cases you can technically recover access by creating and using Windows recovery media, this article will cover the steps to complete this.
Please note that this method would be considered non-standard and the actions taken to could lead to damaging your Windows installation and prevent you from using the computer regularly without reinstalling the operating system. We do not officially support or condone using this method, you assume any risk by following these instructions and we only provide these as a last resort while offering no guarantees.
You will either need the original installation media that you used to install Windows 10, or if you don’t have that you can create a bootable USB / CD by visiting this link and using the Windows 10 installation media tool.
Instructions
Insert the bootable Windows 10 USB/CD media into the computer, then reboot
While rebooting you will likely need to change the default booting device on the computer. The method to do this is specific to your computer, generally this menu can be accessed by pressing a designated function key (F1-F12 for example) – look for a prompt while the computer boots or refer to your computer manufacturers documentation if you’re not sure
Reboot to the recovery media
A default boot prompt
Once you’ve booted to the installation media, click Next, then click the Repair your computer option
Click Troubleshoot, then click Command Prompt
After booting to recovery media
Click Repair your computer
The repair options
Opening the Command Prompt
At the command prompt enter the following commands (one per line):
 diskpart
 list volume
After entering the list volume command, check the output, look for the volume with a letter that is of the type Partition, remember this letter as we’ll need it shortly
Continue entering these commands (one per line, and replace the {LETTER} placeholder in the command with the actual letter you found above):
After the final command your computer will reboot, once it finishes booting, click the accessibility icon, then click On-Screen Keyboard. This should now open a command prompt window
If you’re resetting a password for an existing account, you can enter the command net user to display a list of accounts, when you know the account name enter the the following command (substituting {user} with the actual username and {password} with the new password you’ll be setting):
net user {user} {password}
Access the On-Screen Keyboard
Resetting an existing user password
If you don’t have an admin account to reset the password, you can enable the default Administrator account on the computer with the following command (reboot after to display that account and allow you to log in):
net user Administrator /active:yes
Access the On-Screen Keyboard
Activating the default Administrator account
Once you’ve regained access you should undo the changes you made so as to restore the security of your computer, you can do so easily by opening an administrative PowerShell session (press Windows Key+X to show the power user menu and click Windows PowerShell (Admin)) and copy+paste the following command into the prompt:
Following these instructions should allow you back into your computer in most cases. It’s important to undo the changes you made to the exe files when you’re done, otherwise anyone else could technically use the same commands to bypass your password to access the computer. Thanks for reading!
1.11. How to fix “No Boot Device Found” on Windows 10
Problems with the operating system and computer are bound to happen every now and then, even if you’re extremely careful about the type of activities you carry out on your PC.
Some users try to launch Windows but wind up staring at white text on a black screen instead, which says No boot device found, No bootable device found, No boot device available, or something similar.
It can be scary and you might be left wondering if you can still use your computer or lost access to all your data. There’s nothing to worry about, though, since you can troubleshoot this issue without turning to an expert’s advice.
What causes No boot device found?
No boot device found indicates an issue with your hard drive, which prevents your OS from booting. It can occur on many operating systems and platforms, including Windows 10, Windows 7, and even macOS.
Furthermore, all types of computers are susceptible to the No boot device available error, including HP and DELL.
How to fix No boot device found on Windows 10?
There are multiple ways to repair the inaccessible boot error and allow Windows to start properly again. Some of these solutions can be controlled from BIOS while others require you to run Windows in safe mode.
In the worst case scenario, you have to use an OS recovery media disk, which means losing access to all your files and applications.
1. Check your HDD cables
It might sound trivial when you first hear someone tell you this, but you should start by checking your HDD or SSD to see if it’s properly connected to your PC.
For example, if Windows is installed on an detachable hard disk, it’s a good idea to check the cables and USB ports. It comes in handy if you have another similar cable on standby since you can switch the two and try booting Windows 10.
Moreover, you should try connecting your external disk to another USB port in case the initial port is not working correctly anymore.
On the other hand, if you recently cleaned your hardware components, make sure that you have successfully reattached your HDD to the motherboard. You could also replug it firmly but carefully, without applying force.
2. Enable Legacy BIOS Boot
Windows usually gets installed in UEFI mode because there are more security features available. However, some users have reported that switching to legacy boot mode fixed the No boot device available error.
Enable Legacy BIOS Boot Mode by using the up and down arrows, then press Enter
Save the current BIOS configuration and exit
3. Run ePSA Diagnostic on DELL
DELL computers have a special diagnostics tool that can be accessed from BIOS and used to scan your machine for hard drive errors. Here’s how to easily use ePSA Diagnostic:
1. Restart your DELL 2. Press F12 during boot to enter BIOS mode 3. Locate and access the Diagnostics section 4. Follow the on-screen instructions to diagnose your PC for errors 5. Copy any error and validation codes displayed during the scan
You can use the error and validation codes to look up more information online about the specific problem you’re having that causes the No boot device error.
Or, you can contact tech support from DELL and supply them with the error codes.
4. Restart Windows in safe mode
To do more on your computer, you need to load Windows even if the No boot device available error code blocks your path. It’s possible by starting Windows in Safe Mode.
The No boot device found error message could be caused by a missing or improperly installed driver. There are two solutions for this scenario: reinstalling drivers and updating them to the latest version. We’ll show you how to do both.
Make sure to start Windows 10 in Safe Mode before following these steps.
How to reinstall drivers:
Press Win key + R, type devmgmt.msc, and press Enter
Open the Disk drives menu
Select your hard disk, right-click it, and select Uninstall device
Follow the on-screen instructions
Reboot your computer
If you’re having a hard time trying to identify a faulty driver, you should use DriverVerifier. It’s a simple and effective tool that reveals malfunctioning devices on your PC, letting you know which require your attention.
How to update Windows 10 drivers
Access Device Manager, right-click your disk drive, and select Update driver
Click Search automatically for updated driver software
If you get the The best drivers for your device are already installed message, click Search for updated drivers on Windows Update
Restart your computer
The operating system might not be able to locate a newer driver version using Windows Update. In that case, you should visit the manufacturer website of your disk driver to download and install a newer version.
However, if you don’t want to risk causing more issues to your PC by installing an incompatible driver, then you should turn to a driver update application. It identifies and updates all your outdated drivers with just a few clicks.
6. Use System Restore
If the No boot device found was caused by an event that recently happened at the software level but you can’t quite put your finger on it, then rolling back Windows to a previous restore point should solve it.
However, keep in mind that it could mean losing some applications or games that you have installed after creating the restore point.
How to roll back Windows 10:
Start Windows 10 in Safe Mode
Press Win key + R, type control panel, and hit Enter
Click Recovery
Click Open System Restore
Select a restore point from the list. To see which apps will be affected, click Scan for affected programs
Proceed with the on-screen instructions
Restart your computer
7. Repair disk and system errors
If your hard drive has bad sectors, this can lead to boot issues and the No boot device found error messages. But you can quickly fix it without having to install third-party tools, thanks to CHKDSK (Check Disk).
How to use CHKDSK:
Press Win key + R, type cmd, and press Ctrl + Shift + Enter to run CMD as admin
Run chkdsk c: /f if Windows is installed on the C: drive. Otherwise, set the correct partition letter
Type y when you’re asked to schedule the task at the next system boot and press Enter
More severe system issues can be resolved using DISM (Deployment Image Servicing and Management).
How to use DISM:
Run CMD with elevation rights
Type DISM /online /cleanup-image /scanhealth and press Enter
If DISM finds any problems, you can fix them using DISM /online /cleanup-image /restorehealth
Reboot your PC and run CMD as admin
Run sfc /scannow
Restart your computer
8. Reset BIOS to factory settings
BIOS has a lot of cool options that can be enabled to get more out of your computer, such as overclocking and caching. If you or someone else has customized settings in BIOS mode, perhaps this caused hardware failure that led to the No boot device found error message.
Quickly press the key displayed on the bottom of the screen to access BIOS
Select the area with advanced settings
Enable the option to reset configuration data
Save the current BIOS configuration and exit
9. Update BIOS
While we’re on the topic of BIOS, it’s a good idea to keep it updated to the latest version.
Press the Win key, type System Information, and open this app
Select the System Summary section and take note of the BIOS Version/Date
Visit the website of your BIOS manufacturer and download a newer version
Unzip the BIOS file to an external storage unit
Restart your PC and switch to BIOS mode
Back up your current BIOS version to the portable disk
Start the BIOS update and follow the on-screen instructions
Don’t shut down or restart your PC during the update
Try to launch Windows and bypass the No boot device found error
10. Use the BCD command
Using the BCD (Boot Configuration Data) command can help fix hardware failure and get rid of the No boot device found error message. And you don’t need to install any special software since you can use the command-line environment.
Restart the computer and interrupt the boot sequence until the PC enters advanced startup mode
Select Troubleshoot and head over to Advanced options
Click Command Prompt. Windows will restart and launch the console
Choose your account and specify your password
Type the next two commands and press Enter after each line
bcdedit/deletevalue {default} numproc
bcdedit/deletevalue {default} truncatememory
Restart your computer
11. Fix the BCD
A corrupt BCD is the source of computer problems, including inaccessible boot device, which prevents Windows 10 from starting. But you can fix the broken BCD with the help of a bootable flash drive that has the Windows installation files.
Restart Windows in advanced startup mode
Go to Troubleshoot > Advanced Options > Command Prompt
After Windows restarts in CMD mode, enter the following lines (press Enter after each one):
bootrec /repairbcd
bootrec /osscan
bootrec /repairmbr
Restart your machine
12. Repair system registry
If the Windows registry contains corrupt data, this can result in hardware issues and the No boot device found error message. But you can fix it with a few commands, without having to install anything else or use OS recovery media.
Windows 10 allows you to create a full backup of your computer thanks to a simple tool called Windows Backup. Many users turn to it after a fresh OS installation, in order to back up the clean state of their operating system. If you created such a backup, you can restore it using System Image Recovery, in order to undo all software events that may have caused the No boot device available error.
How to use System Image Recovery:
Reboot your computer
Interrupt the boot sequence three times to force advanced startup mode
Select Troubleshoot and go to Advanced Options
Pick System Image Recovery and follow the on-screen instructions
However, if you try to create a backup on another PC, you won’t be able to restore it on the malfunctioning computer, so don’t waste your time.
A rundown of No boot device found fixes
To summarize, if you can’t start Windows due to the No boot device available error message, you don’t need to panic because there are multiple solutions you can try to fix it.
For instance, you should check your HDD cables, enable Legacy BIOS Boot, run ePSA Diagnostic on DELL, and restart Windows in safe mode.
It’s also a good idea to check your drivers, roll back Windows to a previous checkpoint, repair any disk and system errors, reset BIOS to factory mode, as well as update BIOS to the latest version.
You can also use the BCD command or fix BCD if it’s damaged, and repair corrupt system registry entries. When everything else fails, it’s time to create an OS recovery media disk to resewt Windows 10.
Creates a directory or file symbolic or hard link.
Syntax
mklink [[/d] | [/h] | [/j]] <link> <target>
Parameters
Parameter
Description
/d
Creates a directory symbolic link. By default, this command creates a file symbolic link.
/h
Creates a hard link instead of a symbolic link.
/j
Creates a Directory Junction.
<link>
Specifies the name of the symbolic link being created.
<target>
Specifies the path (relative or absolute) that the new symbolic link refers to.
/?
Displays help at the command prompt.
Examples
To create and remove a symbolic link named MyFolder from the root directory to the \Users\User1\Documents directory, and a hard link named Myfile.file to the example.file file located within the directory, type:
1.13. How to Map Network Drives From the Command Prompt
Mapping a network drive to a shared folder from Windows’ graphic interface isn’t hard. But if you already know the network path for the shared folder, you can map drives a lot quicker using the Command Prompt.
Mapping a drive to a network share assigns that share a drive letter so that it’s easier to work with. We’ll be using the net use command in Command Prompt to map a network drive for this tutorial. You can also use the same command in PowerShell if you prefer.
To map a network drive, type the following command and then hit Enter:
net use DRIVE: PATH
DRIVE is the drive letter you want to use and PATH is the full UNC path to the share. So, for example, if we wanted to map drive letter S to the share \\tower\movies, we’d use the following command:
net use s: \\tower\movies
If the share to which you’re connecting is protected with some sort of authentication, and you’d rather not type in the credentials every time you open the network drive, you can add the user name and password to the command with the /user: switch. For example, if we wanted to connect the same share from above, but with the username HTG and the password CrazyFourHorseMen, we’d use the command:
net use s: \\tower\movies /user:HTG CrazyFourHorseMen
By default, mapped drives are not persistent. If we map drives using the commands we’ve talked about so far, the mapped drives would disappear when you restarted your computer. If you’d rather those mapped drives stick around, you can make them persistent by using the /persistent switch. The switch works as a toggle:
/persistent:Yes: Makes the connection you’re currently creating persistent. Future connections you make using the command during the same session are also persistent (you don’t need to keep using the switch) until you use the /persistent:No switch to turn it off.
/persistent:No: Turns off the persistency toggle. Future connections you make are not persistent until you turn the toggle back on.
So, essentially, you could type something like the following command:
net use s: \\tower\movies /user:HTG CrazyFourHorseMen /persistent:Yes
And the drive map would be persistent. All future mapping you create (even if you don’t use the /persistent:Yes switch) will also be persistent until you turn it off using the /persistent:No switch.
If you ever need to delete a mapped network drive, all you have to do is specify the drive letter and add the /delete switch. For example, the following command would delete the drive mapping we assigned to drive S:
net use s: /delete
You can also use the asterisk as a wildcard should you ever want to delete all your mapped drives in one go:
net use * /delete
And that’s all there is to it. Once you get used to using the command, you’ll find it a lot quicker than clicking through File Explorer’s interface–especially if you work with mapped drives often.
To view the current status of the Symlink settings on your system, execute the following command from an elevated (administrator) command prompt: fsutil behavior query SymlinkEvaluation
C:\>fsutil behavior query SymlinkEvaluation

Local to local symbolic links are enabled.
Local to remote symbolic links are enabled.
Remote to local symbolic links are disabled.
Remote to remote symbolic links are disabled.
You'll notice the last line of the response to the above command notes that Remote to remote symbolic links are disabled.
In order to enable remote to remote symbolic links, enter the following command:
C:\>fsutil behavior set SymlinkEvaluation R2R:1
You won't see any response if the command was successful. To check that the setting has been updated, enter the evaluation query again:
C:\>fsutil behavior query SymlinkEvaluation

Local to local symbolic links are enabled.
Local to remote symbolic links are enabled.
Remote to local symbolic links are disabled.
Remote to remote symbolic links are enabled.
If you also need to enable remote to local link evaluation, you can substitute R2R:1 with R2L:1 in the set behavior command. (fsutil behavior set SymlinkEvaluation R2L:1)
If the text size feels too small when navigating through Windows, you can make the text bigger. This affects, for example, title bars, menus, and icon texts.
To go to the Ease of Access settings on your computer, press the Windows key+U.
Under Make text bigger on the Display tab, drag the slider to the right to increase the size of the sample text.
Once you're happy with the text size, select Apply. Windows scales up the size of all text.
Make images and apps bigger on your screen
In addition to the text size, you can also make everything else on your screen bigger, including images and apps.
To go to the Ease of Access settings on your computer, press the Windows key+U.
Under Make everything bigger on the Display tab, expand the menu and select the option you want.
You may need to sign out and back in again for some of the changes to take effect on certain apps, but it applies to most things immediately.
Windows 11:
Make text bigger on your screen
If the text size feels too small when navigating through Windows, you can make the text bigger. This affects, for example, title bars, menus, and icon texts.
To go to the Accessibility settings on your computer, press the Windows logo key+U or select Start > Settings > Accessibility.
Select Text size.
Drag the Text size slider to the right to increase the size of the sample text.
Once you're happy with the text size, select Apply. Windows scales up the size of all text.
Make images and apps bigger on your screen
In addition to the text size, you can also make everything else on your screen bigger, including images and apps.
To open Settings on your computer, press the Windows logo key+I or select Start > Settings .
Select Display.
Under Scale & layout, expand the Scale menu and select the option you want.
You may need to sign out and back in again for some of the changes to take effect on certain apps, but it applies to most things immediately.
Windows.edb is the Windows Search index database. A search index allows users to quickly search for data and files in the file system due to indexing of files, e-mails in PST files and other content. Indexing is performed in the background by the SearchIndexer.exe process. Obviously, the more files there are in the system, the larger the size of the Windows.edb file. In some cases, it can grow up to tens or even hundreds of GB, taking up all the free space on the system drive.
The Windows.edb file is hidden and by default is stored in the folder C:\ProgramData\Microsoft\Search\Data\Applications\Windows\.
Note. The Windows.edb file can be found in all modern client and server Microsoft OSs: from Windows 7/Server 2008 to Windows 10/Server 2019.
For example, in my case the size of Windows.edb is more than 15.5 GB (i. e. over 15% on my 100 GB SSD drive).
You can check the current size of the Windows.edb file with the following PowerShell command:
The most appropriate, though not too effective way to reduce the size of Windows.edb is to re-index the files in the system. To do it, open Control Panel -> IndexingOptions -> Advanced -> click Rebuild (to open this dialog box, you can run the following command: Control srchadmin.dll ).
In some time, the Windows Search will complete a full reindex of the data on the system drive (and other indexed location), and the size of the edb file will be reduced (it took several hours to rebuild the search index on my computer).
Reducing Windows.edb Size Using Defragmentation
The Windows Search Index file is a Microsoft EDB database. You can defragment the EDB database using the standard tool for maintaining such databases, esentutl.exe (Extensible Storage Engine Utility – should be familiar to Exchange admins). The database is defragmented offline (it must not be used), so you will have to stop Widows Search service first. You can join all these operations in a single bat/cmd script:
Tip. To perform the defragmentation, there should be sufficient free space on the hard drive, since a full copy of the EDB file will be created.
Esentutl displays on the screen the current EDB file defragmentation progress.
Note. If you see an error after running the esentutl command:
Operation terminated with error -1213 (JET_errPageSizeMismatch, The database page size does not match the engine) after 10.125 seconds.
This means that you are using a 64-bit OS and you need to use the x86 esentutl version to perform defragmentation. In this case, the third command will look like this:
In my case, after the defragmentation, the size of the Windows.edb file reduced by 30%.
Remove and Recreate the Windows.edb file
If free disk space is critical, you can safely delete the Windows.edb file. This action is safe because you don’t lose any data, only the search index is reset. To delete the Windows.edb file, stop the Windows Search service, then delete the file and start the service. net stop "Windows Search" REG ADD "HKLM\SOFTWARE\Microsoft\Windows Search" /v SetupCompletedSuccessfully /t REG_DWORD /d 0 /f del %PROGRAMDATA%\Microsoft\Search\Data\Applications\Windows\Windows.edb net start "Windows Search"
The value of the registry parameter SetupCompletedSuccessfully = 0 in the reg key HKEY_LOCAL_MACHINE\SOFTWARE\Microsoft\Windows Search forces the Windows Search service to reset the current settings and indexing paths at the next start, restore the default wsearch parameters and add the default indexing paths.
After you restart Windows Search, it will start the background reindexing process and recreate the Windows.edb file (system performance may decrease during the full reindexing).
Move the Windows.edb File to a Different Drive
In some cases, when the size of Windows.edb file is constantly growing, it is better to move the index database of Windows Search to another drive (volume). Thus, a sharp increase in the search database won’t cause an OS crash due to the exhaustion of free space on the system partition. As a rule, you should do it on RDS servers, where users actively work with files, personal folders and other indexed content.
To change the index file location, go to Control Panel -> Indexing Options -> Advanced -> Index location-> New Location, specify the path to the new location of Windows.edb file and click Ok.
Install the Update Rollup to Fix Windows.edb File Growth
A special update was released in May, 2013 to fix the problem of the constant growth of Windows.edb file in Windows 8 and Windows Server 2012 (this bug fix is a part of update rollup KB 2836988). It is recommended to manually download and install this patch on these Windows versions. Please note that the update doesn’t reduce the current size of the Windows.edb file, but only fixes the bug causing it to grow excessively. To reduce the size of the edb file, you need to rebuild the search index or defragment as described above.
For other versions of Windows, it is always recommended to install the latest cumulative updates through Windows Update or WSUS.
Windows.edb File Keeps Growing
If the Windows.edb file starts growing again after defragmenting and/or rebuilding the search index, try the following methods that may help you to fix the issue:
Run the built-in Windows 10 SearchandIndexingTroubleshooter. You can run this using the command: msdt.exe -ep SystemSettings_Troubleshoot_L2 -id SearchDiagnostic . In the list of issues, select “Search or indexing is slow”. The troubleshooting wizard will then try to get the Windows Search service back to normal state;
Try to index only the content you need. Exclude items you are not looking for from the search index. Click the “Modify” button in the indexing settings and in the “Indexing Location” window, disable paths and apps that you don’t want to be indexed. After changing the index path settings, you need to rebuild the search index each time (Advanced -> Rebuild);
Also note that Windows.edb file size grows much faster in Windows 10/8.1 than in Windows 7. The fact is that in modern Windows versions, all file contents are indexed, regardless of their size. And Windows 7 indexed only the first part of large documents.
If you use Outlook with PST files on your computer, then when you index them, the size of the Windows.edb file grows in proportion to the size of the PST files. This can lead to running out of disk space and performance problems. This can lead to insufficient disk space and slow computer performance. In this case, Microsoft recommends excluding Outlook from the list of indexed items. Of course, Outlook search will stop working (this won’t be a problem if you store your mailbox on an Exchange server with search index enabled);
If nothing helps and the Windows.edb file size keeps growing, you can completely disable the wsearch service or configure a logon script that resets the search index on startup.
If you want to change the boot priority, enable or disable secure boot or change any other low-level settings, then you need to boot into UEFI mode. Depending on the motherboard manufacturer, you have to press specific keys or a combination of keys on your keyboard to access UEFI mode. If you missed the opportunity to do so when turning on your computer, you can also boot into UEFI mode directly from Windows. This eliminates the need to press relevant keys as fast as possible at boot time.
Booting into UEFI from Windows is not difficult. However, you can only do this if your motherboard supports or has a UEFI chip on it. If your motherboard doesn’t support UEFI, you cannot boot into UEFI from Windows. That being said, most modern motherboards come equipped with a UEFI chip and support both UEFI and legacy BIOS.
Access UEFI or Legacy BIOS Using Boot Key Option
To get started, you can enter the UEFI or Legacy BIOS menu during the boot, with a dedicated key. This negates the need to go through several steps to enter the BIOS menu.
In order to enter the UEFI or Legacy BIOS during boot:
1. Boot up your PC, and when the screen splashes the first boot screen, you should see information about the dedicated key that lets you enter the BIOS menu.
3. Press the required key repeatedly until your enter the BIOS menu. Usually, the boot keys are ESC, Del, or one of the Function keys (F1, F2, F10, etc.).
Note that laptops or PCs from different brands will have different boot keys. You may have to check for the boot key for the brand of laptop or PC you use. Below are the boot keys for some popular brands:
Dell: F2 or F12
HP: ESC or F10
Acer: F2 or Del
ASUS: F2 or Del
Lenovo: F1 or F2
MSI: Del
Toshiba: F2
Samsung: F2
Microsoft Surface: Press and hold the volume up button.
Check Whether Your System Supports UEFI or Legacy BIOS
If you don’t know or are unsure whether your motherboard supports UEFI or not, you can easily verify it directly from Windows.
There are several ways to check whether you are using UEFI or BIOS.
Windows displays all the system information in a single app called System Information. By accessing the System Information application, you can find out whether you are using BIOS or UEFI.
1. Press Win + R, type msinfo32, and press Enter. This action will open the System Information app.
2. Select “System Summary” on the left panel. On the right panel, you can see whether you are using BIOS or UEFI next to “BIOS Mode.” If you see UEFI, then your system is using UEFI bios. If you see “Legacy,” then your system is using Legacy BIOS.
Alternatively, you can also find it using the Disk Management tool.
1. Open the Start menu and search for “Create and format hard disk partitions” and open it. Don’t worry, we are not going to partition or format your hard drive.
2. If you see a partition named “Healthy (EFI System Partition),” then your system supports UEFI. If you don’t have this partition, then your system is using Legacy BIOS.
Once you’ve confirmed your motherboard’s support for UEFI, proceed to the next steps of booting into UEFI directly from Windows 10.
Boot into UEFI from Settings App
To boot into UEFI from the Settings panel, we are using the Advanced Start-up options.
1. Search for “Settings” in the Start menu and open it. Go to “Update and Security -> Recovery,” and click on the “Restart Now” button under the Advanced Start-up section.
2. In the Advanced start-up screen, go to “Troubleshoot -> Advanced options” and click on the “UEFI Firmware Settings” option.
3. On the next screen, click on the Restart button to be taken to the UEFI screen.
Boot into UEFI from Command Prompt
You can also boot into UEFI from Windows by executing a single command.
1. Search for Command Prompt in the Start Menu, right-click on it and select the option “Run as administrator.”
2. In the command prompt, execute the below command:
shutdown /r /fw
3. Windows will show a warning message saying the system will restart in less than a minute.
Close the warning message and save all your work. The system will automatically restart and boot into UEFI mode.
1.18. How to use Net User command to Manage User Accounts
The command Net User allows you to manage your local and even your domain users from the command line. It’s mainly used to quickly add, delete or disable user accounts from the command line. But it can do more than just that. The tool can be used in both command prompt and PowerShell.
For managing domain users, I recommend using the PowerShell ActiveDirectory module. It comes with more options and allows you to filter, copy and search users and set or change all properties. But as mentioned, you can also perform basic tasks with the Net User command for domain users.
In this article
In this article, we are going to take a closer look at the Net User command. I will explain how you can add, and remove accounts, change passwords, and more.
Net User Command
The Net User command is a command-line utility that you can run in any terminal on Windows. But to use it you will need to have Administrator permissions on the computer. Without it, you won’t be able to create new user accounts for example. Also, make sure that you open Windows PowerShell or Windows Terminal in Admin mode.
AD
Note
If you get the error “System error 5 has occurred. Access is denied” Then you haven’t start the command prompt or PowerShell with administrator privileges.
The most important parameters of the Net User command are:
Parameter
Description
<username>
Specify the username to the account you want to perform the action on
<password>
Set or change the password for the specified user account. Use * to get a prompt for the password.
/domain
Used for managing domain accounts
/add
Create a new user account
/delete
Delete a user account
/active
Enable or disable the user account. Options are yes or no.
/expire
Set the date when the account expires
/time
Specifies the times that a user is allowed to log in
/homedir
Set the home directory path of the user account.
Net User Commands
List all users
When you enter the command Net User without any parameters, then it will list all user accounts on the computer. If you run the command on the Domain Controller, then it will list all domain accounts.
AD
Net User
# Or you can also type
Net Users
Net User results on Windows 11Net User results on a domain controller
In the first screenshot above you will see the results on a local computer, the second one are all the users from the local domain.
AD
When you specify the username you will see all the details from the user account
# Get the user details for Zoe Tucker
net user ztucker
Net User Details
Net User Add Account
The Net User command can be used to create new user accounts on your computer and in your domain. To create a user account you will need to add the /add parameter and specify the username. A password is by default not required on a local computer. For domain accounts, however, you will need to specify the password as well.
AD
# Create a new local user account with the login name lazyadmin
Net User /Add lazyadmin
For entering the password you have two options, you can type it in plain text in the command line or use the * which will show you a prompt to enter the password.
# Create a new domain user with username testusr and passswd123
Net User /add /domain testusr passwd123
# Prompt for the password
Net User /add /domain testusr *
Net User Add
The new domain user is placed in the built-in OU “Users”.
When creating a user we can also specify login details, home directory path, etc of the user. I will explain each command later in the article. But to give you an idea of the possible options, we are going to create a user with the following details:
AD
Username: testusr
Password: prompt
Full name: Test User
Password required: yes
Allowed to login between: Monday to Friday between 08:00 and 17:00
Home folder directory: \\lazyadmin.local\home\testusr
Net User /add /domain testusr * /fullname:"Test User" /passwordreq:yes /time:M-F,08:00-17:00 /homedir:"\\lazyadmin.local\home\testusr" /scriptpath:"\\lazyadmin.local\netlogon\welcome.bat"
Net User Delete User Account
We can also use the command line tool to delete user accounts, both local and from the domain. For this, you will need to use the parameter /delete and enter the username. Important to note is that the command tool won’t ask for confirmation. So be careful when using the delete option.
AD
# Delete the local user Lazyadmin
Net User /delete lazyadmin
# Delete a domain user
Net User /delete /domain testusr
Net User Change or Set Password
One of the common tasks for an IT Helpdesk is to reset a user’s password. Of course, you can reset the password in the Active Directory. But it’s also possible with the command Net User. Resetting passwords is not limited to domain accounts, you can also use this method for local computer accounts.
AD
To reset a password you will need to specify the username and then either type in the password or type * after which you can securely type the password:
# Set the password for LazyAdmin to passwd123
Net User LazyAdmin passwd123
# Pormpt for the new password
Net User LazyAdmin *
When it’s a domain user, then just add the /domain parameter. Make sure that the password meets the complexity requirements of the domain
# Reset the password for the domain user tesusr
Net User /domain testusr *
Enable or Disable User accounts
We can also use the command-line tool to enable and disable accounts. This is particularly useful when a user is locked out or when you quickly need to disable an account. To do this we are going to use the parameter /Active:yes|no
AD
The command can be used for local computer accounts as for domain accounts:
# Disable local account
Net User lazyadmin /active:no
# Disable domain user account
Net User tesusr /Domain /Active:no
To enable an account, simply replace /Active:no with /Active:yes
Set Expire date for User Account
If you know the data that an employee leaves the organization then it’s a good idea to set the expired date for the account. This way the account is automatically locked after the specified data. The date format depends on your region settings, but the options are:
MM/DD/YYYY
DD/MM/YYYY
mmm,dd,YYYY
Account expiration settings are not limited to a domain account, you can also set the expired date on a local Windows 10 or 11 user account.
AD
# Set expire date for local user
Net User lazyadmin /expires:21/09/2022
# Set expire data for domain user
Net User testusr /domain /expires:09/20/2022
Set login times for User Account
Some accounts are only allowed to be used between specific hours, office hours for example. We can specify these hours with the /time parameter. To specify the time we will need to enter the days and hours between the account is allowed to log in.
AD
You can use different notions for the days and hours (12-hour or 24-hour notation), and we can specify multiple time blocks by separating them with the semi-column ;.
# Allow login during office hours only
Net User lazyadmin /time:M-F,08:00-17:00
# Or in 12-hour notation
Net User lazyadmin /time:M-F,8am-5pm
# Specify multiple blocks
Net User lazyadmin /time:M,08:00-17:00;W,08:00-13:00;F,08:00-17:00
Net User Password settings
When you create a new account you can set a password for the account as well. But when it comes to passwords we have two other interesting parameters, passwordchg and passwordreg. The first determines if the user can change the password. This setting is really useful for kiosk accounts. The user can’t change the password when this is set to no.
AD
# User lazyadmin can't change it's password
net user lazyadmin /passwordchg:no
The parameter passwordreg is used to specify it a user account must have a password. If this is set to no, then the user can remove their password, making the device vulnerable.
net user lazyadmin /passwordreg:yes
Home Directory Path
The last parameter that I want to mention is the home directory path. If you want to store the home directory of the user on a network share then you can set the path to the folder with the parameter /homedir. But make sure that the full path, including the user’s folder, exists.
AD
# Set the home directory for testusr
net user testusr homedir:"\\lazyadmin.local\home\testusr"
Wrapping Up
The Net User command is great when wanting to quickly enable or disable a user account or reset a password. Also, it’s great to manage local computer accounts on small networks. When working with domain accounts I prefer to use the Active Directory module in PowerShell.
1.19. How to Recover Your Lost Windows 7/8/8.1/10/11 User Profile
How to Recover Your Lost Windows 10 User Profile
These instructions apply to all versions of Windows from 7 through 11 currently.
Getting an error message when you sign into your Windows 10 user account? Your profile might be corrupted! Learn what to do about it.
If an error message prevents you from signing in to your Windows 10 user account, your profile may have become corrupted. We're going to show you how to fix it to recover your user profile or, alternatively, make a new account.
Your user account contains your personal settings, like desktop wallpaper, taskbar preferences, and some program settings like browser history. It can be very frustrating to lose this.
MAKEUSEOF VIDEO OF THE DAY
Advertisement: 0:13
Skip Ad
Without further ado, here's how to restore a user profile in Windows 10.
Why You Shouldn't Use the Temporary Windows Profile
If you try to sign in to your normal user account when it's broken, you'll be taken into a temporary account. This usually occurs if a critical Windows update has been forcibly ceased midway through the process.
You'll see one of two errors (or sometimes both):
You've been signed in with a temporary profile. You can't access your files, and files created in this profile will be deleted when you sign out. To fix this, sign out and try signing in later. Please see the event log for details or contact your system administrator.
We can't sign in to your account. This problem can often be fixed by signing out of your account, then signing back in. If you don't sign out now, any files you create or changes will be lost.
Obviously, the first thing to do here is to sign out and then back in. Chances are it won't work, but it's worth a shot.
Being signed in to a temporary profile is unsuitable because any changes you make will be reset every time you log out. As such, let's look at how to recover your usual Windows profile.
Step 1: Find Your Security Identifier
First, you need to know the security identifier (SID) of the temporary user account you're being signed in to. This unique string is what Windows uses to control permissions and group your interactions.
Do a system search for cmd and open the Command Prompt.
Type whoami /user and press Enter. This command queries the system to tell you the SID of the current account.
Make a note of your SID. You can press Ctrl + M to enable highlighting, left-click and drag over the SID, and then press Ctrl + C to copy it.
Step 2: Recover Your Windows Profile With the Registry
You now need to edit the registry to recover the original profile. Editing the registry can be dangerous if you mess with the wrong thing, so please follow the instructions below carefully.
Do a system search for regedit and select the Registry Editor. Paste the following path into the address bar (go to View > Address Bar if you don't see it) and press Enter:
You will see several sub-folders within the ProfileList folder on the left-hand pane, some containing SIDs.
One of three options should apply:
Your SID is listed twice, with and without a BAK extension.
Your SID is listed only once with a BAK extension (e.g., S-1-5-21-2795999757-2048908912-3492586281-1000.bak).
Your SID is listed only once without a BAK extension (e.g., S-1-5-21-2795999757-2048908912-3492586281-1000).
The process is mostly the same for all three options but with some slight differences. Follow all the steps below in order, but only those which contain your option number.
Option 1: Delete the Duplicate Folder
If your SID is listed twice—and only in this case—you need to delete the folder without the BAK extension.
On the left-hand pane, right-click the folder that matches your SID and doesn't have the BAK extension.
Click Delete.
Click Yes to confirm.
Option 1 and 2: Rename the BAK Folder
On the left-hand pane, right-click the folder that matches your SID and has the BAK extension.
Click Rename.
Remove .BAK from the end.
Press Enter to save the changes.
Option 1, 2, and 3: Adjust the Folder Path and State
On the left-hand pane, click the folder that matches your SID.
On the right-hand pane, double-click ProfileImagePath.
In the Value data field, input the correct path for your user profile (for example, C:\Users\Joe).
Click OK.
If you're unsure what the Value data should be, press Windows key + R to open Run, input C:\Users, and press Enter. This will bring up a list of all your user profiles. You can enter the right profile and copy the path from the address bar.
Once you've done this, on the Registry Editor:
On the right-hand pane, double-click State.
Change the Value data to 0.
Click OK.
Close the Registry Editor and restart your computer. Sign back into your user account, and you should find that everything is restored and back to normal.
If you're still encountering problems, read on to find out how to make a new permanent user account.
How to Create a New Windows Profile
If the instructions above didn't bring your profile back, it's time to make a new user profile. Note that this won't recover your desktop settings, like wallpaper or taskbar preferences, but it will mean you'll have a permanent user account again.
On the sign-in screen, hold Shift and click Power > Restart.
When this has completed, you'll be on the Choose an option screen. Go to Troubleshoot > Advanced options > Start-up Settings > Restart.
Your computer will restart again. Press F4 to start it in Safe Mode.
Step 2: Enable the Administrator Account
Next, you need to enable the hidden administrator account.
Once logged in, input cmd in the Start menu search bar
Right-click Command Prompt and select Run as administrator. This opens Command Prompt in administrator mode.
Input net user administrator /active:yes and press Enter.
Note that you can reverse this in the future by running the same command; just switch yes for no.
This will enable the hidden administrator account on your computer. Restart and then sign in to this new account.
Step 3: Create a New Account
Now that you're signed in to the administrator account, it's time to create a new permanent Windows account.
Press Windows key + I to open Settings.
Go to Accounts > Family & other users.
Click Add someone else to this PC.
At this point, you can just follow the wizard through. However, if you want to create a local account instead of a Microsoft one, click I don't have this person's sign-in information and then Add a user without a Microsoft account.
Step 4: Transfer Your Files
Finally, you need to transfer the files from your broken Windows profile to the new one.
To navigate to these files:
Restart your PC and log back into the administrator account.
Press Windows key + R to open Run.
Input C:\Users and press Enter.
Navigate to your old and broken user account.
Once here, copy and paste all your user files from this old account to the new one. You'll want to do this individually for each folder; otherwise, you might accidentally bring across some hidden and problematic system files.
To highlight all files in a folder, press Ctrl + A. To select specific ones in bulk, hold down Ctrl as you left-click. Alternatively, hold left-click and drag around the files.
Then press Ctrl + C to copy them. Navigate back to the Users folder, enter the new account, and press Ctrl + V to paste your files.
Once done, sign out of the administrator account and into your new account. All the files you transferred will be there.
Remember to Keep Your Data Backed Up
Now your Windows profile has been restored, and you have a permanent user account again. To try and stop this from happening in the future, don't shut your computer down while it's installing an update.
Luckily, in this scenario of profile corruption, it doesn't result in much lost data. Regardless, you should regularly back up your files to protect against all eventualities.
1.20. How to Recover Your Lost Windows 10 User Profile
How to Recover Your Lost Windows 10 User Profile
If an error message prevents you from signing in to your Windows 10 user account, your profile may have become corrupted. We're going to show you how to fix it to recover your user profile or, alternatively, make a new account.
Your user account contains your personal settings, like desktop wallpaper, taskbar preferences, and some program settings like browser history. It can be very frustrating to lose this.
Without further ado, here's how to restore a user profile in Windows 10.
Why You Shouldn't Use the Temporary Windows Profile
If you try to sign in to your normal user account when it's broken, you'll be taken into a temporary account. This usually occurs if a critical Windows update has been forcibly ceased midway through the process.
You'll see one of two errors (or sometimes both):
You've been signed in with a temporary profile. You can't access your files, and files created in this profile will be deleted when you sign out. To fix this, sign out and try signing in later. Please see the event log for details or contact your system administrator.
We can't sign in to your account. This problem can often be fixed by signing out of your account, then signing back in. If you don't sign out now, any files you create or changes will be lost.
Obviously, the first thing to do here is to sign out and then back in. Chances are it won't work, but it's worth a shot.
Being signed in to a temporary profile is unsuitable because any changes you make will be reset every time you log out. As such, let's look at how to recover your usual Windows profile.
Step 1: Find Your Security Identifier
First, you need to know the security identifier (SID) of the temporary user account you're being signed in to. This unique string is what Windows uses to control permissions and group your interactions.
Do a system search for cmd and open the Command Prompt.
Type whoami /user and press Enter. This command queries the system to tell you the SID of the current account.
Make a note of your SID. You can press Ctrl + M to enable highlighting, left-click and drag over the SID, and then press Ctrl + C to copy it.
Step 2: Recover Your Windows Profile With the Registry
You now need to edit the registry to recover the original profile. Editing the registry can be dangerous if you mess with the wrong thing, so please follow the instructions below carefully.
Do a system search for regedit and select the Registry Editor. Paste the following path into the address bar (go to View > Address Bar if you don't see it) and press Enter:
You will see several sub-folders within the ProfileList folder on the left-hand pane, some containing SIDs.
One of three options should apply:
Your SID is listed twice, with and without a BAK extension.
Your SID is listed only once with a BAK extension (e.g., S-1-5-21-2795999757-2048908912-3492586281-1000.bak).
Your SID is listed only once without a BAK extension (e.g., S-1-5-21-2795999757-2048908912-3492586281-1000).
The process is mostly the same for all three options but with some slight differences. Follow all the steps below in order, but only those which contain your option number.
Option 1: Delete the Duplicate Folder
If your SID is listed twice—and only in this case—you need to delete the folder without the BAK extension.
On the left-hand pane, right-click the folder that matches your SID and doesn't have the BAK extension.
Click Delete.
Click Yes to confirm.
Option 1 and 2: Rename the BAK Folder
On the left-hand pane, right-click the folder that matches your SID and has the BAK extension.
Click Rename.
Remove .BAK from the end.
Press Enter to save the changes.
Option 1, 2, and 3: Adjust the Folder Path and State
On the left-hand pane, click the folder that matches your SID.
On the right-hand pane, double-click ProfileImagePath.
In the Value data field, input the correct path for your user profile (for example, C:\Users\Joe).
Click OK.
If you're unsure what the Value data should be, press Windows key + R to open Run, input C:\Users, and press Enter. This will bring up a list of all your user profiles. You can enter the right profile and copy the path from the address bar.
Once you've done this, on the Registry Editor:
On the right-hand pane, double-click State.
Change the Value data to 0.
Click OK.
Close the Registry Editor and restart your computer. Sign back into your user account, and you should find that everything is restored and back to normal.
If you're still encountering problems, read on to find out how to make a new permanent user account.
How to Create a New Windows Profile
If the instructions above didn't bring your profile back, it's time to make a new user profile. Note that this won't recover your desktop settings, like wallpaper or taskbar preferences, but it will mean you'll have a permanent user account again.
On the sign-in screen, hold Shift and click Power > Restart.
When this has completed, you'll be on the Choose an option screen. Go to Troubleshoot > Advanced options > Start-up Settings > Restart.
Your computer will restart again. Press F4 to start it in Safe Mode.
Step 2: Enable the Administrator Account
Next, you need to enable the hidden administrator account.
Once logged in, input cmd in the Start menu search bar
Right-click Command Prompt and select Run as administrator. This opens Command Prompt in administrator mode.
Input net user administrator /active:yes and press Enter.
Note that you can reverse this in the future by running the same command; just switch yes for no.
This will enable the hidden administrator account on your computer. Restart and then sign in to this new account.
Step 3: Create a New Account
Now that you're signed in to the administrator account, it's time to create a new permanent Windows account.
Press Windows key + I to open Settings.
Go to Accounts > Family & other users.
Click Add someone else to this PC.
At this point, you can just follow the wizard through. However, if you want to create a local account instead of a Microsoft one, click I don't have this person's sign-in information and then Add a user without a Microsoft account.
Step 4: Transfer Your Files
Finally, you need to transfer the files from your broken Windows profile to the new one.
To navigate to these files:
Restart your PC and log back into the administrator account.
Press Windows key + R to open Run.
Input C:\Users and press Enter.
Navigate to your old and broken user account.
Once here, copy and paste all your user files from this old account to the new one. You'll want to do this individually for each folder; otherwise, you might accidentally bring across some hidden and problematic system files.
To highlight all files in a folder, press Ctrl + A. To select specific ones in bulk, hold down Ctrl as you left-click. Alternatively, hold left-click and drag around the files.
Then press Ctrl + C to copy them. Navigate back to the Users folder, enter the new account, and press Ctrl + V to paste your files.
Once done, sign out of the administrator account and into your new account. All the files you transferred will be there.
Now your Windows profile has been restored, and you have a permanent user account again. To try and stop this from happening in the future, don't shut your computer down while it's installing an update.
Luckily, in this scenario of profile corruption, it doesn't result in much lost data. Regardless, you should regularly back up your files to protect against all eventualities.
1.21. Fixing: “Total identified Windows installations: 0”
Fixing: “Total identified Windows installations: 0”
I bought a second-hand replacement laptop for a misbehaving Surface Pro 4 (jittery screen) and to save my time (the computer wasn’t mine) I decided to image it. Anyway, long story short, after I restored 82GB of data on the target laptop (HP 830 G5), I tried to boot it but got an HP bios error stating something like no operating system found, please reinstall the operating system.
So I booted from some USB based Windows installation media and checked the partitions, all the data was there, Windows was there, and it all looked good but obviously, the boot loader was broken.
I googled and found the following suggestions.
Bootrec /fixmbrBootrec /fixboot (Note: If this fails with access denied try BOOTSECT /NT60 SYS and then issue the command again)
Bootrec /scanosBootrec /rebuildbcd
The problem however, is that after issuing Bootrec /rebuildbcd it stated
“Total identified Windows installations: 0”
which of course, didn’t leave me feeling super confident that this would work. The value should be 1 at a minimum.
Another quick Google and the advice out there all stated something like the following…
bcdedit /export C:\BCD_Backup

C:

cd boot
But that gave me the following error
“The system cannot find the path specified”
because there was no C:\boot folder. This folder doesn’t exist as this computer (Windows 10) is UEFI-based and not legacy based as I guess the gazillion guides out there assumed.
Due to the format change (legacy versus UEFI) this computer uses an EFI partition to store the boot files, but that partition doesn’t have a drive letter and the path to the BCD is different from all the guides out there, so how do you fix that?
To find the EFI partition, boot to your Windows setup screen and choose
Boot from the Windows installation disc, and select Install. Next, click on Repair your computer then select ->Advanced Options ->Troubleshoot ->Command Prompt.
Once done, launch diskpart and then select the disk on your computer (most likely disk 0) like so
diskpart
sel disk 0
list vol
that will show you the partitions on your computer. Then I selected each of the two SYSTEM partitions and assigned a drive letter to them so I could view the files on them using
sel vol x (where x is the volume number)

assign
After assigning a drive letter and exiting diskpart I could browse that drive and view the files on it. I did this a few times to identify the correct drive, after I was done with that drive I removed the drive letter using
remove
Once I identified the EFI partition I navigated to where the BCD files were located, and that path was D:\EFI\Microsoft\Boot as shown below, note your EFI partition may end up on a different drive letter using the ASSIGN command.
Now that I found the BCD, I renamed it and rebuilt the BCD.
1.22. How to Pin “This PC” to Taskbar on Windows 11
If you want to pin “This PC” to your Windows 11 taskbar but you’re unsure how to do that, you’ve come to the right place. This quick guide will list the steps you need to follow to get the job done. By pinning “This PC” to your taskbar, you can always have this handy shortcut within easy reach.
How Do I Pin “This PC” to Taskbar on Windows 11?
Create a New “This PC” Shortcut
Right-click on your Windows 11 desktop
Select New → Shortcut
Paste the following path in the location field: %SystemRoot%\explorer.exe shell:MyComputerFolder
Name the new shortcut “This PC Taskbar” and hit Finish
The new shortcut icon should now be visible on the desktop
You need to assign a new icon to your shortcut. If you don’t do that, you’ll have two File Explorer icons on your taskbar.
Right-click on This PC Taskbar and select Properties
Click on the Change icon button
Select the Computer icon and save the settings
AD
You can now finally pin the shortcut to your Windows 11 taskbar. Simply right-click on it and select Show More Options. Then, click on Pin to taskbar, and you’re done.
Set File Explorer to Open “This PC”
Type File Explorer Options in the search box
Click on the General tab
Go to Open File Explorer to
Change it from Quick Access to This PC
Save the settings
Pin File Explorer to the taskbar
AD
Your File Explorer taskbar shortcut will open to “This PC” when you click on it.
While these two methods may not be the solutions you’ve been looking for, they can help you access “This PC” quicker. Unfortunately, Windows 11 no longer supports the option to pin “This PC” to your taskbar. If you right-click on “This PC,” there’s no “Pin to taskbar” option.
Conclusion
To pin “This PC” to your Windows 11 taskbar, you need to create a special “This PC” shortcut and change its icon. Then, right-click on the new shortcut and pin it to your taskbar. Alternatively, you can also set File Explorer to open “This PC” instead of “Quick Access.”
I bought a second hand replacement laptop for a mis-behaving Surface Pro 4 (jittery screen) and to save my time (the computer wasn’t mine) I decided to image it. Anyway, long story short, after I restored 82GB of data on the target laptop (HP 830 G5), I tried to boot it but got a HP bios error stating something like no operating system found, please reinstall the operating system.
So I booted from some usb based Windows installation media and checked the partitions, all the data was there, Windows was there, it all looked good but obviously the boot loader was broken.
I googled and found the following suggestions.
Bootrec /fixmbrBootrec /fixboot (Note: If this fails with access denied try BOOTSECT /NT60 SYS and then issue the command again)
Bootrec /scanosBootrec /rebuildbcd
The problem however, is that after issuing Bootrec /rebuildbcd it stated
“Total identified Windows installations: 0”
which of course, didn’t leave me feeling super confident that this would work. The value should be 1 at a minimum.
Another quick google and the advice out there all stated something like the following…
bcdedit /export C:\BCD_Backup

C:

cd boot
But that gave me the following error
“The system cannot find the path specified”
because there was no C:\boot folder. This folder doesn’t exist as this computer (Windows 10) is UEFI based and not legacy based as I guess the gazillion guides out there assumed.
Due to the format change (legacy versus UEFI) this computer uses an EFI partition to store the boot files, but that partition doesn’t have a drive letter and the path to the BCD is different to all the guides out there, so how do you fix that ?
To find the efi partition, boot from the Windows installation disc, and select Install. Next click on Repair your computer then select ->Advanced Options ->Troubleshoot ->Command Prompt.
Once done, launch diskpart and then select the disk on your computer (most likely disk 0) like so
diskpart
sel disk 0
list vol
that will show you the partitions on your computer. Then I selected each of the two SYSTEM partitions, and assigned a drive letter to them so I could view the files on them using
sel vol x (where x is the volume number)

assign
After assigning a drive letter and exiting diskpart I could browse to that drive in another command prompt by typing it’s drive letter, for example:
D:
and view the files on it using:
DIR
I did this a few times to identify the correct drive, after I was done with that drive I removed the drive letter in the diskpart command prompt using:
remove
Once I identified the EFI partition I navigated to where the bcd files were located using:
cd D:\EFI\Microsoft\Boot
and that path was D:\EFI\Microsoft\Boot as shown below, note your EFI partition may end up on a different drive letter using the ASSIGN command.
Now that I found the BCD, shown above, I removed the SYSTEM, READ ONLY and HIDDEN attributes from it before renaming it to bcd.old and then rebuilt the BCD.
1.24. How to Fix the WinX Menu Not Working on Windows
The WinX menu (also known as the Power User menu) lets you access essential Windows functions quickly. These functions include the Device Manager, Network Connections, and Power Options, to name a few. But what if this menu suddenly stops working?
If you're in this boat, we've explained a few fixes to get your Power User menu working again.
What Causes the WinX Menu to Stop Working?
Before discussing solutions, you must understand why this issue occurs in the first place. There could be several reasons:
Corrupted System Files: This is one of the most frequent causes. Windows relies on system files to operate correctly. If these files are missing or corrupted, you'll experience issues like this.
Conflict with Third-party Software: If you have recently installed new software on your system, it might cause conflicts with the Win + X menu functionality.
Faulty Keyboard: A faulty keyboard could also be the culprit. If the Win or X keys are not working, you won't be able to access the power user menu.
Now that you know the possible causes, it's time to get your Win + X menu working again. Let's start with the first fix!
1. Restart Your PC
If you're facing trouble with the Power User menu, try restarting your Windows computer. A restart refreshes your system and repairs software glitches that prevent the WinX menu from working correctly.
Once your PC has restarted, check if your Power User menu works fine.
2. Check the Win and X Keys on Your Keyboard
Sometimes the problem with key combination errors lies withing your keyboard. To ensure the Win and X keys aren't defective, open any text editor like Notepad and try pressing the keys individually.
If any of these keys aren't responding, try giving your keyboard a clean. Use a soft cloth to gently wipe the key and check if it works. You can also replace the keyboard if cleaning doesn't fix the issue.
3. Use the SFC and DISM Command Line Utilities
The System File Checker (SFC) tool scans your PC for corrupted system files and repairs them automatically. If your WinX menu isn't working because of missing system files, you can use this utility to fix the issue.
This Microsoft tool comes pre-installed with Windows, and you can run it from the Command Prompt.
If SFC fails to fix your Power User menu, use the Deployment Image Servicing and Management (DISM) tool. This command line utility repairs your Windows image (.wim) files and restores the system to a properly working state.
The DISM utility will take a few minutes to scan your system. Once it's done, reboot your computer and check if the Power User menu works normally.
Sometimes third-party programs conflict with Windows functions, causing problems. To check for such programs, follow these steps:
Press the Ctrl + Shift + Esc keys simultaneously. Doing this will launch Task Manager.
Once inside the Task Manager, switch to the Startup apps tab and disable third-party programs installed on your computer. For that, right-click on a program and select Disable.
After this, reboot your computer and see if it solves the issue.
If the Power User menu works after turning off startup apps, it confirms that one of these third-party programs is causing the issue. Now enable each program individually and check if it conflicts with your WinX menu. If it does, uninstall the program from your PC.
If disabling startup programs doesn't fix the issue, uninstall any recently installed programs. One of these programs may prevent the Power User menu from functioning correctly.
5. Remap the Shortcut Keys
This is another quick way to solve your WinX menu issue. You can remap the shortcut keys and assign them to other commands or functions.
To remap shortcut keys, you can use the Windows Registry Editor or keyboard mapping programs like SharpKeys and AutoHotkey. Both of these apps let you create custom key mappings quickly. If you aren't sure how to do that, read our guide on how to remap your keyboard layout on Windows.
6. Tweak the Registry Editor
You can also tweak the Windows Registry Editor to fix your WinX menu issue. The Windows registry is a database that stores all settings for your system. Modifying specific registry values can repair corrupted files and restore the Power User menu.
Before you continue, create a Windows registry backup. This way, you can restore the registry to its original state if anything goes wrong.
Once done, you're now ready to edit the registry:
Press Win + Q to launch the Windows search.
Type regedit in the search bar and press Enter to launch the Registry Editor.
If you're prompted for confirmation, select Yes to continue.
Navigate to the following path in the Registry Editor:
HKEY_CLASSES_ROOT\piffile
In the right pane of the registry, search for the IsShortcut key. If you find NoIsShortcut, right-click and rename it to "IsShortcut."
Close the Registry Editor and restart your computer. Now check if your WinX menu works correctly after rebooting your system.
7. Copy the WinX Folder From the Default User Profile
If the problem persists, you can copy the WinX folder from the default user profile and see if it solves the issue. Here's how to do it.
Press Win + E to launch File Explorer and navigate to the following path:
C:\Users\Default\AppData\Local\Microsoft\Windows
Copy the WinX folder and paste it to the same location, but this time in your user profile. In the below path, replace "YourUsername" with your Windows user account name:
If you're prompted for confirmation, select Yes to continue.
Now restart your computer and check if you can access the Power User menu. The Win + X shortcut keys should now work correctly.
Fixing the WinX Menu on Windows
Hopefully, one of these solutions has helped you fix the Win X menu problem on your Windows PC. If the issue persists, perform a system restore. This process will undo the recent changes made to your system and restore it to a previous working state.
If you don’t feel confident tinkering around with your system, it’s best to contact a computer technician and let them handle the issue for you.
Microsoft has finally rolled out the ever-controversial Recall feature, but not everyone is pleased with the idea of it. Here's how you can disable Recall if it is on, and how you can prevent Recall from re-enabling itself in the future.
What is Recall?
Recall is an AI-driven feature that allows your operating system to "remember" what you've done, where you placed files, and other activities.
It does that by saving snapshots of your desktop once every five seconds, then lets you search for information from those snapshots using natural language to help you remember what you were doing. Don't remember where you saw that recipe for bolognese? You can just ask Recall.
Recall has been the subject of controversy since it was first announced due to the potential security and privacy concerns. It also eats up a respectable amount of storage—you'll need at least 50GB free for Recall to work, and it'll automatically disable itself once your PC's free space drops below 25GB.
Microsoft claims the data is only processed locally (which is true, it works without an internet connection), but I'm still not a fan of having yet more of my data processed and analyzed.
How to Disable Recall
If feeding screenshots of your PC's activity to an AI isn't appealing, you can disable Recall.
To do that, press Windows+i to open the Settings app, then click "Privacy & security" in the left sidebar, then navigate to "Recall & snapshots."
Click the toggle below "Save Snapshots."
That should disable Recall.
However, since Windows features have a funny habit of activating after updates, there are a few things you can do to force Recall to stay off.
Prevent Recall from Activating by Removing Biometric Authentication
Recall requires more than just Windows Hello, which includes the PIN option. It requires you to use biometric authentication, which means your fingerprint or facial recognition. If you remove your biometric login information, Recall can't be activated, and it should prevent it from being spontaneously reactivated later.
Tired of punching in a password or PIN every time you log in? You can use your face with Windows Hello instead, if your webcam supports it.
To remove your biometric login data, press Windows+i, then head to Accounts > Sign-in Options. Click on a biometric option to see more options, then click the "Remove" button to delete it.
Once you've removed both facial recognition and fingerprint, Recall should disable itself, since you no longer meet the requirements. It should also prevent Recall from being reactivated.
Can You Delete Recall?
Not exactly. You can't forcibly delete something like "recall.exe" because it doesn't exist, though you can turn it off completely. Recall is built into explorer.exe, which is what gives you File Explorer, your taskbar, and the Start menu. It is an essential program if you plan to run Windows with a graphical user interface and not a command line.
You may find modified executables of explorer.exe that claim to remove the part related to Recall, but I'd strongly advise against trying them. That is an enormous security vulnerability and an exciting malware opportunity for someone with bad intentions. It isn't worth the risk.
If you want to turn off Recall, press the Windows key to open the Start menu, then search for Turn Windows Features On or Off and select the first option.
Scroll down until you see Recall, then untick the box next to it.
If you aren't satisfied with disabling and uninstalling Recall, your only long-term option is to switch operating systems, because it seems unlikely to go away any time soon.
You can forcibly disable Recall by disabling Device Encryption (or BitLocker), since encryption is required for Recall to function, but that would be extremely counterproductive.
Without encryption, all of the contents of your PC would be freely accessible to anyone that gained physical access to your drive and plugged it into another computer.
Opening a privacy and security vulnerability the size of the Pacific Ocean on your PC just to disable Recall because of privacy concerns is working against your own interests.
Recall is an interesting feature, and one that potentially has many benefits. However, until it has a proven safety and privacy record, it isn't a vulnerability I'm willing to create.
The Windows 11 taskbar gives access to frequently used apps, virtual desktops, the Start menu, and quick settings. If it stops working, you’ll likely have issues navigating your computer.
To quickly fix the stuck or unresponsive taskbar, open Task Manager and end the Windows Explorer service. However, the taskbar can also stop working due to a bad Window update, corrupt system files, and issues with system services. Depending on the issue, you'll need to try multiple solutions to fix the Windows 11 taskbar when it stops working or loading.
1. Restart Windows File Explorer
Windows Explorer is responsible for how you interact with the Windows 11 user interface. Restarting the service will reboot the GUI process and fix any temporary glitches causing the taskbar to stop working.
To restart a Windows Explorer service:
Press Win + X to open the WinX menu.
Click on Task Manager to open the app.
In Task Manager, open the Process tab and select Windows Explorer.
Click the Restart task button in the top right corner. Alternatively, right-click on Windows Explorer and select Restart.
Your screen may flicker for a moment as the Windows Explorer restarts. Your taskbar should start working now.
2. Reinstall and Re-Register All Windows Apps for All Accounts
The Windows 11 taskbar can stop working due to issues with the built-in apps and the user account. To fix the problem, you can reinstall and re-register all the built-in apps using a PowerShell cmdlet. Doing so will restore the taskbar to its working state.
To reinstall and register all Windows apps:
Press the Win key and type powershell.
Right-click on Windows PowerShell and select Run as administrator.
In the PowerShell window, type the following command and press Enter:
Windows will now try to reinstall and re-register all the built-in Windows apps. You’ll see an error message in red indicating the app already exists and cannot be reinstalled. Ignore the message and wait for the process to complete till you see the following line:
PS C:\Users\Administrator>
Close PowerShell and restart your computer. If you don’t want to perform a system reboot, restart Windows Explorer in Task Manager.
3. Uninstall the Recently Installed Windows Update
If the taskbar starts to act up after installing a Windows update, uninstall the update to see if it helps fix the issue. Feature Windows updates can sometimes break more things they intend to fix.
Fortunately, you can uninstall updates in Windows 11 using the update history feature. Update history shows all the recent updates installed for Windows 11. You may need to dig around a bit to find an update that coincides with when the taskbar stopped working. Next, uninstall the update and restart your PC to see if the taskbar is working again.
4. Close Conflicting System Services
Issues with some system services, such as searchhost.exe and runtimebroker.exe, can cause the taskbar to stop working. You can restart these services in Task Manager to resolve the issue.
In Task Manager, open the Details tab in the left pane.
Next, locate the following services. Right-click on each service and select End Task.
ShellExperienceHost.exe

	SearchIndexer.exe

	SearchHost.exe

	RuntimeBroker.exe
After you restart all the services, close Task Manager and restart your computer. After the computer restarts, check if the taskbar is working.
5. Enable XAML for Start Menu Using Registry Editor
Another nifty trick to fix the taskbar not working issue is to make the Start menu use XAML and resolve issues that may cause the menu to stop working.
It is a Windows 10 workaround, but it works on Windows 11 as well. That said, this method involves modifying Windows Registry. Incorrect modifications to the registry entry can cause system malfunction. Make sure to create a restore point and take a registry backup before you try the below steps.
To make the Start menu use XAML:
Press Win + R to open Run.
Type regedit and click OK. Click Yes if prompted by User Account Control.
In Registry Editor, navigate to the following location. You can copy and paste the registry path for quick navigation:
Next, in the left pane, right-click on the Advanced key and select New > DWORD (32-bit) Value.
Rename the value as EnableXamlStartMenu.
Next, double-click on the newly created EnableXamlStartMenu value to modify it.
Type 0 in the Value data field and click OK to save the changes.
Close Registry Editor and restart your PC.
6. Run System File Checker and DISM
Windows features a handful of system recovery and repair command-line utilities. System File Checker (SFC), for example, can scan your system for missing or corrupted files and repair them.
In addition, you can also use the Deployment Image Service Management (DISM) utility to fix the corrupt system Windows image and recover your Windows without reinstalling the operating system.
You can use a recent system restore point to restore your PC to an earlier point where the taskbar works. Restore point helps you recover Windows OS when a driver, feature, or application update breaks the system.
To use a restore point, make sure you have set up your PC to create automatic restore points. If yes, follow these steps to restore your OS using system restore. The Restore Points affects system files and applications. Your data will not be affected during the process.
Press Win + R to open the Run dialog.
Type rstrui.exe and click OK.
In the System Restore dialog, you may be prompted to use a recommended restore point. Ensure the restore point was created before the taskbar stopped working, and click Next.
Alternatively, select Choose a different restore point option and click Next.
Here, select the Show more restore points option to view all restore points available.
Select the most recent one but created before the date of the taskbar issue and click Next. If you want to view which programs will be affected, click on Scan for affected programs.
Read the description and click on Finish to confirm your restore point.
Your system may restart a few times when system restore is in progress. Leave the system idle and wait for the process to complete. When the system restarts, you’ll see a success message. If not, try again with the same or another restore point if available.
8. Create a New User Account
A corrupt user profile can cause some system functions to stop working. To fix the issue, create a new user account and try to access the taskbar.
You can create a new user account in Windows 11 from the Settings panel, using the User Accounts dialog, Command Prompt, and Local Users and Groups. Next, log in to your new user account and check if the taskbar works.
Easy Fixes to Restore the Windows 11 Taskbar
The Windows 11 taskbar is a vital cog in the operating system and makes it easy to navigate a complicated piece of software for both advanced and standard users. Fortunately, you can restart Windows Explorer in Task Manager to fix most issues with the taskbar.
If the issue persists, check and uninstall bad Windows updates, restart system services, reinstall Windows built-in apps, and perform a restore using restore points.
Active Directory (AD) is a crucial component of Windows networks, enabling centralized management of users, groups, and resources. Implementing AD effectively streamlines network administration and enhances security. This guide provides a step-by-step approach to deploying AD in your organization.
1. Planning and Preparation
Before diving into the installation process, it's essential to carefully plan your #AD deployment.
Define Requirements: Clearly outline your organization's #AD needs, including the number of users, groups, and resources to be managed.
Identify Domain Controllers: Determine the number of domain controllers (DCs) required, considering redundancy and geographical distribution if necessary.
2. Install Prerequisites
Ensure the servers designated for AD installation meet the hardware and software requirements.
Hardware Requirements: Verify that the servers have sufficient processing power, RAM, and storage capacity to handle the AD workload.
Software Requirements: Install the latest Windows Server operating system and ensure it's properly patched and updated.
DNS Configuration: Configure static IP addresses for the servers and ensure they are correctly configured for #DNS resolution.
3. Install Active Directory
On the designated primary domain controller (PDC) server, follow these steps:
Launch AD DS Setup: Open Server Manager and initiate the "Add Roles and Features" wizard. Select "Active Directory Domain Services" and proceed with the installation.
Configure Domain: During the installation process, choose "Create a new forest" and provide a unique domain name.
Promote to Domain Controller: Once the installation is complete, promote the server to a domain controller using the "Promote this server to a domain controller" wizard.
4. Initial Configuration
After successful installation, perform the following initial configuration tasks:
Server Reboot: Restart the server to ensure proper initialization of AD services.
Replication Verification: Validate replication between DCs to maintain data consistency.
5. Roles and Features Configuration
Enable the necessary AD roles and features based on your organization's requirements:
Directory Services: This core role provides the foundation for AD functionality.
Group Policy Management: Manage and enforce group policies across the domain.
Certificate Services: Issue and manage digital certificates for secure authentication and communication.
6. Workstation Joining
Join workstations to the newly created Active Directory domain:
System Configuration Wizard: Utilize the "System Configuration Wizard" on each workstation to join the domain.
7. User and Group Management
Create and manage users, groups, and computers within the AD domain:
Active Directory Users and Computers: Employ this management tool to add, modify, and remove #users, #groups, and computers.
8. Security Configuration
Implement robust security measures to protect your AD environment:
Complex Passwords: Enforce strong password policies to prevent unauthorized access.
Account Lockout Policies: Implement account lockout policies to mitigate brute force attacks.
Regular Security Audits: Conduct regular security audits to identify and address potential vulnerabilities.
9. Monitoring and Maintenance
Establish ongoing monitoring and maintenance practices to ensure AD's health and availability:
Monitoring Tools: Utilize monitoring tools to track AD performance, resource utilization, and event logs.
Regular #Backups: Schedule regular backups of the AD database to safeguard against data loss.
Disaster #Recovery Plan: Develop a comprehensive disaster recovery plan to restore AD in case of a major outage.
10. Staff Training
Provide training to relevant personnel on managing and utilizing Active Directory effectively:
System Administrators: Train system administrators to handle AD administration tasks, including user management, group policies, and security configurations.
#HelpDesk Technicians: Equip help desk technicians with the knowledge to assist users with AD-related issues, such as password resets and access permissions.
Additional Tips for a Successful AD Deployment:
Document Your Configuration: Maintain detailed documentation of your AD configuration, including domain structure, user groups, and security settings.
Leverage Best Practices: Adhere to industry best practices for AD deployment and management to ensure optimal performance and security.
Seek Expert Guidance: Consider consulting with experienced IT professionals for assistance with complex AD deployments or troubleshooting issues.
By following these comprehensive steps and incorporating additional tips, you can successfully deploy and manage Active Directory, enabling centralized control, enhanced security, and streamlined network administration for your organization. Remember to adapt this guide to your specific organizational needs and infrastructure.
2.2. Windows Active Directory Step by Step Installation Guide
Last Update: October 3, 2024 Post Views: 2919
Windows Active Directory (AD) is a service developed by Microsoft for Windows domain networks. It is included in most Windows Server operating systems as a set of processes and services. Initially, Active Directory was used only for centralized domain management. However, Active Directory eventually became an umbrella title for a broad range of directory-based identity-related services.
Directory services have become more critical to managing IT infrastructure as networking resources have grown. Microsoft Windows Active Directory is one of the most well-known directory services, and ADDS has established itself as a standard tool among network administrators. Here we will demonstrate how to set up Active Directory on Windows Server 2016 step-by-step. The same steps can be followed for installing Microsoft active directory on Windows 2019 and 2022 server's.
Requirement to install AD
There must be enough space on the NTFS partition
An Administrator’s username and password
the correct version of the operating system
A network interface controller (NIC)
An IP address, subnet mask, and - if desired - a default gateway configured adequately.
An Internet connection
Name of the domain you wish to use
The Windows 2016 Server CD media.
Here is how you can create and configure user profiles for Windows Server 2016 by using Active Directory Domain Services.
Give a name like 'dc' and click on OK
Select "use the following IP address" and "use the following DNS" and Give IP Address and DNS
Log on to Windows Server machine.
Navigate into Server Manager.
Click Manage -> Add roles and features.
Click on Next
Select the type of installation - Role-based or feature-based - then click Next.
Select the Server as below
Click on Active Directory Domain Services
Click on Next
Click on Next
Select restart and click on Install
Click on Close
Click on promote this server to a domain controller
Click on Add a new forest and give Root domain name (example attari.com)
Type in DSRM password
Click on Next
Give NetBIOS Name and Click on Next
Click on next
Click on next
Click on Install
Suppose you are a fresh graduate or desktop engineer who wants to gain practical knowledge of Microsoft Windows Server ( MCSE ), In that case, you can enroll in this course with Attari Classes , which offers live instructor-led training, recorded lectures for backup purposes, and trainer support via WhatsApp.
You might be looking into the possibility to convert the Windows Server Evaluation edition to the retail edition. We'll look at how to install a license key to transform Windows Server 2019 from the Evaluation version to the retail one.
Microsoft calls this license conversion. In some releases of Windows Server, you can also freely convert among OEM, volume-licensed, and retail versions with the same command and the appropriate key.
Cases in which you run an evaluation and then need to convert it to retail are numerous. Yes, this is really useful for environments created for a proof-of-concept (POC) purpose that then decide to go to production. In such cases, it's a great time-saver because you don't have to start from scratch.
Some features of Windows Server 2019 need the Datacenter edition instead of the Standard edition installed. You should know you can also convert the Standard to the Datacenter edition without reinstalling, and this post will show you how.
The possibility of converting a Microsoft OS isn't new, but previously, back in the day, this was not really possible.
Although in this post we'll focus only on converting licenses or editions, you might be looking also for upgrade options. There's support for some use cases but not others.
Supported and unsupported cases
There are situations when an upgrade won't work. Let's have a look.
If you think that upgrading between server versions is easy, it might be in some situations. You should not underestimate it. But you need to be aware of some considerations first.
Here are a couple of known facts about upgrading from a previous release of Windows Server (WS 2012 or WS 2016):
There's no support for upgrading from one language to another. You'll have to upgrade to the same language. You can then change the language UI only.
If you have a domain controller (DC), you'll need to run a Forestprep and Domainprep prior to the upgrade. You should follow the usual Microsoft checklist concerning DCs before the upgrade.
There's no support for converting the Core edition to Server with the UI, even though some sources have been saying Microsoft will finally implement this in WS 2019. They have not.
You can't downgrade from Standard back to Eval. There's no support for upgrading from a previous Windows Server installation to an evaluation copy. You can and should install evaluation versions as clean installs.
You can convert the evaluation version of Windows Server 2019 Standard to either Windows Server 2019 Standard (retail) or Datacenter (retail).
Upgrade Windows Server 2019 Evaluation to Full
If you have installed Windows Server 2019 StandardEvaluation or DatacenterEvaluation, you have essentially only 180 days to test any features of the new server platform version. This might be enough for some but not for others.
During this period, all features of Windows Server 2019 are fully working and available. However, after the trial period is over, the system starts to ask for activation and powers down every hour. This is quite annoying.
The Windows License expiration notice displays on regular basis.
This edition cannot be upgraded
First, check the version that's running with this command:
DISM /online /Get-CurrentEdition
You'll see a message about the edition you currently have.
Get the current edition
Now we can get the list of editions you can convert your current Eval edition to:
DISM /online /Get-TargetEditions
And you should get this output:
Get target editions
To upgrade to the edition you want, you can run a PowerShell command to perform the actual edition upgrade. You'll need, however, a valid serial number to do this.
You'll get a prompt to reboot the server during which the server will change its edition.
The server will run through the image-conversion process and then restart twice. After the server reboots, you'll need to reactivate it and enter the key again.
How to convert the Standard edition to Datacenter
This is basically the same process as above. The main difference is the system we're on is on Standard already, not Eval.
We'll be using PowerShell, even if apparently other ways exist. From an elevated command prompt, use this command:
DISM /online /Get-CurrentEdition
You'll see a message about the edition you currently have.
Get the current edition Standard
Then simply run this command, which is the same as the one to go from Eval Standard to Datacenter:
You must enter a valid product key to continue with the upgrade process. It'll ask you to reboot.
It's worth noting that if you've used an evaluation edition to build a DC for your POC, you can't change the edition. You'll either need to build a new DC, demote the evaluation edition DC, or convert Eval to Standard (or Datacenter) and then promote it again for a DC.
You can also use this command to change your edition between other types, such as Datacenter or Essentials.
Subscribe to 4sysops newsletter!
By simply running a few PowerShell commands, you can check the currently installed edition, see which version you can upgrade to, and also run the actual upgrade PowerShell command.
There are two tools you can use to administer a fax server in Windows Server 2012: Server Manager and Fax Service Manager. You can use Server Manager to install the Fax Server server role, the fax printer, and the Fax Service Manager. Server Manager also displays fax-related events from the Event Viewer and includes an instance of the Fax Management snap-in, which can administer the local fax devices only.
Fax Service Manager provides a single interface that administrators can use to efficiently administer fax resources and is the primary focus of this article.
What is a fax server?
A fax server is comprised of four different parts: the Fax Server role, Fax service, Fax Service Manager, and Windows Fax and Scan.
Fax Server server role. To create a fax server, you must install the Fax Server server role from Server Manager. This installs Fax Service Manager, Windows Fax and Scan, the fax printer, and the Fax service. After you install the Fax Server server role, you can access a role page in Server Manager that provides a single point from which you can view fax events, view status information for the Fax service, and access resources and additional information for fax servers. To access this page in Server Manager, click Fax Server in the left pane. The role page appears in the right pane.
Fax service. After you install the Fax Server server role, the Fax service appears in the Services snap-in and you can start or stop the service directly from there or from the Fax Server server role page in Server Manager.
Fax Service Manager. Fax Service Manager, a Microsoft Management Console (MMC) snap-in, provides a central administration point for configuring and managing your fax resources. After you install the Fax Server server role, you can access Fax Service Manager from Server Manager by clicking Tools, clicking Fax Service Manager. You can also access this snap-in by adding it to an MMC console.
Windows Fax and Scan. After you install the Fax Server server role, you can access Windows Fax and Scan by clicking the Start charm, and then clicking Windows Fax and Scan. On a fax server, you can use Windows Fax and Scan to send faxes, add accounts, and to monitor the incoming fax queue, the inbox, and the outbox. Users who are using computers running windows client operating systems can use this feature to send faxes and configure fax receipts.
This guide is targeted at the following audiences:
Fax administrators and help desk professionals.
Information technology (IT) planners and analysts who are evaluating the product.
Enterprise IT planners and designers.
Benefits of a fax server
The Fax Server server role can save the fax administrator a significant amount of time. Instead of installing fax machines on client computers and managing and monitoring fax machines, you can complete those tasks in 2 or 3 steps on multiple computers simultaneously and remotely.
By using Fax Service Manager, you can automatically make fax connections available to users and computers in your organization.
Requirements for using the Fax service
All of the fax-related parts discussed in the previous section are available in all versions of Windows Server 2012 and are compatible with its basic system requirements. To determine your fax capacity needs, use performance counters, testing in the lab, data from existing hardware in a production environment, and pilot rollouts.
Important
Fax Server requires a Server with a GUI installation. You cannot install Fax Server on a Server Core Installation or a Minimal Server Interface installation. For more information about server installation options, see Windows Server Installation Options.
Deploying a fax server
The following sections provide information about how to deploy a fax server and attach fax devices:
To use Fax Service Manager, you must install the Fax Server server role.
Before you begin installing the Fax Server server role, make sure that any modem devices have been installed on the server. If you plan to install a new modem device, you can save time by installing it before you set up the Fax Server role. We recommend that you install the Fax Server role locally and not by using a Remote Desktop connection. You can install the Fax Server role remotely, but you need to make sure that local resource sharing is turned off. Remote management is not supported. To administer a Fax Server, you must do it from the local console.
To install the Fax Server server role
In the task bar, click Server Manager.
In the menu bar, click Manage, and then click Add Roles and Features.
On the Before you begin page, read the text and click Next.
On the Select installation type page, ensure Role-based or feature-based installation is selected and click Next.
On the Select destination server page, ensure the target server is selected and click Next.
On the Select Server Roles page, select the Fax Server check box. When you do this, a dialog box displays the tools and services that also need to be installed with the Fax Server server role. Click Add Features, then click Next on the Select server roles page.
On the Select features page, click Next.
On the Fax Server page, read the text and then click Next.
On the Confirm installation selections page, click Install.
When the installation completes, click Close and restart the server.
From Server Manager, click the Notifications flag, and click Perform additional configuration in the Fax Server notification. The Microsoft Fax Service Manager opens.
Right-click Accounts, select New, and click Account.
Add any users that you want to allow to send and receive faxes using this server.
Note
The members of the local Administrators group are added automatically to the Fax Users group and cannot be removed. (The local Administrators group is also separately granted full permissions for the Fax service.) Membership in this group can be modified later by using Fax Service Manager.
Right-click the Start charm, and click Control Panel.
In the Control Panel search box, type phone and then click Phone and Modem.
In the Location Information dialog, type the information for your country/region, area/city code, carrier code, information to dial an outside line, and whether you use tone or pulse dialing.
Step 2: Install and share a fax printer
When you install the Fax Server server role, if you have not attached a fax device to the computer, a local fax printer connection, Fax, is automatically created in the Printers folder in Control Panel. Follow the steps in this procedure to share the printer so that users can connect.
This procedure describes how to create a new fax printer, and then share the printer so that your users can find it.
Note
To install fax devices, such as a fax printer, you must be a member of the Administrators group or you must have been delegated the appropriate authority.
To create and share a new fax printer
Click the Start charm, right-click the Windows Fax and Scan tile, and then click Run as administrator.
Click Tools, and then click Fax Accounts.
In Fax Accounts, click Add to open Fax Setup.
On the Choose a fax modem or server page, click Connect to a fax modem.
You might be asked to install a printer. To do this, follow the instructions in the Add Hardware Wizard.
On the Choose a modem name page, type a name for the fax printer, and then click Next. The default name is Fax Modem.
On the Choose how to receive faxes page, click the option that you prefer.
The new fax printer should appear in Fax Accounts, under Account Name.
Then, to share the printer that has been created, right-click the Start charm, and then click Control Panel.
Under Hardware, click View devices and printers.
In the list of printers, right-click Fax, click Printer properties, click the Sharing tab, select Share this printer, and then type a name for the printer that you want your network users to see.
If you want to enable users with computers running different versions of Windows to use this printer, click Additional Drivers to install the needed drivers.
In Additional Drivers, select the check box for the versions of Windows that you want to support. You are prompted to provide a path to the driver. Provide the path to the %windir%\System32\DriverStore\FileRepository\prnms002.inf* file on a computer that is running the version of Windows that you want to support.
To confirm that the files were copied properly, in Windows Explorer navigate to %windir%\System32\spool\drivers\ and look for the folder that contains the files for the selected architectures.
Important
Because the Fax service uses remote procedure calls (RPCs), you must ensure that the firewall on the server will allow RPCs. Typically, when you add an account to the Fax service, Fax Setup in Windows Fax and Scan will ask the user to unblock RPC so that the firewall is unblocked for fax communication. You can also configure the firewall directly at any other time in Windows Firewall by verifying that Windows Fax Service is in the exceptions list. If you are sharing the Fax service, make sure that File and Printer Sharing are also added to the exceptions list. For more information see Windows Firewall with Advanced Security Overview.
Step 3: Add and remove fax devices
Windows recognizes any newly installed Plug and Play fax device during service startup. After the device is installed, restart the Fax service and refresh the display. The new device will automatically appear in Fax Service Manager. To remove a device, remove it as you would any device using Device Manager, restart the Fax service, and refresh the display.
To refresh the Device list and view the updated display
Open Server Manager, click Tools, and then click Fax Service Manager.
In the left pane, right-click Fax, and then click Stop.
In the left pane, right-click Fax, and then click Start.
Press F5 to refresh the display.
Double-click Devices and Providers, and then click Devices.
In the right pane, view the list of devices.
Step 4: Configure fax devices to send and receive
By default, a fax device is enabled to send when it is installed. However, if needed, you can also enable a device to send later. As part of this process, you can specify an optional Transmitting Subscriber ID (TSID) string, a text string that identifies the device sending the fax. The identification information typically appears in the banner in a fax message to help the recipient determine where the fax originated.
You must specifically enable a fax device to receive—it is not enabled by default. A fax device can be configured to answer incoming calls automatically or manually. (The manual option is useful if your fax and telephone share the same incoming line.) And you can specify the number of rings before answering. (A higher number of rings before answering is useful if your fax and telephone share the same incoming line, to give you time to answer the telephone.)
As part of this process, you can also specify an optional Called Subscriber ID (CSID) string, a text string used to identify a fax recipient to a fax sender.
Important
To configure fax devices, such as a fax printer, you must be a member of the Administrators group or you must have been delegated the appropriate authority.
To enable a fax device to send
Open Server Manager, click Tools, and then click Fax Service Manager.
In the left pane, double-click Devices and Providers, and then click Devices.
In the right pane, right-click the device you want to configure, and then click Send.
To configure a Transmitting Subscriber ID (TSID), right-click the device you want to configure, and then click Properties.
On the General tab, in Transmitting Subscriber ID (TSID), type a TSID string. This string is limited to 20 characters.
Note
Later, if you want to disable the fax device from sending faxes, right-click the device, and then click Send to clear the check mark.
To enable a fax device to receive
Open Server Manager, click Tools, and then click Fax Service Manager.
In the left pane, double-click Devices and Providers, and then click Devices.
In the right pane, right-click the device you want to configure, click Properties, and then click the General tab.
To configure whether calls are answered automatically or manually, select the Receive faxes check box, and then do one of the following:
Click Automatic Answer to enable the fax device to answer calls automatically, and then type a number for the value in the Rings before answering field. The default number of rings is 5. If your fax and telephone do not share a line, you should decrease this number. If your fax and telephone do share a line, and you decide to increase this number, do not increase it so much that the fax sender stops transmission.
Click Manual Answer to enable the fax device to answer calls manually.
To configure a Called Subscriber ID (CSID), in Called Subscriber ID (CSID), type a CSID string. This string is limited to 20 characters.
Important
Later, if you want to disable the fax device from receiving faxes, right-click the device, and then clear either the Auto Receive or Manual Receive check box.
Step 5: Configure fax settings
You can use Fax Service Manager to configure fax settings, including routing rules and Simple Mail Transfer Protocol (SMTP) settings. For outgoing faxes, you can also configure receipts, whether you will enable your users to create and use personal cover pages, and what your organization will include in the banners of sent faxes.
Configure incoming fax settings
Fax administrators have full control over the incoming fax queue. This queue is the collective queue for all receiving fax devices that are managed by the fax server—it corresponds to the Incoming folder. Users who are not members of the Administrators group need to be assigned permissions to view or manage the incoming fax queue.
A fax remains in the incoming fax queue until it is received successfully and routed in accordance with the policy specified by the fax administrator. Only then is it moved to the inbox. If a fax is not routed successfully for some reason, it remains in the incoming fax queue until it is deleted manually—or it is handled in accordance with the automatic deletion policy that you have configured for the fax queue.
You can control incoming fax jobs handled by the Fax service by disabling the reception of faxes into the incoming fax queue. If the reception of a fax is stopped while being received, but a portion of the fax is successfully received, the fax is assigned the Partially received status and is moved to the Inbox folder.
Note
You can view the Incoming and Inbox folders by using Windows Fax and Scan.
Start or stop fax reception
You can start or stop the reception of faxes for all devices on a fax server.
To start or stop fax reception
Open Server Manager, click Tools, and then click Fax Service Manager.
In the left pane, right-click Fax, and then click Properties.
On the General tab, select Disable reception of new faxes to block new faxes from being added to the incoming fax queue.
Configure incoming fax routing
Administrators can configure incoming fax routing methods to route incoming faxes to recipients on the network. In Fax Service Manager, there are incoming fax routing extensions that are global (applied to all devices) and others that are associated with just individual fax devices. For global methods, you can set the priority order in which they are applied to an incoming fax. Non-Microsoft vendors can extend the global methods for incoming faxes. Extensions could include, for example, converting incoming files to specific file formats.
Individual incoming fax routing methods are configured per device. After a method is configured, it can then be enabled or disabled. More than one incoming fax routing method can be applied to incoming faxes, and if a method is disabled, the device skips that method and processes the incoming fax in order of global-level priority. A disabled incoming fax routing method appears with an icon (an arrow pointing down) over it in the right pane.
The following default incoming fax routing methods can be configured and prioritized:
Route through e-mail. Specify the e-mail address for receiving incoming faxes. To change SMTP server or authentication settings, use Fax Service Manager for configuring delivery receipts for sent faxes.
Store in a folder. Specify the local or network path of the folder to which a copy of incoming faxes will be saved. If you choose this method, make sure that the folder you use has access to the Network Service account.
Print. Specify the Universal Naming Convention (UNC) path of the printer location (\\<network_location>\<printername>) to which incoming faxes will be printed.
You can use incoming fax routing methods to control what happens to faxes that are received by a fax device managed by the fax server. You can use any combination of routing methods to forward received faxes to an e-mail address, store faxes in a folder, or print faxes.
To configure incoming fax routing methods
Open Server Manager, click Tools, and then click Fax Service Manager.
In the left pane, double-click Devices and Providers, double-click Devices, double-click the device you want to configure, and then click Incoming Methods.
In the right pane, right-click the method you want to configure, click Properties, and then do the following:
To configure the Store in a folder method, click the Store in Folder tab, and then either type the UNC path of the folder (\\<network_location>\<folder>), or click Browse to select the folder.
To configure the Route through e-mail method, click the E-mail tab, and then type the e-mail address to which you want incoming faxes to be delivered.
For the Print method, click the Print tab, and then type the UNC path of the printer for incoming faxes.
After the incoming methods have been configured, in the details pane, right-click each method, and then click Enable to enable the method, or Disable to disable it. (You might want to disable a method if, for example, you want to temporarily disable printing because the printer is not working and faxes are getting stuck in the inbox.)
Configure SMTP settings for e-mail routing
You should use this procedure if you have chosen to configure the Route through e-mail method for a fax device.
To configure SMTP settings for e-mail routing
Open Server Manager, click Tools, and then click Fax Service Manager.
In the left pane, right-click Fax, and then click Properties.
To enable incoming faxes to be routed to recipients by e-mail, click the Receipts tab and then do the following:
Select the Use these SMTP settings for the Route Through E-mail incoming routing method check box.
In From e-mail address, type the e-mail address to which all incoming faxes will be received.
In Server address, type the address of the SMTP server to which incoming faxes will be received.
In Port, type the port number.
Also on the Receipts tab, click Authentication, and then, based on how your SMTP server is set up, do one of the following:
Click Anonymous access if this is sufficient to access the SMTP server.
Click Basic authentication, click Credentials, and then type a user name and password.
Click Integrated Windows Authentication if NTLM authentication is needed to access the SMTP server, click Credentials, and then type a user name and password.
Configuring outgoing fax settings
You can use Fax Service Manager to configure and manage how faxes are sent and archived, what is included as part of the fax transmission, whether receipts are issued, and rules for routing.
Note
You can monitor outgoing faxes in the Outbox folder in Windows Fax and Scan.
Start or stop outgoing faxes
You can start or stop sending faxes for all devices on a fax server.
To start or stop outgoing faxes
Open Server Manager, click Tools, and then click Fax Service Manager.
In the left pane, right-click Fax, and then click Properties.
On the General tab, do the following:
Select Disable submission of new outgoing faxes to prevent users from submitting new faxes to the Outgoing folder. Clear this check box to restart fax submissions.
Select Disable transmission of outgoing faxes to prevent faxes from being sent from the Outgoing folder. Clear this check box to restart fax transmissions.
Configure the outbox and outgoing transmissions
The outbox folder is the queue of all faxes that are waiting to be sent or are in the process of being sent. If you send faxes using multiple fax devices, the outbox is the collective queue for all these devices. After a fax is sent successfully, it is moved to the archive.
You can view the Outbox folder by using Windows Fax and Scan.
Administrators can use Fax Service Manager to configure the following properties for the outbox and outgoing faxes:
Include banner. You can add a banner to outgoing faxes. A banner is text that is added to each page of a transmitted fax. The banner format cannot be modified. However, if all the banner information does not fit, a shorter version appears. Information in a banner includes:
Date and time of transmission
TSID of sender
Recipient phone number (full version of banner only)
Page of total pages
Allow use of personal cover pages. You can enable users to attach custom cover pages to outgoing faxes. If you do not enable this feature, then users connecting to a fax server with a remote fax printer connection can only choose cover page templates located on the fax server computer.
Use device Transmitting Subscriber ID (TSID). You can specify that the TSID specified for the device should be used. If you do not enable this option, the TSID used in the outgoing fax is the sender's fax number, as specified on the Sender Information properties page. However, if you send a fax programmatically, the TSID parameter specified in the application programming interface (API) will be used instead of the sender's fax number.
Number of retries. You can set the number of retries for attempting to resend faxes following an unsuccessful connection attempt or transmission failure. If the maximum number of retries is reached, the outgoing fax remains in the outbox until it is deleted or until you restart the failed transmission.
Retry after. You can set the number of minutes between attempts to retry fax transmission. When the maximum number of retries has been exhausted, the user can restart the transmission, which resets the transmission attempts.
Discount rate start and stop. You can specify times when discount rates for the fax line apply and send faxes during these times. A discount rate fax job can never start transmission outside the specified discount period. However, for a long fax, a discount rate fax job might have some part of its transmission outside the specified discount period.
Automatically delete faxes older than. You can specify that failed faxes in the fax queue should be automatically deleted periodically. The fax queue consists of the Outbox folder and Incoming folder.
To configure the outbox and outgoing fax transmissions
Open Server Manager, click Tools, and then click Fax Service Manager.
In the left pane, right-click Fax, and then click Properties.
On the Outbox tab, do the following:
Select Include banner to print transmission information on the edge of each page of outgoing faxes.
Select Allow use of personal cover pages to allow users to use cover pages from their personal cover pages folder when sending faxes.
Select Use device Transmitting Subscriber ID (TSID) to include identification information about a fax device to a fax recipient.
In Number of retries, enter the number of times to attempt to resend a failed outgoing fax.
In Retry after, enter the number of minutes to wait before trying to resend a failed outgoing fax.
In Discount rate start, specify the time at which discount line rates will be taken into account when sending faxes.
In Discount rate stop, specify the time at which discount line rates will no longer be taken into account when sending faxes.
Select Automatically delete faxes older than <number> days to set a duration to automatically delete failed faxes that are not sent and remain in the outbox.
Configure fax delivery receipts
Delivery notification receipts provide users with information about the success or failure of their sent faxes. The following options can be configured for delivery receipts:
Enable SMTP e-mail receipts delivery. An e-mail receipt is sent to the user who sent the fax, to confirm whether the fax has been sent correctly. To configure this option, you must specify an e-mail address from which receipts will be sent to fax senders, the IP address of the SMTP server, and the port number of the SMTP service. You must also select the appropriate authentication method for accessing the SMTP server. The following authentication methods can be chosen:
Anonymous access. All users can access the SMTP server, which in effect disables authentication.
Basic authentication. You can specify a user name and password for access to the SMTP server. The password is sent over the network in standard text.
Integrated Windows Authentication. You can specify a user name and password for access to the SMTP server using Integrated Windows Authentication.
After this receipt option is enabled and configured, a user who sends a fax by using Windows Fax and Scan (or using Fax Console in Windows XP) can request an e-mail to confirm that the fax was sent without error.
To configure delivery receipts for sent faxes
Open Server Manager, click Tools, and then click Fax Service Manager.
In the left pane, right-click Fax, and then click Properties.
On the Receipts tab, select the Enable SMTP e-mail receipts delivery check box and then do the following:
In From e-mail address, type the e-mail address from which the receipt will be sent.
In Server address, type the IP address of the SMTP server from which the receipts will be sent.
In Port, type the port number.
Also on the Receipts tab, click Authentication, and then, based on how your SMTP server is set up, do one of the following:
Click Anonymous access if this is sufficient to access the SMTP server.
Click Basic authentication, click Credentials, and then type a user name and password.
Click Integrated Windows Authentication if NTLM authentication is needed to access the SMTP server, click Credentials, and then type a user name and password.
Configure outgoing routing
You can use Outgoing Routing in Fax Service Manager to configure routing rules for outgoing faxes to optimize use of available fax devices. To do this, you can create rules to associate a device or group of devices with faxes sent to a specific domestic area code or to a specific country/region.
Create a fax device group
You can use Fax Service Manager to create groups of one or more fax devices, and then associate outgoing rules with these groups. For example, you can designate specific fax devices to send faxes to only specific destinations.
By default, there is a group, All devices, that cannot be deleted. You can add or remove groups, or devices from groups, at any time. A device can also belong to one or more groups simultaneously.
When you create a new group, it is not active until you add a fax device to it. Groups that do not contain devices display a mark over the group folder icon.
Outgoing faxes are routed to groups according to the outgoing routing rules. Fax Service Manager notes the destination of the fax, routes it to the appropriate group, and accesses the first available device in that group for transmission.
To create or delete a fax device group
Open Server Manager, click Tools, and then click Fax Service Manager.
In the left pane, double-click Fax, double-click Outgoing Routing, right-click Groups, point to New, and then click Group.
In the Add New Group dialog box, type a group name then click OK.
To later delete the group, right-click the group name, and then click Delete.
Add or remove a fax device in a group
To perform this procedure, you must first have created a group. You can add or remove devices from groups at any time. A device can also belong to one or more groups simultaneously. Fax devices in a group can be sorted into priority order, so that the highest priority device in a group will attempt to send a fax first. If it is busy, the next highest priority device will attempt to send.
To add or remove a fax device in a group
Open Server Manager, click Tools, and then click Fax Service Manager.
In the left pane, double-click Fax, double-click Outgoing Routing, and then double-click Groups.
Right-click the group to which you want to add a device, point to New, and then click Device(s).
In Add New Device(s), click the device that you want to add, and then click OK.
To change the priority order of devices within a group, in the right pane, right-click a device, click Move Up or Move Down, and then click Yes to confirm.
To later remove the device from the group, in the right pane, right-click the device, and then click Delete.
Add or delete a fax routing rule
You can use Fax Service Manager to create rules for routing outgoing faxes. For example, you can create a group for local destinations and another for domestic long distance destinations, or a group for a specific foreign destination.
Using these rules helps you ensure that your fax devices are used efficiently, and outgoing faxes do not spend idle time in queues. If all of the devices in a group are constantly busy, or if faxes accumulate within queues, check the group and rule configurations.
To add or delete a routing rule for outgoing faxes
Open Server Manager, click Tools, and then click Fax Service Manager.
In the left pane, double-click Fax, and then double-click Outgoing Routing.
Right-click Rules, point to New, and then click Rule.
In Add New Rule, if you know the country/region code, type it in Country/region code. If you are not sure of the code, click Select. In the list, click a country/region, and then click OK.
In Area code, select Specific to limit the rule within the selected country/region, and then type the area code, or select All areas to apply the rule to the entire country or region.
In Target device, if you want the rule to apply to a specific device or routing group, do one of the following:
If you want the rule to apply to a device, select Device, and then select a device from the list.
If you want the rule to apply to a routing group, select Routing group, and then select a group from the list.
Step 6: Set up user accounts
User accounts
Windows Server 2012 provides fax-related user accounts for more privacy and better organization and management of faxes. Users can use accounts for accessing different types of fax services such as the local fax modem and a fax server.
Your users must have an account to be able to access a fax server running Windows Server 2012. You can configure a fax server so that when a user uses Windows Fax and Scan for the first time to send a fax, an account is automatically created. If you use this option, as soon as a user connects to the fax server, the account is automatically created.
If you want to limit users connecting to the fax server, you can disable this setting, in which case you must manually create the user accounts for all the users who need to access the fax server. In such a setting, if a user tries to connect to the server without having an account already, the connection attempt fails.
To automatically create a user account for a fax server
Open Server Manager, click Tools, and then click Fax Service Manager.
In the left pane, right-click Fax, and then click Properties.
On the Accounts tab, select the Auto-create accounts on connection check box so that an Administrator does not need to explicitly create each user account.
In Reassign Setting, do one of the following:
Click On if you want messages that are received to be reassigned to individual accounts.
Click Off if you want to allow all accounts to access the fax server inbox and view incoming messages.
You can also add or delete user accounts directly.
To manually add a user account for a fax server
Open Server Manager, click Tools, and then click Fax Service Manager.
In the left pane, double-click Fax, and then click Accounts.
In the right pane, view the existing accounts, and then determine which new accounts you want to add.
To add a new account, right-click Accounts, click New, and then click Account.
In Create New Account, provide a user name and domain, and then click OK.
To later delete an account, right-click the account, and then click Delete.
2.6. [MS-FAX]: Fax Server and Client Remote Protocol
[MS-FAX]: Fax Server and Client Remote Protocol
Article
04/23/2024
Specifies the Fax Server and Client Remote Protocol. It is an RPC-based, client-server protocol, and is used to send faxes and to manage the fax server and its queues.
This page and associated content may be updated frequently. We recommend you subscribe to the RSS feed to receive update notifications.
From time to time, Microsoft may publish a preview, or pre-release, version of an Open Specifications technical document for community review and feedback. To submit feedback for a preview version of a technical document, please follow any instructions specified for that document. If no instructions are indicated for the document, please provide feedback by using the Open Specification Forums.
The preview period for a technical document varies. Additionally, not every technical document will be published for preview.
A preview version of this document may be available on the Windows Protocols - Preview Documents page. After the preview period, the most current version of the document is available on this page.
Development Resources
Find resources for creating interoperable solutions for Microsoft software, services, hardware, and non-Microsoft products:
Intellectual Property Rights Notice for Open Specifications Documentation
Technical Documentation. Microsoft publishes Open Specifications documentation (“this documentation”) for protocols, file formats, data portability, computer languages, and standards support. Additionally, overview documents cover inter-protocol relationships and interactions.
Copyrights. This documentation is covered by Microsoft copyrights. Regardless of any other terms that are contained in the terms of use for the Microsoft website that hosts this documentation, you can make copies of it in order to develop implementations of the technologies that are described in this documentation and can distribute portions of it in your implementations that use these technologies or in your documentation as necessary to properly document the implementation. You can also distribute in your implementation, with or without modification, any schemas, IDLs, or code samples that are included in the documentation. This permission also applies to any documents that are referenced in the Open Specifications documentation.
No Trade Secrets. Microsoft does not claim any trade secret rights in this documentation.
Patents. Microsoft has patents that might cover your implementations of the technologies described in the Open Specifications documentation. Neither this notice nor Microsoft's delivery of this documentation grants any licenses under those patents or any other Microsoft patents. However, a given Open Specifications document might be covered by the Microsoft Open Specifications Promise or the Microsoft Community Promise. If you would prefer a written license, or if the technologies described in this documentation are not covered by the Open Specifications Promise or Community Promise, as applicable, patent licenses are available by contacting iplg@microsoft.com.
License Programs. To see all of the protocols in scope under a specific license program and the associated patents, visit the Patent Map.
Trademarks. The names of companies and products contained in this documentation might be covered by trademarks or similar intellectual property rights. This notice does not grant any licenses under those rights. For a list of Microsoft trademarks, visit www.microsoft.com/trademarks.
Fictitious Names. The example companies, organizations, products, domain names, email addresses, logos, people, places, and events that are depicted in this documentation are fictitious. No association with any real company, organization, product, domain name, email address, logo, person, place, or event is intended or should be inferred.
Reservation of Rights. All other rights are reserved, and this notice does not grant any rights other than as specifically described above, whether by implication, estoppel, or otherwise.
Tools. The Open Specifications documentation does not require the use of Microsoft programming tools or programming environments in order for you to develop an implementation. If you have access to Microsoft programming tools and environments, you are free to take advantage of them. Certain Open Specifications documents are intended for use in conjunction with publicly available standards specifications and network programming art and, as such, assume that the reader either is familiar with the aforementioned material or has immediate access to it.
This list gives you a glance of (nearly) all shortcut combinations in Excel. Please take the time to read it. I'm sure you'll find many of them useful. There is also a list of the default shortcuts in ASAP Utilities.
While typing a formula, switch between absolute/relative refs
None
All
F5
Goto
Edit, Goto
All
F6
Next Pane
None
All
F7
Spell check
Tools, Spelling
All
F8
Extend mode
None
All
F9
Recalculate all workbooks
Tools, Options, Calculation, Calc Now
All
F10
Activate Menubar
N/A
All
F11
New Chart
Insert, Chart
All
F12
Save As
File, Save As
All
Ctrl+:
Insert Current Time
None
All
Ctrl+;
Insert Current Date
None
All
Ctrl+"
Copy Value from Cell Above
Edit, Paste Special, Value
All
Ctrl+’
Copy Formula from Cell Above
Edit, Copy
All
Shift
Hold down shift for additional functions in Excel’s menu
none
Excel 97/2000+
Shift+F1
What’s This?
Help, What’s This?
All
Shift+F2
Edit cell comment
Insert, Edit Comments
All
Shift+F3
Paste function into formula
Insert, Function
All
Shift+F4
Find Next
Edit, Find, Find Next
All
Shift+F5
Find
Edit, Find, Find Next
All
Shift+F6
Previous Pane
None
All
Shift+F8
Add to selection
None
All
Shift+F9
Calculate active worksheet
Tools, Options, Calculation, Calc Sheet
All
Ctrl+Alt+F9
Calculate all worksheets in all open workbooks, regardless of whether they have changed since the last calculation.
None
Excel 97/2000+
Ctrl+Alt+Shift+F9
Rechecks dependent formulas and then calculates all cells in all open workbooks, including cells not marked as needing to be calculated.
None
Excel 97/2000+
Shift+F10
Display shortcut menu
None
All
Shift+F11
New worksheet
Insert, Worksheet
All
Shift+F12
Save
File, Save
All
Ctrl+F3
Define name
Insert, Names, Define
All
Ctrl+F4
Close
File, Close
All
Ctrl+F5
XL, Restore window size
Restore
All
Ctrl+F6
Next workbook window
Window, ...
All
Shift+Ctrl+F6
Previous workbook window
Window, ...
All
Ctrl+F7
Move window
XL, Move
All
Ctrl+F8
Resize window
XL, Size
All
Ctrl+F9
Minimize workbook
XL, Minimize
All
Ctrl+F10
Maximize or restore window
XL, Maximize
All
Ctrl+F11
Inset 4.0 Macro sheet
None in Excel 97. In versions prior to 97 - Insert, Macro, 4.0 Macro
All
Ctrl+F12
File Open
File, Open
All
Alt+F1
Insert Chart
Insert, Chart...
All
Alt+F2
Save As
File, Save As
All
Alt+F4
Exit
File, Exit
All
Alt+F8
Macro dialog box
Tools, Macro, Macros in Excel 97 Tools,Macros - in earlier versions
Excel 97/2000+
Alt+F11
Visual Basic Editor
Tools, Macro, Visual Basic Editor
Excel 97/2000+
Ctrl+Shift+F3
Create name by using names of row and column labels
Insert, Name, Create
All
Ctrl+Shift+F6
Previous Window
Window, ...
All
Ctrl+Shift+F12
Print
File, Print
All
Alt+Shift+F1
New worksheet
Insert, Worksheet
All
Alt+Shift+F2
Save
File, Save
All
Alt+=
AutoSum
No direct equivalent
All
Ctrl+`
Toggle Value/Formula display
Tools, Options, View, Formulas
All
Ctrl+Shift+A
Insert argument names into formula
No direct equivalent
All
Alt+Down arrow
Display AutoComplete list
None
Excel 95
Alt+’
Format Style dialog box
Format, Style
All
Ctrl+Shift+~
General format
Format, Cells, Number, Category, General
All
Ctrl+Shift+!
Comma format
Format, Cells, Number, Category, Number
All
Ctrl+Shift+@
Time format
Format, Cells, Number, Category, Time
All
Ctrl+Shift+#
Date format
Format, Cells, Number, Category, Date
All
Ctrl+Shift+$
Currency format
Format, Cells, Number, Category, Currency
All
Ctrl+Shift+%
Percent format
Format, Cells, Number, Category, Percentage
All
Ctrl+Shift+^
Exponential format
Format, Cells, Number, Category,
All
Ctrl+Shift+&
Place outline border around selected cells
Format, Cells, Border
All
Ctrl+Shift+_
Remove outline border
Format, Cells, Border
All
Ctrl+Shift+*
Select the current region around the active cell. In a PivotTable report, select the entire PivotTable report.
Edit, Goto, Special, Current Region
All
Ctrl+Shift++
Insert
Insert, (Rows, Columns, or Cells) Depends on selection
All
Ctrl+-
Delete
Delete, (Rows, Columns, or Cells) Depends on selection
All
Ctrl+1
Format cells dialog box
Format, Cells
All
Ctrl+2
Bold
Format, Cells, Font, Font Style, Bold
All
Ctrl+3
Italic
Format, Cells, Font, Font Style, Italic
All
Ctrl+4
Underline
Format, Cells, Font, Font Style, Underline
All
Ctrl+5
Strikethrough
Format, Cells, Font, Effects, Strikethrough
All
Ctrl+6
Show/Hide objects
Tools, Options, View, Objects, Show All/Hide
All
Ctrl+7
Show/Hide Standard toolbar
View, Toolbars, Stardard
All
Ctrl+8
Toggle Outline symbols
None
All
Ctrl+9
Hide rows
Format, Row, Hide
All
Ctrl+0
Hide columns
Format, Column, Hide
All
Ctrl+Shift+(
Unhide rows
Format, Row, Unhide
All
Ctrl+Shift+)
Unhide columns
Format, Column, Unhide
All
Alt or F10
Activate the menu
None
All
Ctrl+Tab
In toolbar: next toolbar In a workbook: activate next workbook
None
Excel 97/2000+
Shift+Ctrl+Tab
In toolbar: previous toolbar In a workbook: activate previous workbook
None
Excel 97/2000+
Tab
Next tool
None
Excel 97/2000+
Shift+Tab
Previous tool
None
Excel 97/2000+
Enter
Do the command
None
Excel 97/2000+
Alt+Enter
Start a new line in the same cell.
None
Excel 97/2000+
Ctrl+Enter
Fill the selected cell range with the current entry.
None
Excel 97/2000+
Shift+Ctrl+F
Font Drop Down List
Format, Cells, Font
All
Shift+Ctrl+F+F
Font tab of Format Cell Dialog box
Format, Cells, Font
Before 97/2000
Shift+Ctrl+P
Point size Drop Down List
Format, Cells, Font
All
Ctrl+Spacebar
Select the entire column
None
Excel 97/2000+
Shift+Spacebar
Select the entire row
None
Excel 97/2000+
CTRL+Backspace
Jump back to the active cell and bring it into view
CTRL+/
Select the array containing the active cell.
CTRL+SHIFT+O
Select all cells that contain comments.
CTRL+\
In a selected row, select the cells that don’t match the formula or static value in the active cell.
CTRL+SHIFT+|
In a selected column, select the cells that don’t match the formula or static value in the active cell.
CTRL+[
Select all cells directly referenced by formulas in the selection.
CTRL+SHIFT+{
Select all cells directly or indirectly referenced by formulas in the selection.
CTRL+]
Select cells that contain formulas that directly reference the active cell.
CTRL+SHIFT+}
Select cells that contain formulas that directly or indirectly reference the active cell.
ALT+;
Select the visible cells in the current selection.
SHIFT+BACKSPACE
With multiple cells selected, select only the active cell.
CTRL+SHIFT+SPACEBAR
Selects the entire worksheet. If the worksheet contains data, CTRL+SHIFT+SPACEBAR selects the current region. CTRL+SHIFT+SPACEBAR a second time selects the entire worksheet. When an object is selected, CTRL+SHIFT+SPACEBAR selects all objects on a worksheet
Ctrl+Alt+L
Reapply the filter and sort on the current range so that changes you've made are included
Data, Reapply
Excel 2007+
Ctrl+Alt+V
Displays the Paste Special dialog box. Available only after you have cut or copied an object, text, or cell contents on a worksheet or in another program.
Home, Paste, Paste Special...
Excel 2007+
A special thanks goes out to Shane Devenshire who provided most of the shortcuts in this list!
Note: If you have a work account that requires the Intune Company Portal app, install it from the App Store before setting up Outlook for iOS. Your IT admin may or may not also require you to Enroll your iOS device in Intune.
3.3. How to Disable Security Defaults in Office 365
Security Defaults are a set of policies that are enabled by default for Microsoft 365 (Office 365) accounts to provide increased account and organizational security. These settings include using Multi-Factor Authentication (MFA) for logins, disabling legacy mail protocols (IMAP, POP3, and SMTP), etc. In some cases, the Microsoft 365 administrator needs to turn off some of the Security Defaults settings in Microsoft 365 tenants.
Azure Ad security defaults are a set of identity security mechanisms recommended by Microsoft. When enabled, these recommendations will be automatically enforced in your organization. Administrators and users will be better protected from common identity-related attacks. Security Defaults are free for all Microsoft 365 subscriptions and replace the Baseline Conditional Access policies.
Security Defaults enable the following settings in the Azure tenant:
Multi-Factor Authentication for administrators and users (a request to configure MFA appears on each user sign-in);
Legacy authentication protocols are disabled, and this blocks access to Office 365 mailboxes from old clients and legacy protocols that do not support Modern Authentication (Office 2010, IMAP, POP3, SMTP, ActiveSync), as well as connecting to Exchange Online via Remote PowerShell;
Force MFA for privileged accounts in Azure AD when accessing management tools that use the Azure Resource Manager API (Azure Portal Access, Azure PowerShell, Azure CLI).
You can enable or disable Security Defaults in your Azure tenant settings:
Open the Microsoft Azure Portal login page and log in with an Azure or Microsoft 365 tenant Global Administrator account;
Select Azure Active Directory > Properties;
At the very bottom of the tenant settings page, click on the Manage Security Defaults link;
You will see a window in which only one Enable Security defaults (Yes/No) switch is available. Security Defaults are enabled by default for all new Azure (Microsoft 365) tenants. If you want to disable Security Defaults, select No, and walk through a small Microsoft survey:
We’d love to understand why you’re disabling Security defaults so we can make improvements. – My organization is using Conditional Access; – My organization is unable to use critical business applications; – My organization is getting too many MFA challenges; – Other.
Press the Save button;
Now users will no longer be prompted to configure the MFA when sign-in. If Multi-Factor Authentication is already configured for some users, you can disable it.
Sign in to Microsoft 365 Admin Center (https://admin.microsoft.com/#/users);
Select Users > Active Users;
Press the Multi-factor authentication;
Find the user you want to disable MFA for, select it, and click Disable;
To enable the use of legacy email protocols, you need to:
Before continuing below to resolve the Office installation problems, try the following:
1. Temporarily disable any third-party Antivirus or Firewall program before starting the Office installation. 2. Install all available Windows 10 Updates. 3. Update Windows 10 to its latest version.
Method 1. FIX Error 30015-11 by Uninstalling all Office versions from your PC.
The first method to solve the error codes 30015-11 (-1073741790) & 30015-11 (3221225506) in Office installation is to remove all Office installations, by following the steps below:
1. Download the Microsoft Support and Recovery Assistant (SARA) utility. 2. When the download is completed double click to run the SetupProd_OffScrub.exe application. 3. Click Install to install the SARA utility.
AD
4. When the installation is completed, click Agree and then click Yes.
5. Wait until the 'Microsoft Support and Recovery Assistant' troubleshooting the issue. 6. Select the checkbox, at the left of the Office product name to select all the installed Office products and click Next.
AD
7. Now wait until the Office removal process is complete and when this is done, restart your computer. 8. After restart, proceed and reinstall Office by following the instructions from these links:
3. When the process is completed, give the following command:
DISM.exe /Online /Cleanup-image /Restorehealth
4. When the DISM operation is completed, type the following command and hit Enter:
sfc /scannow
AD
5. Now wait until the System File Checker repairs the Windows System Files. 6. When the repair is completed, restart your PC and check if the problem has resolved.
Quick copy and paste for the commands to run it as quickly as possible:
Method 3. Check if the Software Protection service can Start.
1. Open Windows Services control panel: To do that:
Press Windows + R keys to open the run command box.
In the Search box, type: services.msc & click OK.
AD
2. In the right pane, make sure that the Startup Type of the Software Protection service is set to Automatic and the Log On As is Network Service.
AD
3. Now try to start the Software Protection service manually, by right-clicking on the service and choosing Start.
4. Now according to your situation, proceed as follows:
A. If the service can start without errors (Status: Running), try again to install Office again.
AD
AD
B. If the service cannot be started for any reason or if you got an "access denied" error:
a. Right-click on the Software Protection service and choose Properties. b. At Log On tab, choose This account and type Network Service. Then clear the password fields and click OK twice to save the changes.
AD
5. Restart your computer and perform the steps 1-3 above to ensure that the Software Protection can be started without errors. If this happens, go ahead and install Office.
Method 4. Clean install Windows 10.
If after applying the above methods, you still cannot install Microsoft Office, I suggest to perform a clean Windows 10 installation.
Important: The clean Windows 10 installation means that all your files and settings will be lost during the installation process. So, proceed and backup all your important files and settings to another storage media before continue. (e.g. to an external USB drive).
3.5. How to Fix Microsoft Office Error code 30175-45
Error code 30175-45 (193) : Microsoft office application is now an important element of our day to day life as it deals about our studies, work, business etc. And as it is a development era Microsoft has launched the well developed and secured products such as Office 365 and Office 2016 and also Office 2013 which was precede of Office 365 and Office 2016. You could buy the Office product from Microsoft product list or store .And in some cases the installation or update of Office may end up with Error code 30175-45 (193)
Step 1. Temporarily disable Firewall and Antivirus
Error code 30175-45 (193) while installing or updating the Microsoft Office may occur in case of Network or firewall restriction. The network rules or firewall rules in the network/computer may block the installation of Office program or its updating as a part of their security measurements. These firewall rules and Antivirus are implemented on the computer by the network provider or the computer user on its core system or registry.
You could fix the Error code 30175-45 (193) by disabling the firewall or antivirus temporarily or you could fix the Error by making creating an exceptional rule for Microsoft Office installation or update.
Follow the steps to disable Firewall:
Step 1. Open “control panel”
Step 2. Navigate to “system and security” and then to “Windows Firewall”
Step 3. Click on “turn windows firewall On or Off”
Step 4. Select Turn Off firewall for both private and public network.
Step 5. Try installing or updating Microsoft Office and check whether the Error is fixed.
For more information: click here to view Microsoft Reference article to disable windows firewall.
Step 1. Open Antivirus application installed on the computer.
Step 2. Click on settings and navigate to real time protection.
Step 3. Turn Off real time protection.
Step 4. Navigate to Antivirus firewall.
Step 5. Turn off Antivirus firewall.
Step 6. Click on YES or OK confirmation prompt if prompted.
Step 7. Try installing or updating Microsoft Office and check whether the Error is fixed.
Step 2. SFC Scan to fix Error code 30175-45 (193)
Error code 30175-45 (193) also occurs in case of system file errors or corruption. If the Error code 30175-45 (193) is occurred due to the system file corruption, it could be fixed easily by the SFC scan. The SFC scan or system file checking scan is the process of replacing or repairing the corrupted copy of system files using the cached copy of the file from the directory.
Follow the steps to initiate SFC scan:
Step 1. Open command prompt in administrative privileges.
Step 2. Type “ sfc /scannow “ and click enter.
Step 3. The scan will begin automatically .
Step 4. Do not close the command prompt until the scan get completed.
Step 5. Try installing or updating Microsoft Office and check whether the Error is fixed.
For more information: Click here to view Microsoft reference kb article 929833 for sfc scan
Error code 30175-45 (193) also occurs due to registry corruption or key value errors. A single key value corruption or change may lead to malfunctioning of the entire Microsoft Office program.
In order to fix the Error, it is required to repair the registry keys and rebuilt the string values. And we request you to back up the registry before initiating the registry repair as registry is a highly sensitive element of a computer system and it is recommended to be done in the presence of Online or offline technician.
For more information on back up of registry follow the Microsoft kb article 322756
Follow the steps to repair registry:
Step 1. Open registry editor
Step 2. Delete the preinstalled or older registry key which block the installation of latest version or update.
Step 5. Also change the DWORD values in below keys from 0 to 1 in Office common registry folder.
LicenseServers
LicenseServerRedirection
AutoExpandDLsEnable
PassportAuthProvider
Solution 4. Remove and reinstallation.
If Error code 30175-45 (193) is not fixed in registry repair, SFC scan and firewall/antivirus exception, it is required to remove the Office suite completely from the programs and features, and then to reinstall the product for a proper use.
Step 2. Login to Office account using your registered email ID and password.
Step 3. Click on install Option under the Office product in your account.
Step 4. Save the installer setup if prompted and run it once download is completed.
Step 5. Do not go offline or reboot the computer once installation is initiated.
Step 6. Click on finish button once the program is installed completely.
Please note: If you are trying to install School or college or company version of Office suite click here to login to your office account and then follow from step 2.
3.6. Error 'This web browser does not support JavaScript or scripts are being blocked' when adding a Google Workspace account
ISSUE
When adding a Google Workspace account to Outlook desktop you encounter the error, “The browser you’re using doesn’t support JavaScript, or has JavaScript turned off."
WORKAROUND
Warning: This task contains steps that tell you how to modify the registry. However, serious problems might occur if you modify the registry incorrectly. Therefore, make sure that you follow these steps carefully. For added protection, back up the registry before you modify it. Then, you can restore the registry if a problem occurs.
From the Start menu, type regedit.exe in the search box, and then press Enter.
If you are prompted for an administrator password or for confirmation, type the password or provide confirmation.
In Registry Editor, navigate to: HKEY_CURRENT_USER\Software\Microsoft\Internet Explorer\Main\FeatureControl\FEATURE_BROWSER_EMULATION
Find the REG_DWORD OUTLOOK.EXE and double-click to edit.
Select Decimal and change it to 11001 and select OK.
Close Registry Editor and restart Outlook.
Note: While using this workaround, the Outlook Today feature may not display information correctly.
Or, go to Settings > Add Account > Add Email Account.
Enter your full email address, then tap Continue.
Note: If you're prompted for server setting information, you may have to set up manually or use IMAP or POP. See the server settings help section below for details.
Enter your email account password and tap Sign In or Next.
Note: The sign in screen may look different for you depending on your email provider.
Outlook may request permission to access your calendar, contacts, etc. Tap Yes or Allow.
You're now ready to use Outlook for Android!
Set up email in the built-in Android apps
The appearance of Androids can vary so use these steps as a guide or consult the manufacturer's help for your particular device. If you're setting up in the built-in app, see the Android built-in app section below.
Update your Gmail app to the latest version:
Open the Google Play Store app on your phone.
Type "Gmail" into the search bar and then select Update.
Note: If the update option is not available, you're already on the latest version.
After the update is installed, tap the Gmail app icon to open it.
Tap the menu icon in the upper left corner > Settings > Add account > Exchange and Microsoft 365.
Important: Do NOT choose "Outlook, Hotmail, and Live" unless you want to sync email only.
Enter your full email address and tap Next.
Enter your password and tap Next.
Note: If you're prompted for server setting information, you may have to set up manually or use IMAP or POP. See the server settings help section below for details.
Follow any prompts you may get, including security permissions. You may also be asked to set your sync settings and a display name.
If you use Microsoft 365 for business, you may also be asked to give additional security control. In this case, choose Activate.
Go to your inbox. If you see an email that says "Action Required to Sync," open it and tap Use another Mail app instead.
If you don't see this message and your emails are syncing, skip this step.
Pull down the Android notification bar by swiping down from the top of your screen.
If you see a notification that reads "Unable to sync calendar and contacts," tap it. Then tap Allow to give access and you're done!
Note: If you don't see a sync error notification, you're good to go!
4 Type the command below into the command prompt, and press Enter. (see screenshot below)
Make note of the SID (ex: "S-1-5-21-237214570-1361766723-3061440971-1015") for the account (ex: "Brink2") you want to change the name of its user profile folder. You will need to know this SID in step 6 below.
wmic useraccount get name,SID
5 Press the Win + R keys to open Run, type regedit into Run, and click/tap on OK to open Registry Editor.
6 Navigate to the registry key below in the left pane of Registry Editor. (see screenshot below)
Substitute <SID> in the registry key path above with the actual SID (ex: "S-1-5-21-237214570-1361766723-3061440971-1015") from step 4 above for the account name (ex: "Brink2") you want to change the name of its user profile folder.
For example: HKEY_LOCAL_MACHINE\SOFTWARE\Microsoft\Windows NT\CurrentVersion\ProfileList\S-1-5-21-237214570-1361766723-3061440971-1015
7 In the right pane of the SID key (ex: "S-1-5-21-237214570-1361766723-3061440971-1015"), double click/tap on the ProfileImagePath expandable string value (REG_EXPAND_SZ) to modify it. (see screenshot above)
8 Change the current name of the user profile folder in its full path (ex: "C:\Users\Brink2.BRINK-W10PC") to what you want (ex: "C:\Users\Brink2") instead, and click/tap on OK. (see screenshot below)
Make note of the current full path and name (ex: "C:\Users\Brink2.BRINK-W10PC") and new name (ex: "Brink2") for this account's user profile folder.
You will need to know both in step 10 and step 12 below.
9 When finished, you can close Registry Editor and command prompt if you like. (see screenshot below)
10 Open File Explorer (Win+E), and navigate to the original full path of the user profile folder (ex: "C:\Users\Brink2.BRINK-W10PC") from step 8 above.
11 Right click or press and hold on the user profile folder (ex: "Brink2.BRINK-W10PC"), and click/tap on Rename. (see screenshot below)
12 Change the current name of the user profile folder (ex: "Brink2.BRINK-W10PC") to the same new name (ex: "Brink2") from step 8 above. (see screenshots below)
5.1. 6 Ways to Fix “The Set of Folders Cannot Be Opened” Error in Outlook for Windows
6 Ways to Fix “The Set of Folders Cannot Be Opened” Error in Outlook for Windows
Fix 1: Reset the Navigation Pane
Sometimes, Outlook may fail to load the navigation pane entirely and throw an error message that reads, “Cannot start Microsoft Outlook. Cannot open the Outlook window. The set of folders cannot be opened.”
You can reset Outlook’s navigation pane to see if that fixes the problem. To do so, press the Windows + R keyboard shortcut to open the Run dialog box. Type in the following command and press Enter.
outlook.exe /resetnavpane
Fix 2: Open Outlook in Safe Mode
Opening Outlook in safe mode can help you determine whether the “The set of folders cannot be opened” error in Outlook is occurring due to a faulty add-in. Press and hold the Ctrl key on your keyboard and double-click the Outlook shortcut. Select Yes when the confirmation prompt appears.
If you don’t encounter any errors while using Outlook in safe mode, it means that one of your add-ins is causing the problem. To identify the problematic add-in, you will need to disable all the add-ins and re-enable them one at a time.
Step 1: Open the Outlook app and click the File menu at the top.
Step 2: Select Options in the left pane.
Step 3: In the Outlook Options window, switch to the Add-ins tab. Use the drop-down menu next to Manage and select COM Add-ins. Then, click the Go button.
Step 4: Uncheck the boxes to disable your add-ins and click OK.
Restart the Outlook app after this and re-enable your add-ins one at a time until the error appears again. Once you find the problematic add-in, consider removing it.
Fix 3: Remove XML Files From Outlook Directory
Outlook uses XML files to store information about user profiles, preferences, and other essential data. If these files somehow become corrupted, Outlook may throw various errors. To fix them, you will need to remove the problematic XML files from the Outlook directory.
Step 1: Press the Windows + R keyboard shortcut to open the Run dialog box. Type the following path in the box and press Enter.
%appdata%\Microsoft\Outlook
Step 2: Locate and select XML files and then click the trash icon at the top.
Fix 4: Run the Inbox Repair Tool
Another reason why you might encounter this error is if your Outlook data files (PST or OST) have become corrupted. The Outlook offers a tool that can automatically find and fix problematic files.
Step 1: Press the Windows + E keyboard shortcut to open File Explorer and navigate to the following folder.
C:\Program Files\Microsoft Office\root\Office16
Step 2: Double-click the SCANPST.EXE file.
Step 3: Click Start to initiate the scan.
Step 4: If the tool finds any issues, click Repair.
Fix 5: Create a New Outlook Profile
Several users on the Microsoft forum reported fixing the “The set of folders cannot be opened” error in Outlook by removing old profiles and recreating them. You can also give it a try.
Step 1: Click the search icon on the taskbar, type in registry editor, and select Run as administrator.
Step 2: In the Registry Editor window, paste the following path in the address bar at the top and press Enter.
Step 3: Right-click on any subkey within the Profiles key and select Delete.
Step 4: Select Yes to confirm. Similarly, delete all the keys within the Profiles subkey and close the Registry Editor window.
Step 5: Click the search icon on the taskbar, type in control panel, and press Enter.
Step 6: Change the view type to Large icons and click on Mail (Microsoft Outlook).
Step 7: Click the Show Profiles button.
Step 8: Click the Add button, enter the name for the new profile, and click OK.
Step 9: In the Add Account window, enter your account details and hit Next.
Step 10: Select your new profile under When starting Microsoft Outlook and hit Apply.
Fix 6: Run the Office Repair Tool
Running the Office repair tool can help you troubleshoot issues with all the Office apps, including Outlook. So, if none of the above tips work, try running the Office repair tool using the steps below.
Step 1: Press the Windows key + R to open the Run dialog box. Type appwiz.cpl in the box and press Enter.
Step 2: In the Programs and Features window, select the Microsoft Office product on the list and click the Change button at the top.
Step 3: Select the Online Repair option and click Repair.
5.2. How to Quickly Clean Up Your Microsoft Outlook Inbox
We see all sorts of advice and methods for tidying up our inboxes, from using search folders to sorting and prioritizing. But check out the built-in cleaning tools in Microsoft Outlook for a super quick cleanup of your inbox. You can clean up conversations, folders, and subfolders with little effort.
Conversation Clean Up Settings in Outlook
Before going through the Clean Up tool options, it’s important to note the emails you “clean up” move to your Deleted Items folder by default. In addition, certain emails will not be moved like flagged or categorized emails. Luckily, you can adjust these settings, and it may be best to do so before using the tool.
Open Outlook and click File > Options.
Select Mail on the left.
Scroll to the Conversation Clean Up section on the right. You’ll then see the options you can adjust.
To select a folder to send your clean-up items to instead of Deleted Items, click Browse and choose the folder.
For the remaining settings, check or uncheck the boxes per your preferences.
Click OK when you finish.
Now that you have the settings you want to use for the Clean Up tool, let’s get to it!
Clean Up Conversations, Folders, and Subfolders in Outlook
Conversation Clean Up in Outlook works by moving redundant emails to Deleted Items or the folder you select. These include those back-and-forth emails you have using replies. As you already know, you can end up with 10 emails on the same topic from many people. Most times, those replies include the other replies in the messages. Conversation Clean Up can remove the messages that are all included in the latest reply.
To clean up a particular conversation, select it and go to the Home tab. Click Clean Up > Clean Up Conversation. You’ll see a pop-up message informing you that the messages will be moved. To continue, click Clean Up.
To clean up a folder, move to it and click Clean Up > Clean Up Folder on the Home tab. Confirm that you’d like to continue by clicking Clean Up Folder in that pop-up window.
To clean a folder and its subfolders, move to the folder and click Clean Up > Clean Up Folder & Subfolders on the Home tab. Again, click Clean Up Folder to confirm and continue.
You’ll notice in each of the above confirmation messages an option for Settings. If you did not adjust the settings described before you began your cleanup, click this button to make changes anytime.
And if you change your mind about the cleanup, click Cancel to return to your inbox without moving any items.
Keep It Clean, Tidy Up Your Outlook Inbox
The Conversation Clean Up tool in Outlook gives you a quick and easy way to clear out unneeded messages. The only manual steps involved are selecting a cleanup option and confirming. So, give it a try and see if your Outlook inbox is happy!
The cleanup feature is not currently available in Outlook on Mac.
5.3. Instantly Declutter Your Inbox with Search Folders in Outlook
How out of control is your inbox in Outlook? If finding emails feels like searching for a needle in a digital haystack, then Search Folders may be just the thing you need. Instead of painstakingly reviewing, sorting, and organizing emails into folders, Search Folders lets you instantly pull up emails that meet certain criteria. This is a major timesaver, especially if your inbox is a veritable firehose of incoming emails. While you may still want to tag and organize your emails in greater detail, Search Folders help you quickly narrow down the emails that deserve your immediate attention.
Creating Search Folders and Custom Search Folders in Outlook
The beauty of search folders in Outlook is that you will be able to see the exact emails that you need without having to dig through your ballooning inbox. In Outlook 2016 and above, it is easy to create new search folders:
1. Go to the Folder tab in the ribbon and select New Search Folder.
2. The New Search Folder dialog box will open up. It gives you many different options to create Search Folders.
3. If you like to have things more customized to your needs, all you need to do is scroll down in the New Search Folder dialog box to create a custom Search Folder.
4. When you select Create a custom Search Folder, you will see some text appear below it that says To specify criteria, click Choose. Just click on the button that says Choose…
5. Another dialog box will open; click on the button that says Criteria… This is where you will specify the criteria for your custom Search Folder.
6. Now, you get to choose what Criteria you need your custom folder to have. You can create folders for specific people, subject titles, emails with attachments, and more options.
Search folders in Outlook make your email and inboxes more manageable. You won’t have to dig through months’ worth of emails to find one single message.
5.4. Sort Important Emails Using Focused Inbox for Outlook
We’ve long ago abandoned the notion of sending and receiving fewer emails. Now, we accept an overflowing inbox as the norm and instead look for ways to manage the mess. Years ago, Google launched an inbox decluttering initiative that gave us Gmail categories and Inbox by Gmail. Microsoft Outlook has taken a swipe at it, too, with its Clutter folder, which contains low-priority emails. Now, Microsoft is rolling out another feature aimed at helping you sort through the avalanche of emails: Focused Inbox.
Organize Important Email Using Focus for Outlook
Focused Inbox is still being rolled out across all of Microsoft’s Outlook clients, including Outlook.com, Outlook on the Web, and Outlook 2016 for Windows and Mac. For me personally, I only have it on my iPhone. Users running Outlook for Android should also have it. Focused appears as a separate tab in your inbox; if you don’t see it, you might need to enable it, or the feature has not been rolled out to your account. Focused Inbox works similarly to the current Clutter technology. In fact, Focus is also powered by the same technology. Here is how you enable it on your account:
Enable Focused Inbox for Outlook on the Web and Outlook.com
Click Settings > Display Settings
Click the Focused Inbox tab
Select Sort messages into Focused and Other
Click OK
You will now have a separate Focused tab in your inbox.
Set up Focused Inbox in Outlook for iOS
Tap Settings, Badge Account, then tap Focused Inbox
After setup is complete, you should see two tabs in your inbox called Focused and Other.
Focused Inbox will display messages that are intelligently prioritized based on an algorithm. Of course, this is software, so it might not be perfect. You can check the Other tab if you do not see a prioritized message.
Are there any immediate benefits to using Focused Inbox? It’s hit or miss so far, but Focused Inbox does ensure you see messages from the contacts you communicate with often based on my testing. This does not mean you should put all your faith in it and ignore the Other tab. Users can customize the behavior by moving messages to the Focused Inbox or vice versa, so the algorithm improves over time. I noticed quite a bit of spam messages within the Focused tab, which proves that Outlook has a little bit of a learning curve to start. Another issue I noticed is the inconsistency between functionality across clients. Focus on Outlook for iOS lacks the functionality found in desktop versions, such as moving between Focused and Other inboxes. Hopefully, it will get better with time, but if you don’t like it, you can always disable it.
5.5. Sender Name isn't showing in Message List view
If the view of your emails is suddenly showing your name where the sender name typically is, or even some other item in its place, here is how to correct that:
The view that you want:
The view you currently have:
First lets expand the list view to show the columns:
See above how the Recipient Name field is first before the From field? This is causing the view when condensed to only show the Recipients Name where normally the Senders name would appear. To correct this, drag the From column to the left of the Recipient Name column. Then to ensure that the view is how it really should be, drag the Recipient Name column all the way to the right past Size. This allows the subject to appear as well in the condensed view.
After rearranging the columns:
The corrected condensed message view:
5.6. Increase maximum size for pst-files and ost-files
In Outlook 2003 and Outlook 2007, the maximum recommended size of a Unicode pst-file and ost-file has been limited to 20GB.
In Outlook 2010, 2013, 2016, 2019 and Microsoft 365, this recommended limit has been set to 50GB.
You can increase (but also decrease) this limit via the Registry or via Group Policies.
To increase the maximum size of pst-files and ost-files in Outlook, you’ll need to create and set 2 values in the following location in the Registry;
Outlook 2003 HKEY_CURRENT_USER\Software\Microsoft\Office\11.0\Outlook\PST
Outlook 2007 HKEY_CURRENT_USER\Software\Microsoft\Office\12.0\Outlook\PST
Outlook 2010 HKEY_CURRENT_USER\Software\Microsoft\Office\14.0\Outlook\PST
Outlook 2013 HKEY_CURRENT_USER\Software\Microsoft\Office\15.0\Outlook\PST
Outlook 2016 / Outlook 2019 / Microsoft 365 HKEY_CURRENT_USER\Software\Microsoft\Office\16.0\Outlook\PST
The following 2 new DWORD values must be created or set;
WarnLargeFileSize Don’t set this higher than 4090445042 (decimal) or f3cf3cf2 (hexadecimal)
MaxLargeFileSize Don’t set this higher than 4294967295 (decimal) or ffffffff (hexadecimal)
The first value is how many MB a user can write to a pst-file or ost-file before receiving a warning that the file is full. The second value is how many MB the system can write to a pst-file or ost-file. This difference has to be at least 5% since there is more written to a pst-file and ost-file than just user data.
In this example the maximum size of pst-files and ost-files has been set to 100GB with a warning at 95GB.
Note: Although the Registry path says “PST”, it also applies to ost-files.
Via Group Policies
If you are a corporate administrator and want to adjust the maximum allowed sizes of pst-files and ost-files, then you can use Group Policies as well. For detailed instructions on how to use and deploy Group Policies see this guide.
The settings for adjusting the maximum file size for pst-files and ost-files can be found in the section;
User Configuration-> Administrative Templates-> Microsoft Outlook <version>-> Miscellaneous-> PST Settings.
The following 2 settings need to be modified;
Large PST: Absolute maximum size Don’t set this higher than 4294967295
Large PST: Size to disable adding new content Don’t set this higher than 4090445042
5.7. How to Automatically BCC Emails Using Rules in Outlook
Sometimes, you might want to copy your sent emails to another address without the recipient knowing. In Microsoft Outlook, you can set up rules for doing this. We’ll walk you through the process and share an important caveat.
Most people are familiar with the CC (carbon copy) option in their email program. CC’ing someone means you’re sending them a copy of the message. The other recipients can also see who’s been CC’ed.
Advertisement
There’s also a BCC (blind carbon copy) option. Anyone you BCC will be hidden from the other recipients, but he or she will be able to see the sender and the recipients.
In Outlook, you can add the BCC field to emails with a simple toggle switch. To do so, open a new email, switch to the “Options” tab, and then click “Bcc.” This will make the “Bcc” field visible on this and all new emails. To hide it once again, click Options > Bcc on any new email.
If you want to BCC someone on a specific email, simply type that person’s email address in the “Bcc” field the same way you would in the “To” or “Cc” fields.
The “Bcc” field is most commonly used when sending bulk emails to lots of recipients, such as a newsletter. Depending on where you are in the world, you might be legally obliged to hide people’s email addresses for data protection reasons.
Even if there isn’t a compelling legal obligation, it’s still a good practice (and common courtesy) not to broadcast people’s email addresses without their consent.
There are other scenarios in which you might want to BCC someone. For example, if you’re dealing with a troublesome employee or coworker, you might want to keep a record of your email interactions in case you need to raise a grievance. BCC allows you to send copies of the messages to any address you want, without the recipients knowing about it.
If you want to add a BCC recipient to every email automatically or to specific emails—such as those to a certain individual or that contain specific words in the subject line—there’s no simple way to do so. If you’ve used Outlook rules, you might expect this to be an option, but unfortunately, it isn’t.
It is possible to use rules, but you have to create more than one. Specifically, one rule to apply a category to emails you want to BCC, and another to auto-forward emails within that category to another address. This isn’t quite the same as a BCC, but it achieves the same thing.
The important caveat we mentioned earlier is a lot of businesses block their staff from auto-forwarding emails outside the company. This is because auto-forwarding rules are a common method cybercriminals use to get data from businesses.
Any business large enough to have its own IT department will most likely block auto-forwarding. It will also probably get an alert when someone sets up an auto-forwarding rule.
If your company blocks auto-forwarding, you’ll have to add the BCC manually if it’s going to an external email address. If you’re forwarding to another mailbox within your company, or your company doesn’t block auto-forwarding, though, you’re good to go.
With that caveat in mind, here’s how to set up the two rules.
Rule 1: Apply a Category
Make sure you’re in your Outlook Inbox, and then, while viewing the “Home” tab, click Rules > Manage Rules and Alerts.
In the “Rules and Alerts” panel, click “New Rule.”
Select “Apply Rule On Messages I Send” in the “Rules Wizard” that appears, and then click “Next.”
Next, you choose the emails to which you want to automatically apply the category. If you want to categorize all emails, click “Next.” A warning will be displayed; click “Yes.”
If you only want to categorize specific messages, you’ll have to choose which kind. There are a large number of conditions to choose from, including those with certain words in the subject line or the body, those with attachments, and so on.
We’re going to categorize emails sent to a specific person, so we select the “Sent to People or Public Group” option.
We click the “People or Public Group” link to choose the recipient.
We can select the person from our address book or type the email address directly in the “To” field, and then click “OK.”
We click “Next.”
On the next page of the wizard, we select the “Assign It to the Category Category.”
We then click the “Category” link to assign a category.
In the “Color Categories” window that opens, we choose the category to which we want this to apply. You can also click “New” to create a new one, and then click “OK.”
To avoid auto-forwarding the wrong emails to yourself, consider creating an entirely new category just for this.
The category in the wizard will change to the one you’ve selected. Click “Finish.”
Click “OK” in the confirmation box and your first rule is created.
Rule 2: Auto Forward the Emails
Now you have to set up a rule which auto forwards emails that have the category you chose in Rule 1.
First, click your “Sent” items folder to switch to it. This step is essential, otherwise, the rule will only run on emails in your Inbox.
On the “Home” tab in Outlook, click Rules > Manage Rules and Alerts.
Select “New Rule.”
In the “Rules Wizard,” click “Apply Rule On Messages I Receive,” and then click “Next.”
On the next page of the wizard, select “Assigned to Category Category.”
Click the “Category” link to choose the category to which you want to assign it.
In the “Color Categories” window, choose the category you set in Rule 1, and then click “OK.”
The category in the wizard will change to the one you selected. Click “Next.”
On the next page, select “Forward It to People or Public Group.”
Click the “People or Public Group” link to choose a recipient.
You can select the address to which you want to forward the emails from your address book or type it in the “To” field. Then, click “OK.”
Click “Next” twice to get to the final page of the wizard. Give your rule a name, make sure it applies to the “Sent Items” folder, and then click “Finish.”
Your rules are now created! Whenever you send an email to the person you specified, a category will be added to the email (Rule 1). Once the email reaches your “Sent Items” folder, it’ll be automatically forwarded to the address you specified in Rule 2.
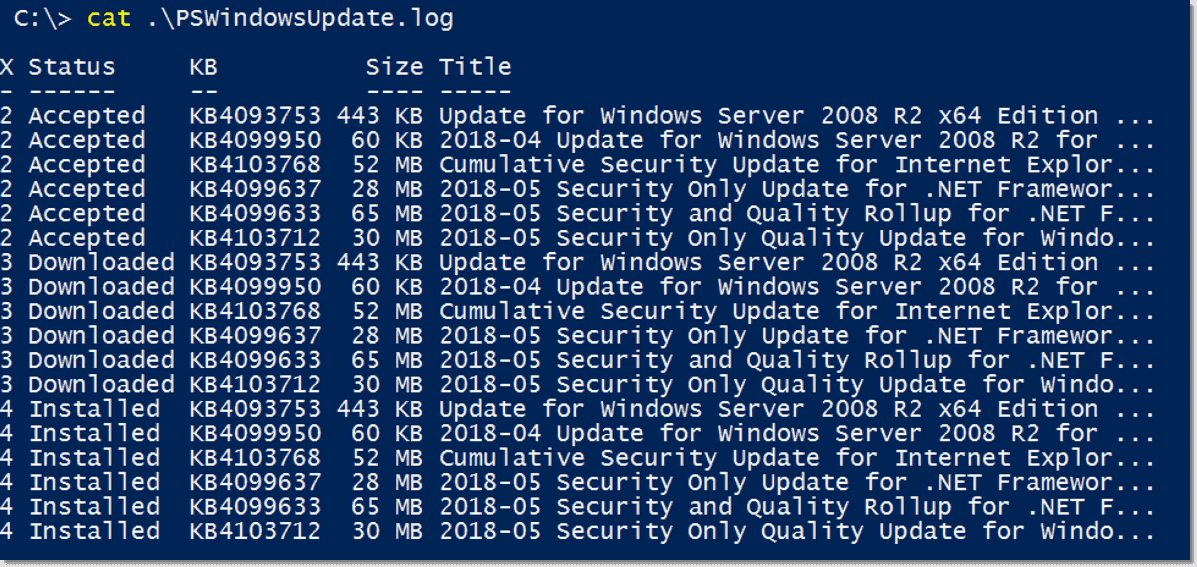
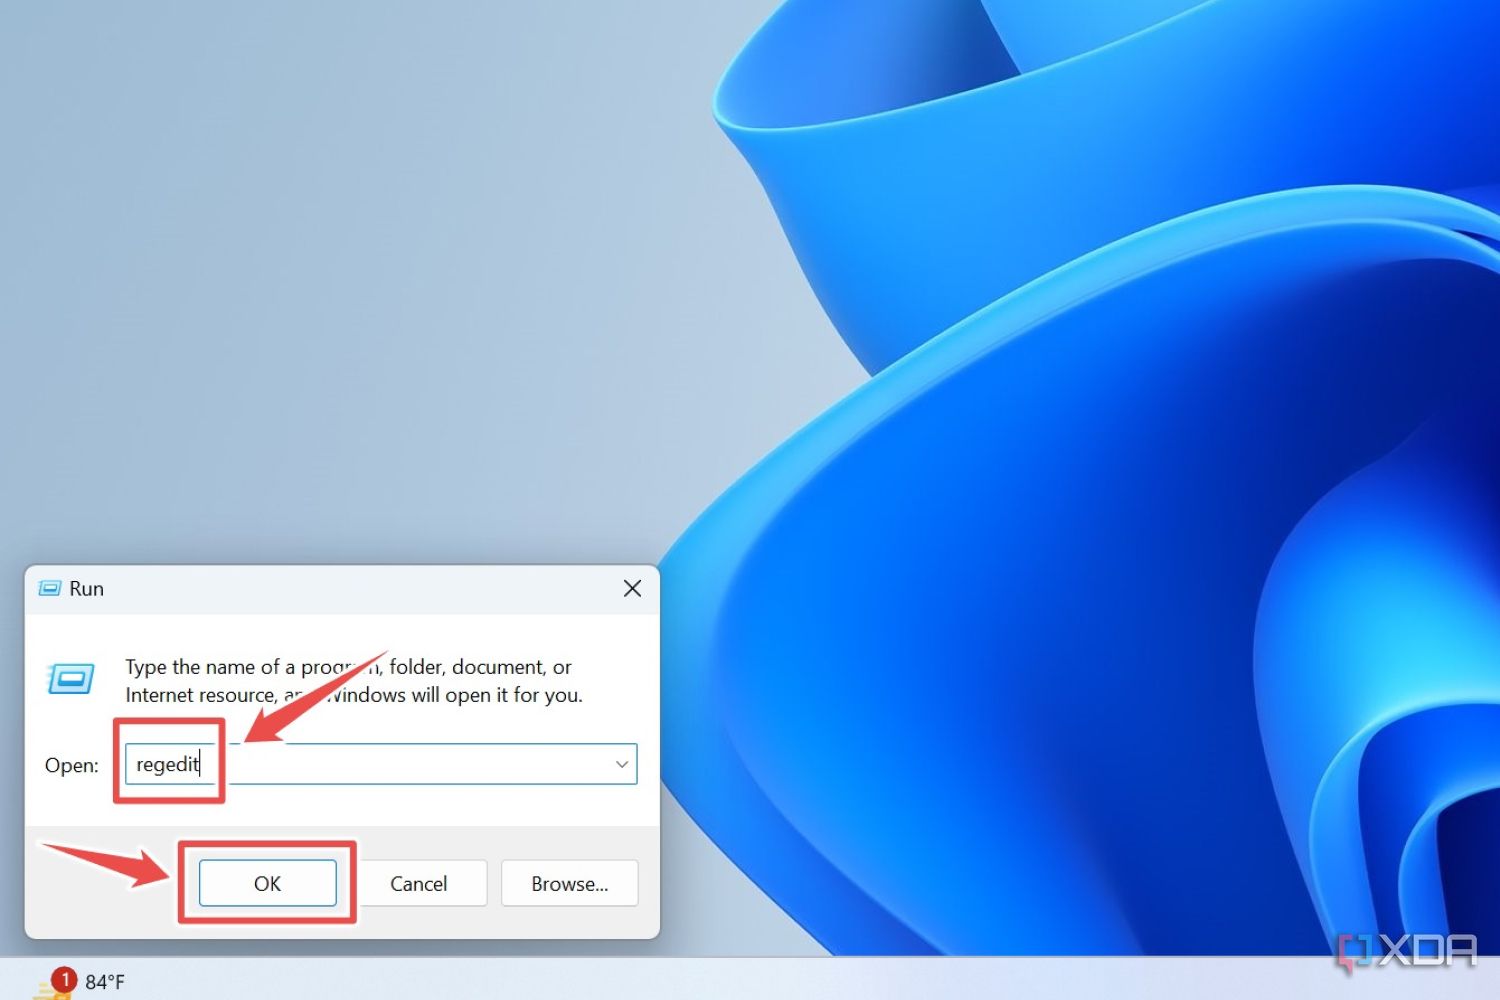
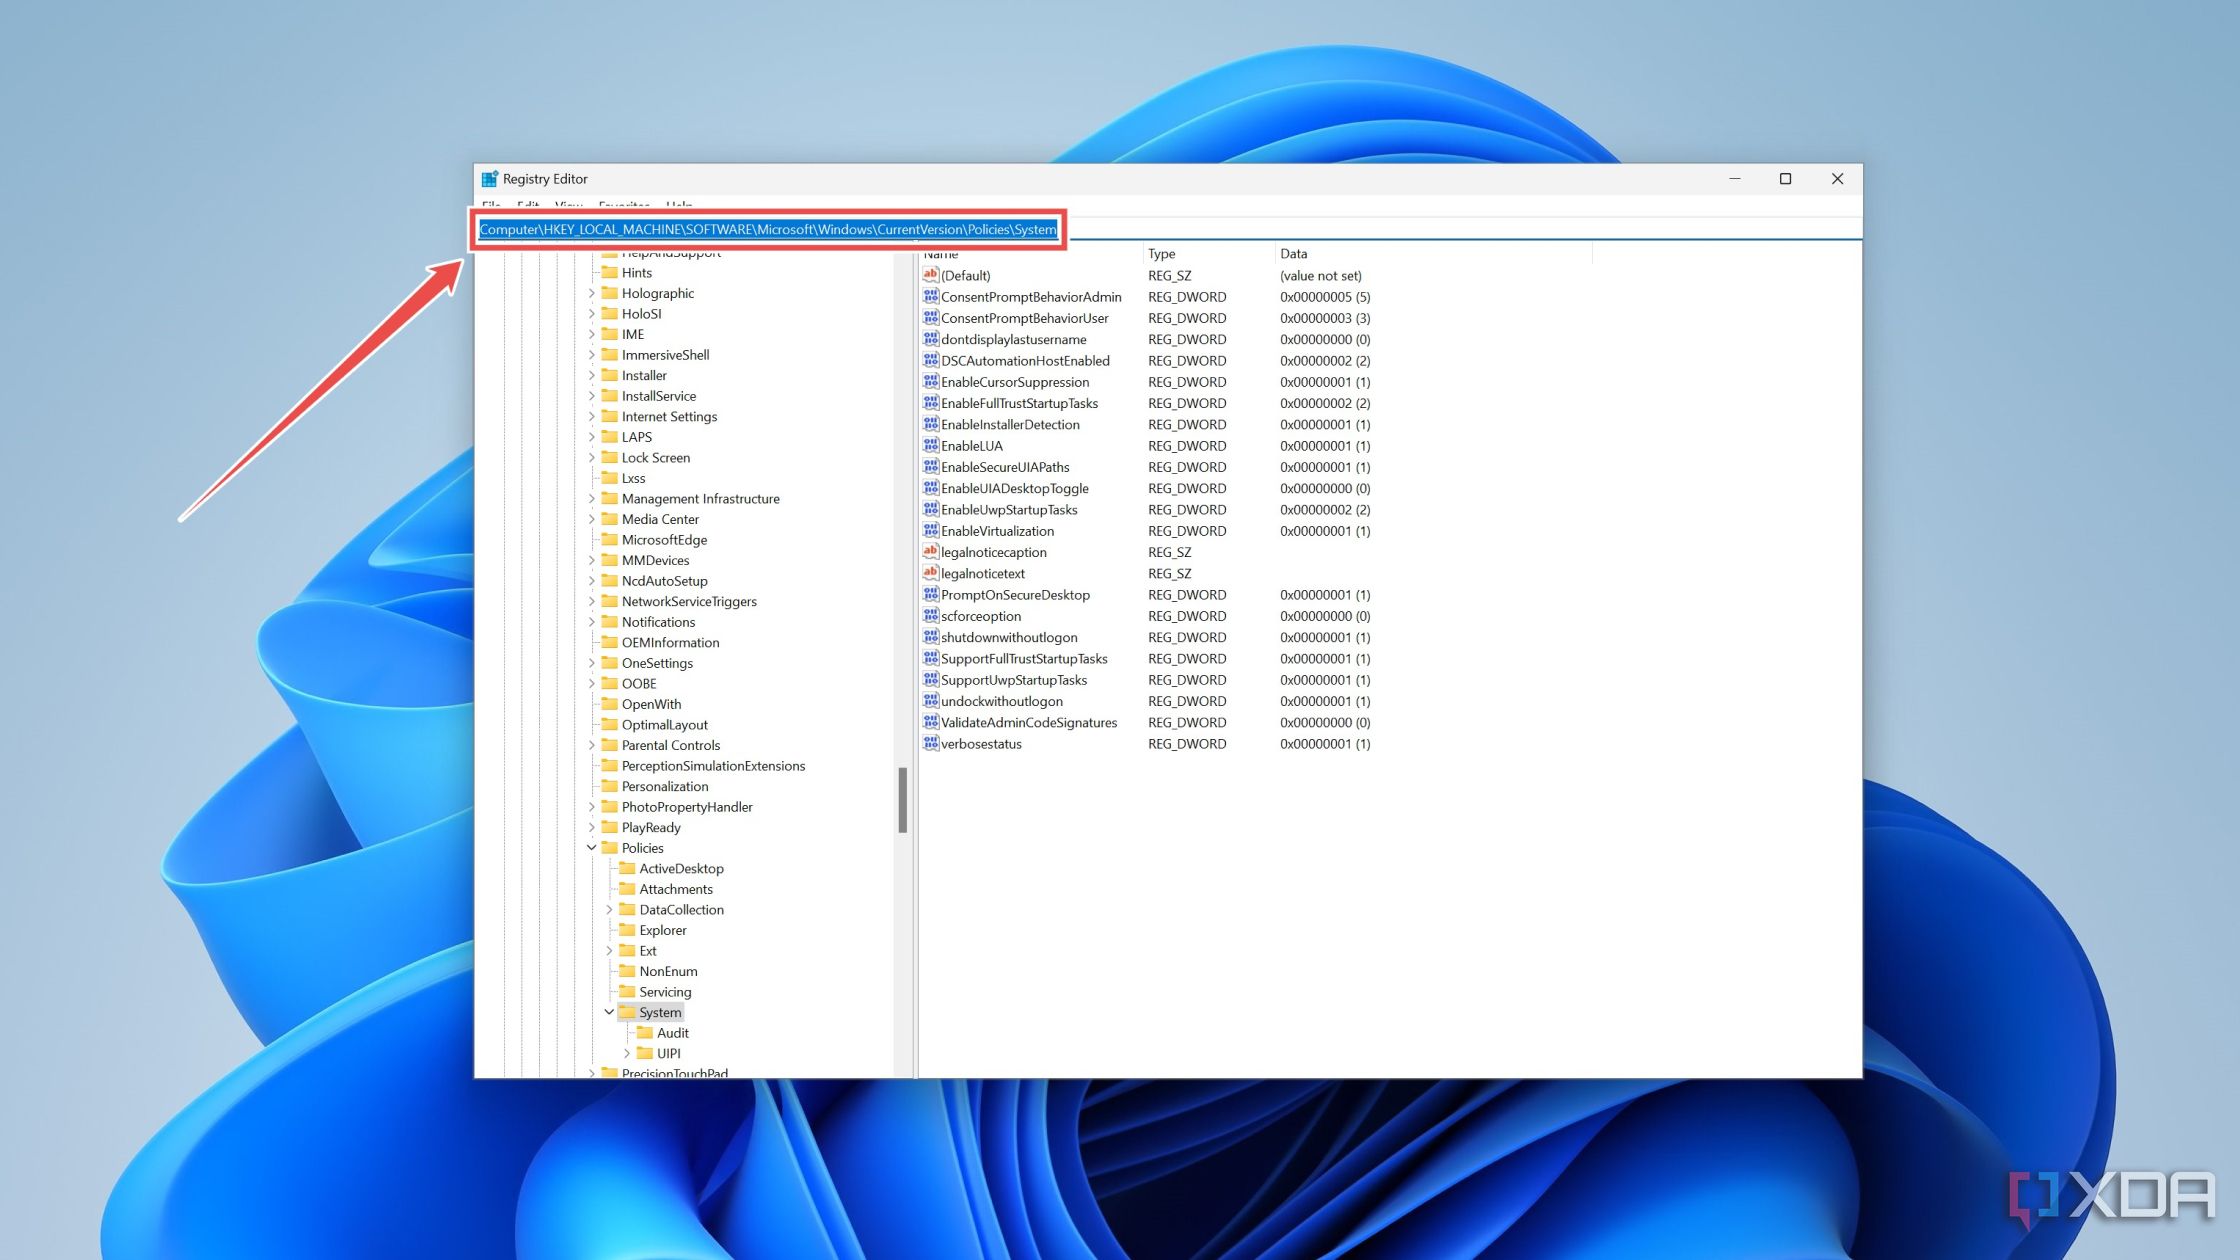
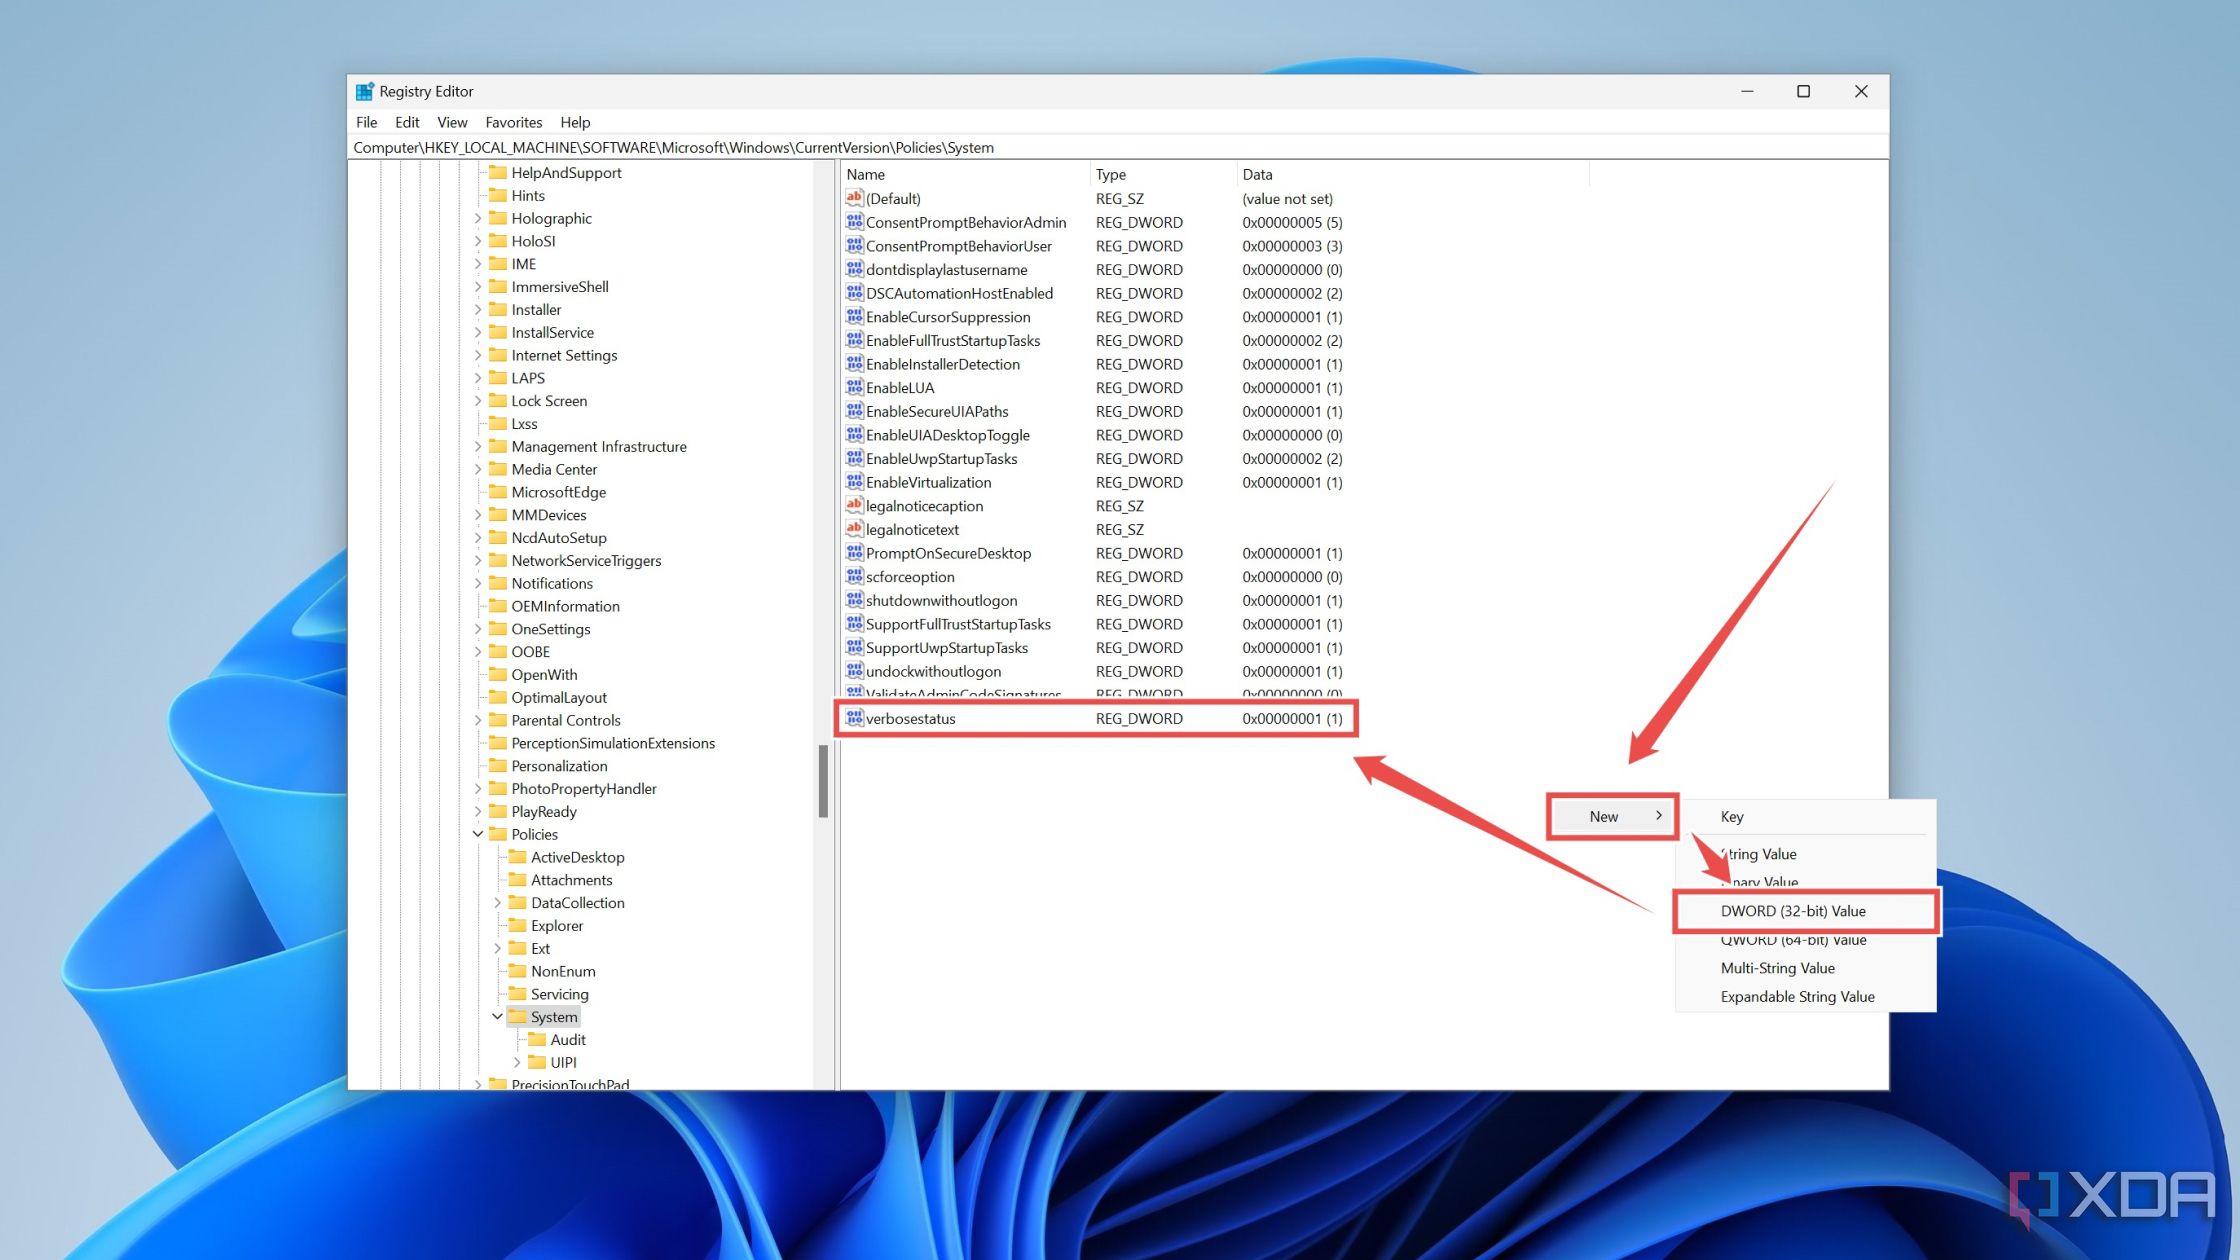
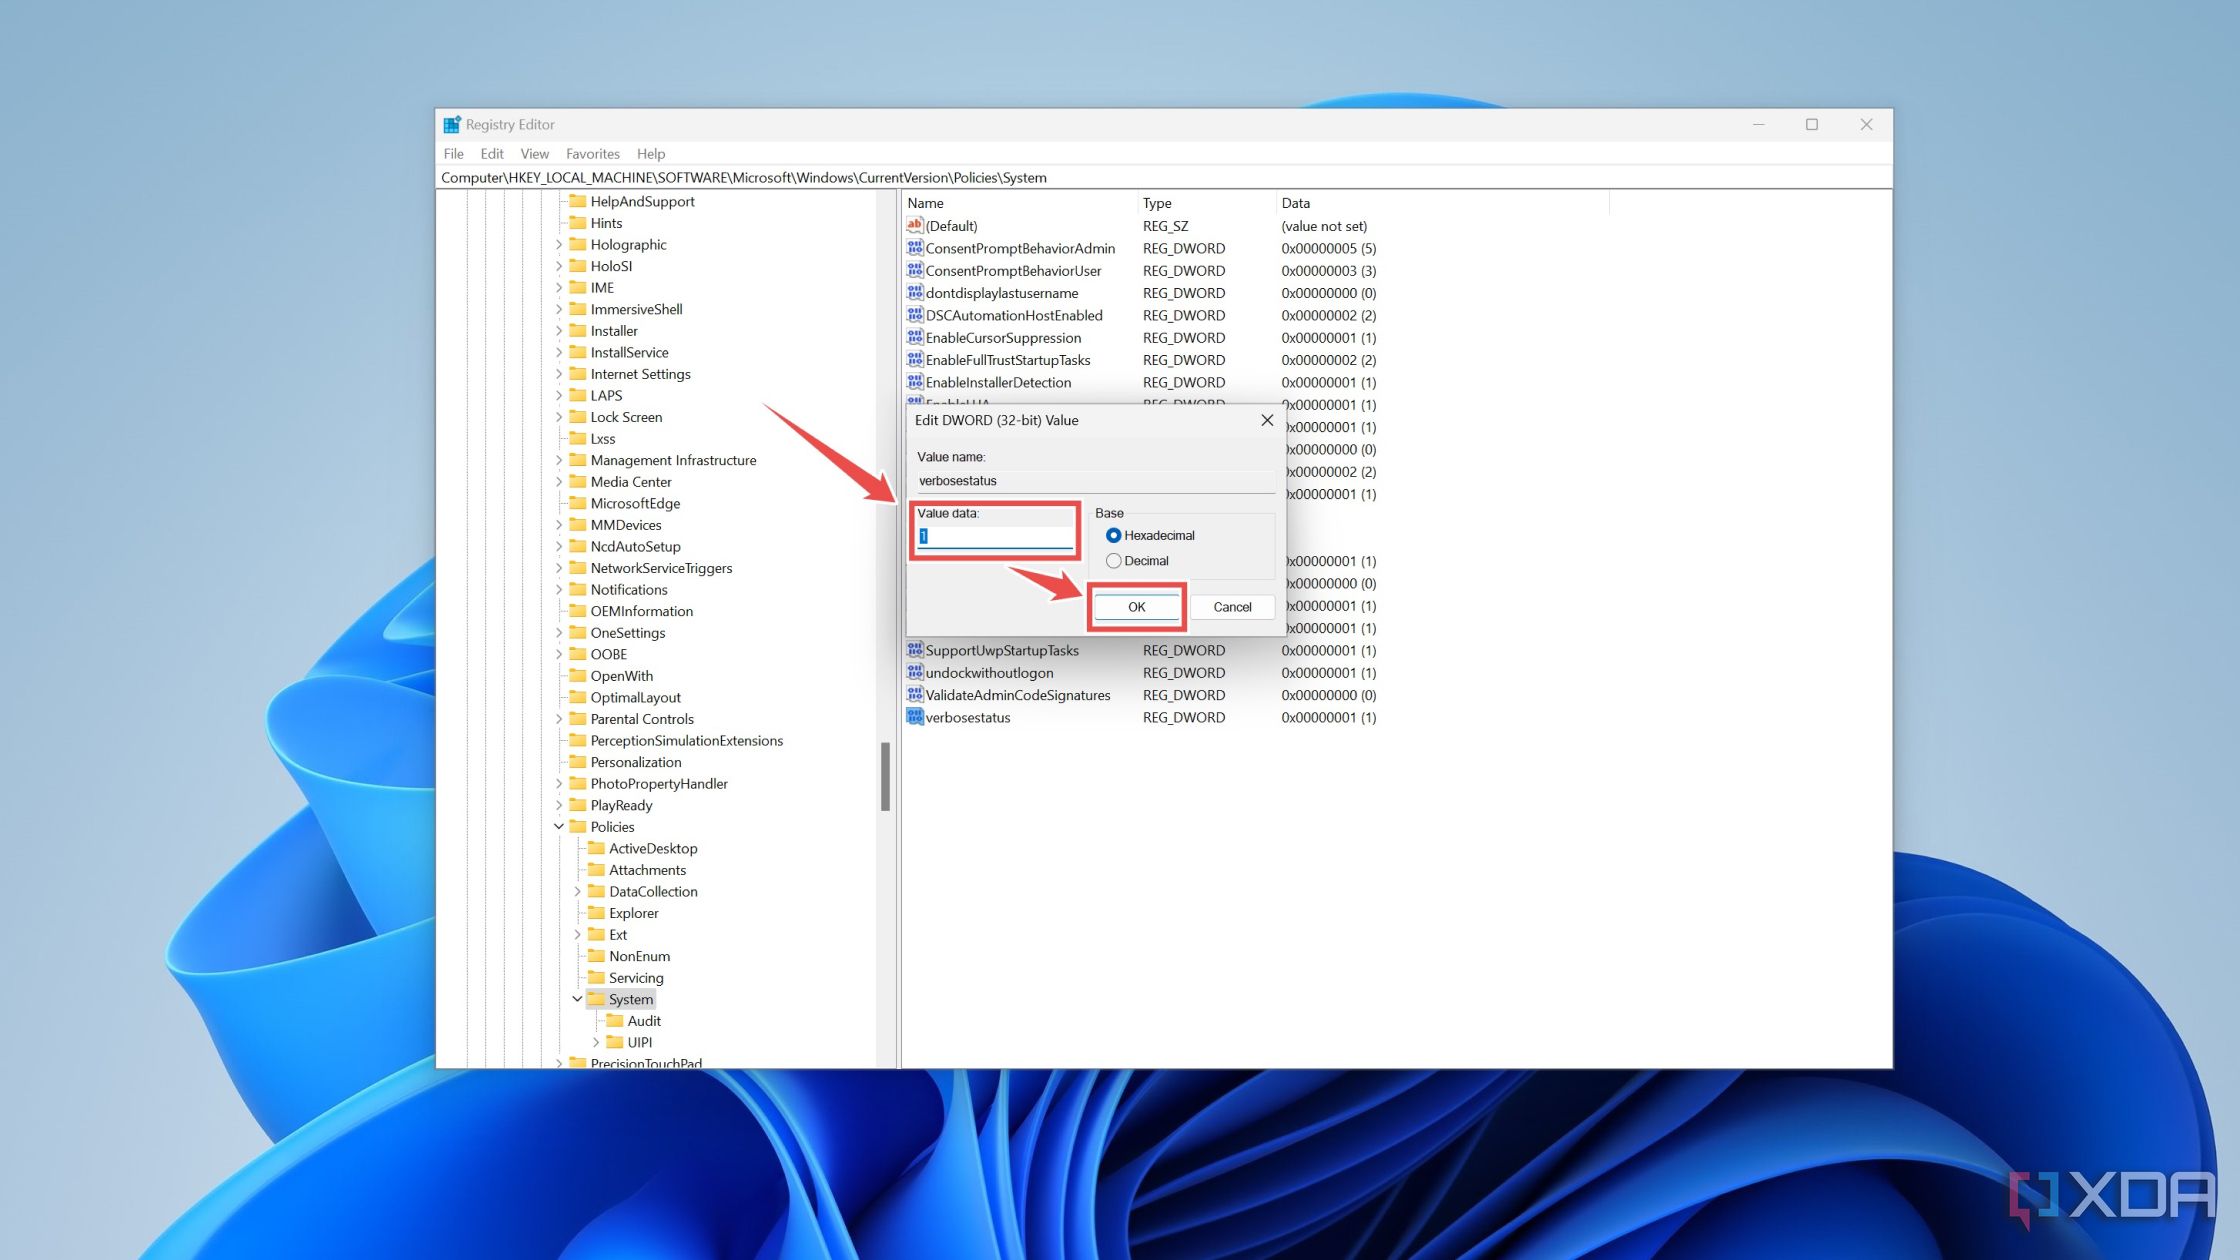

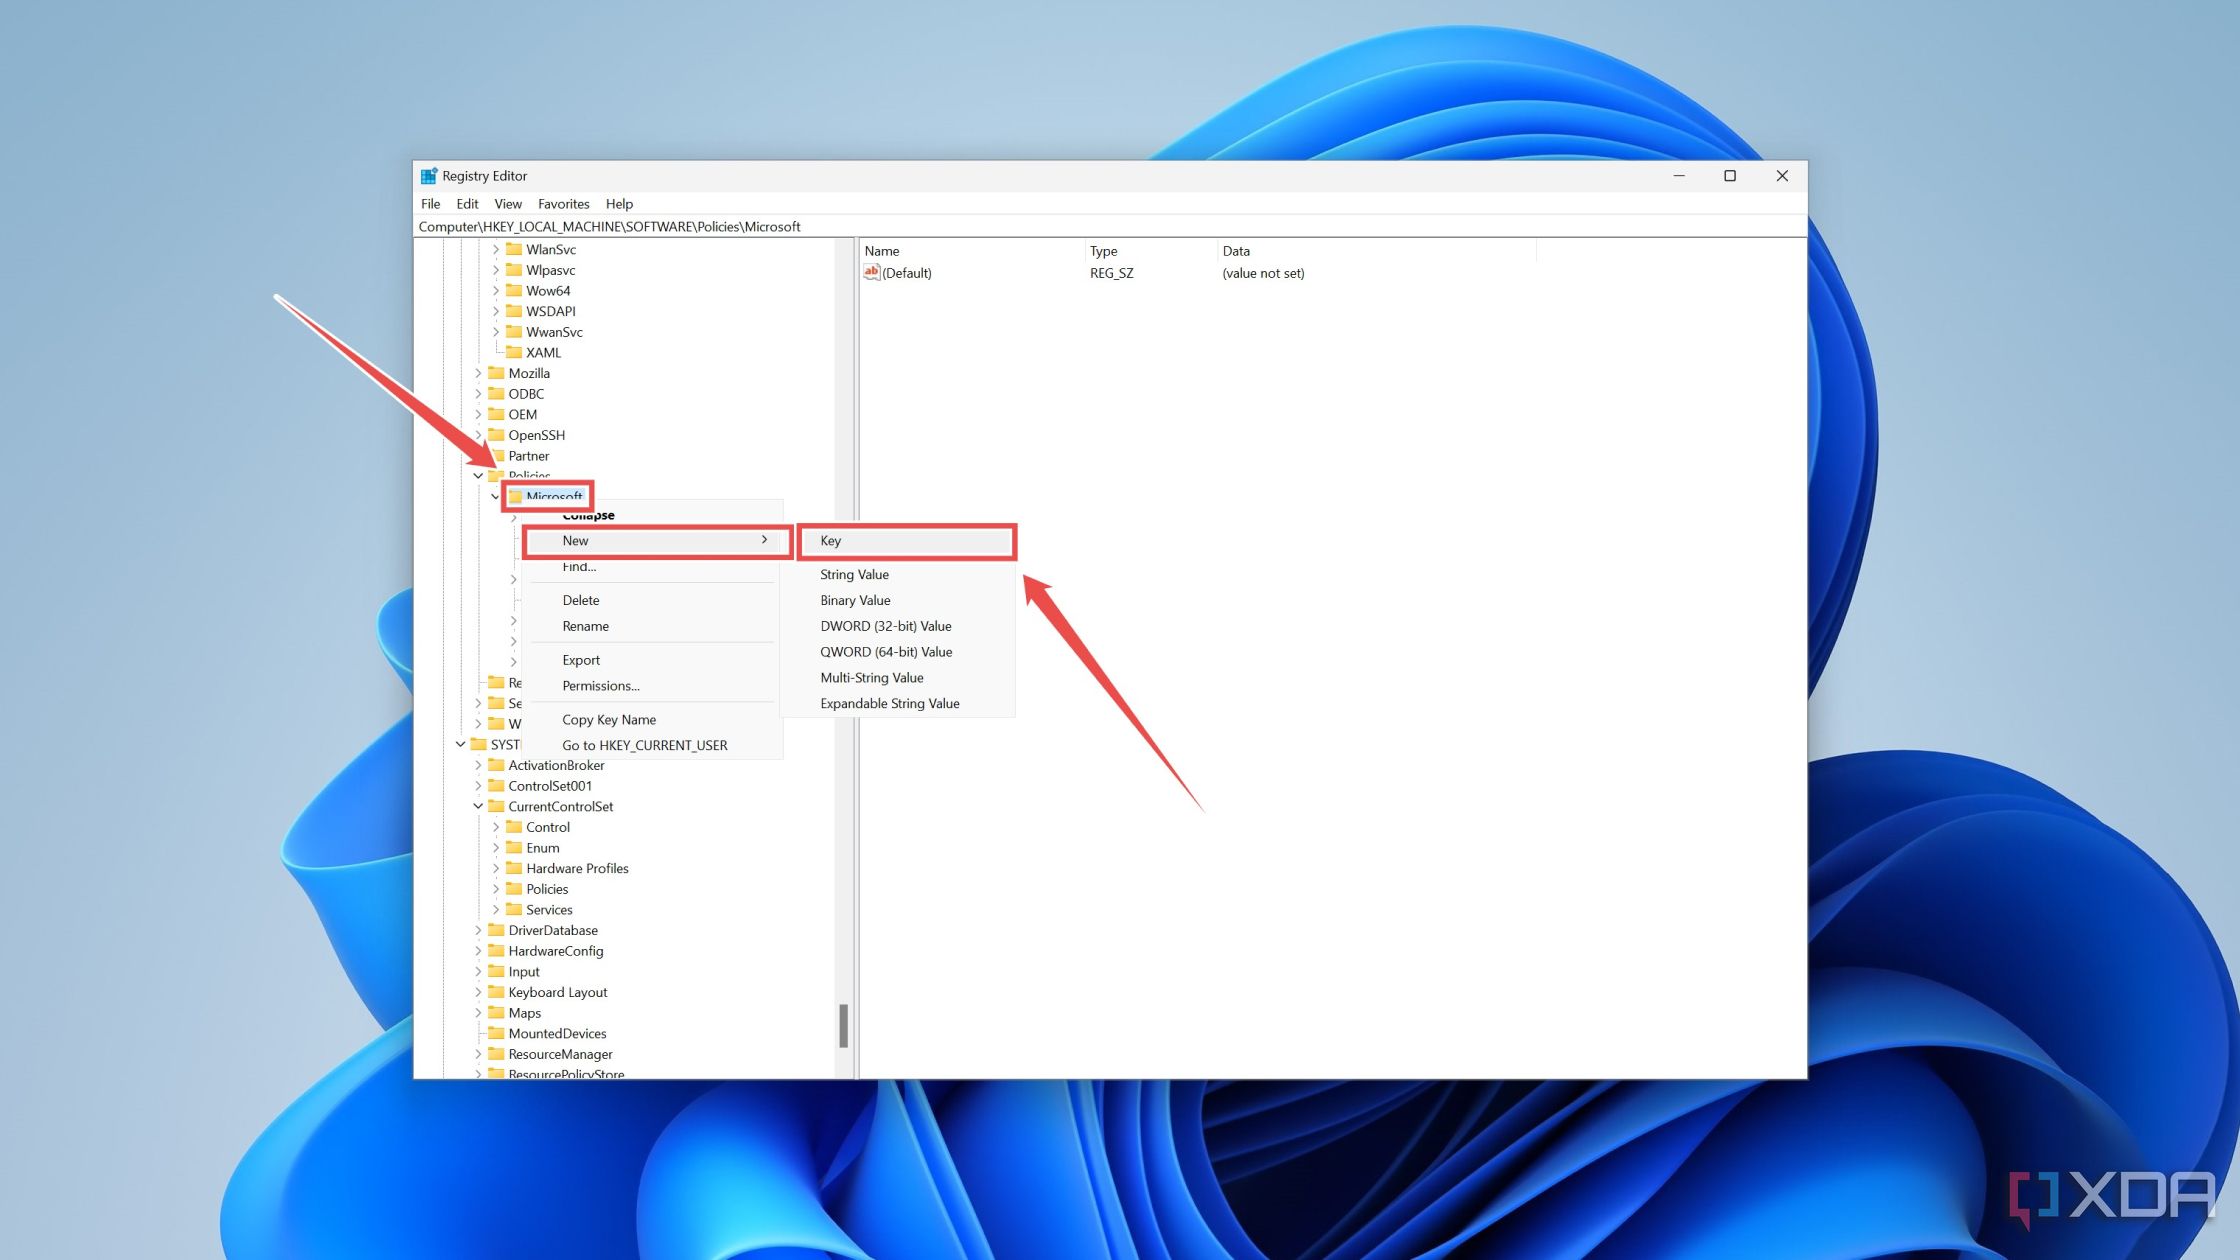

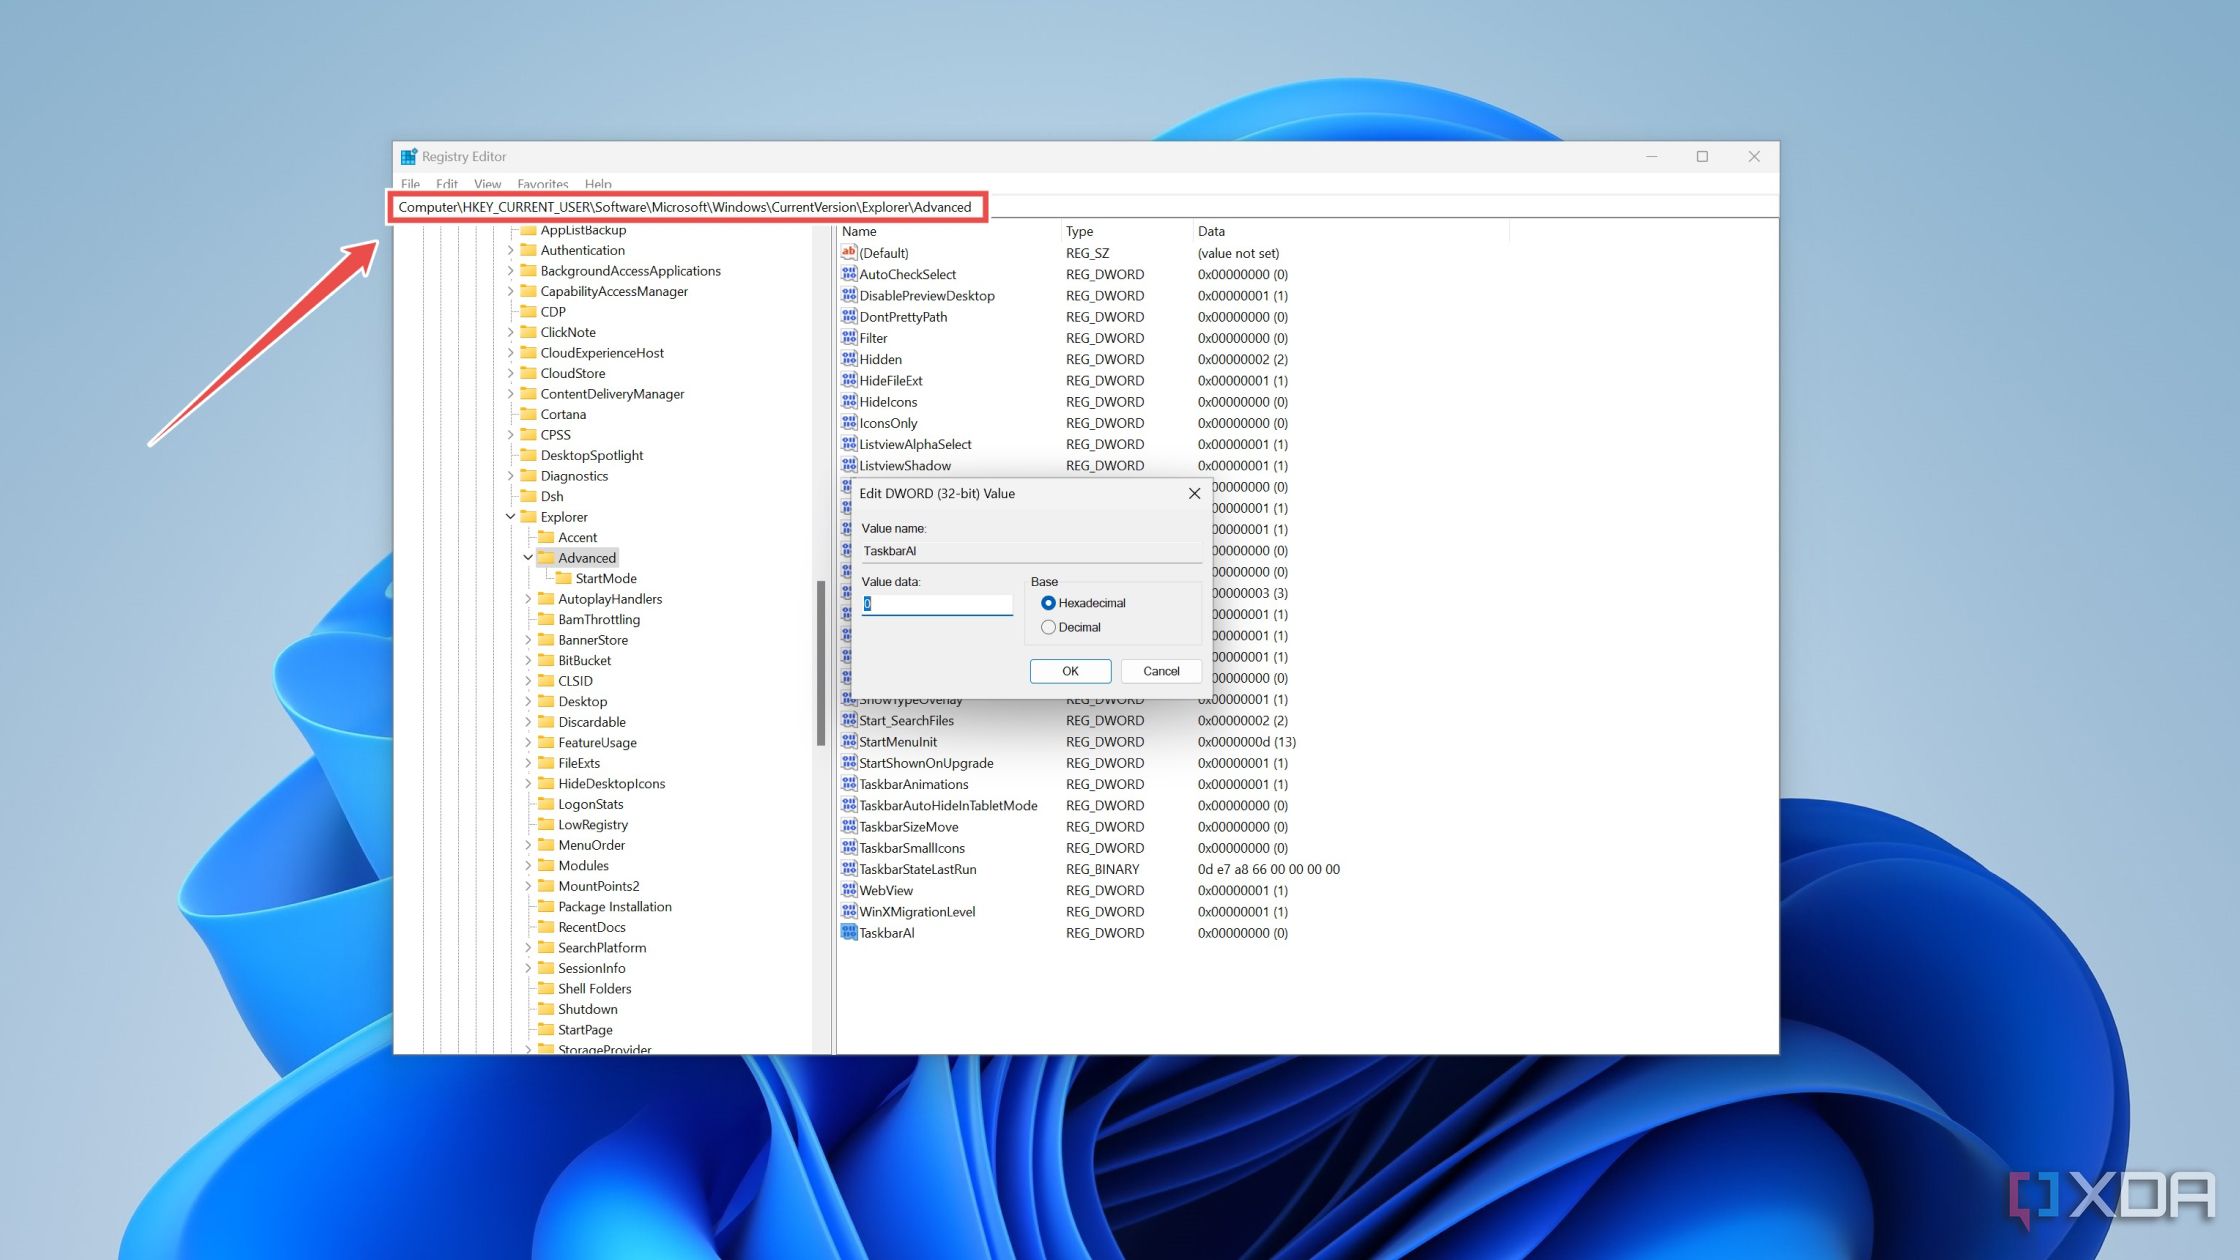
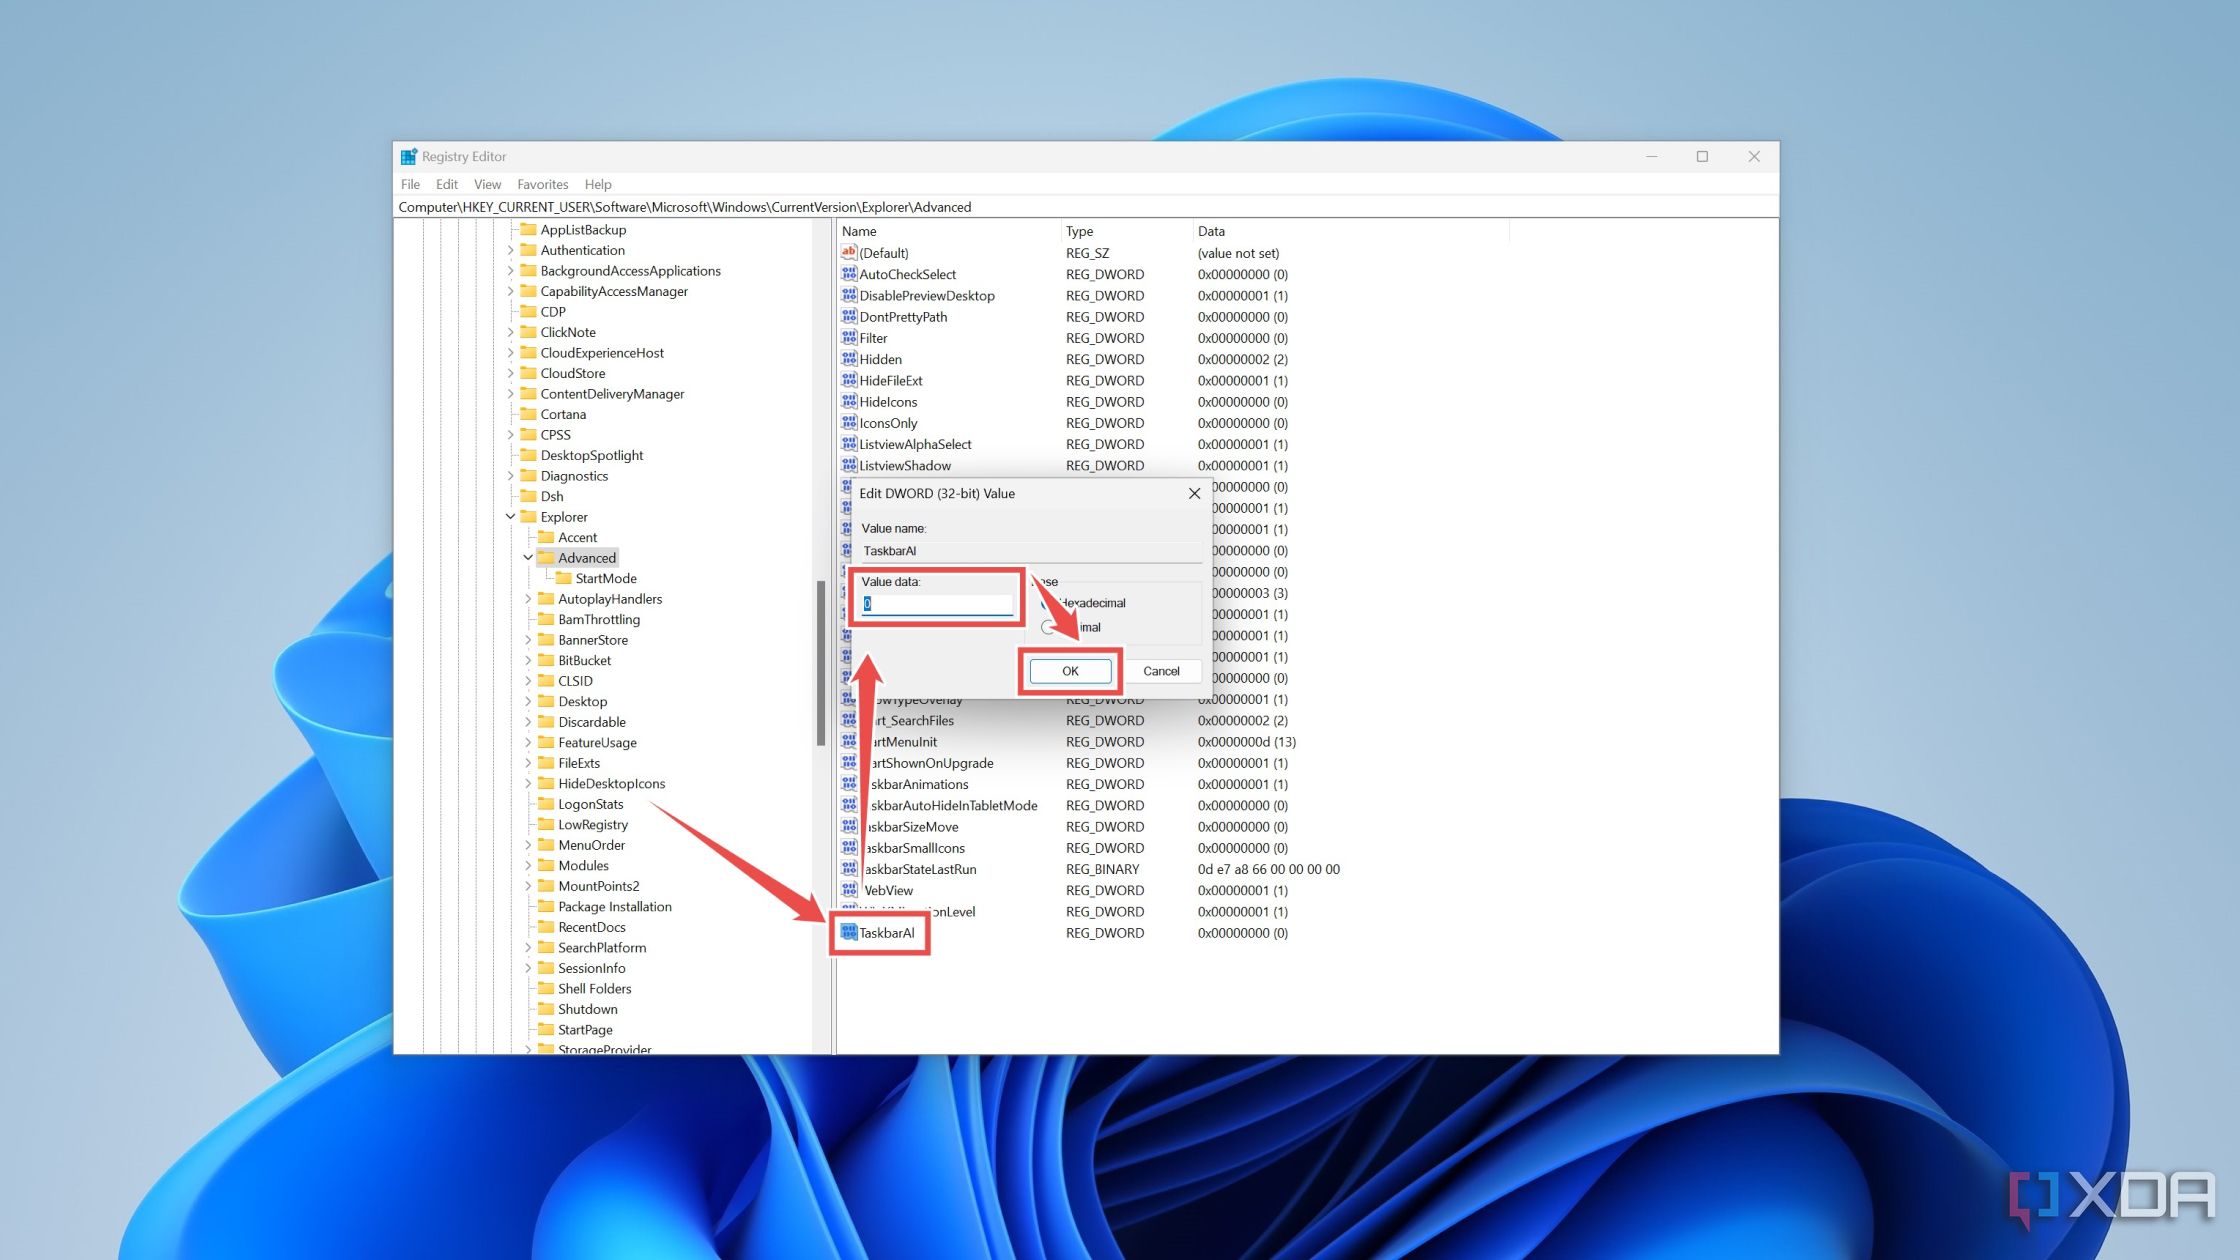

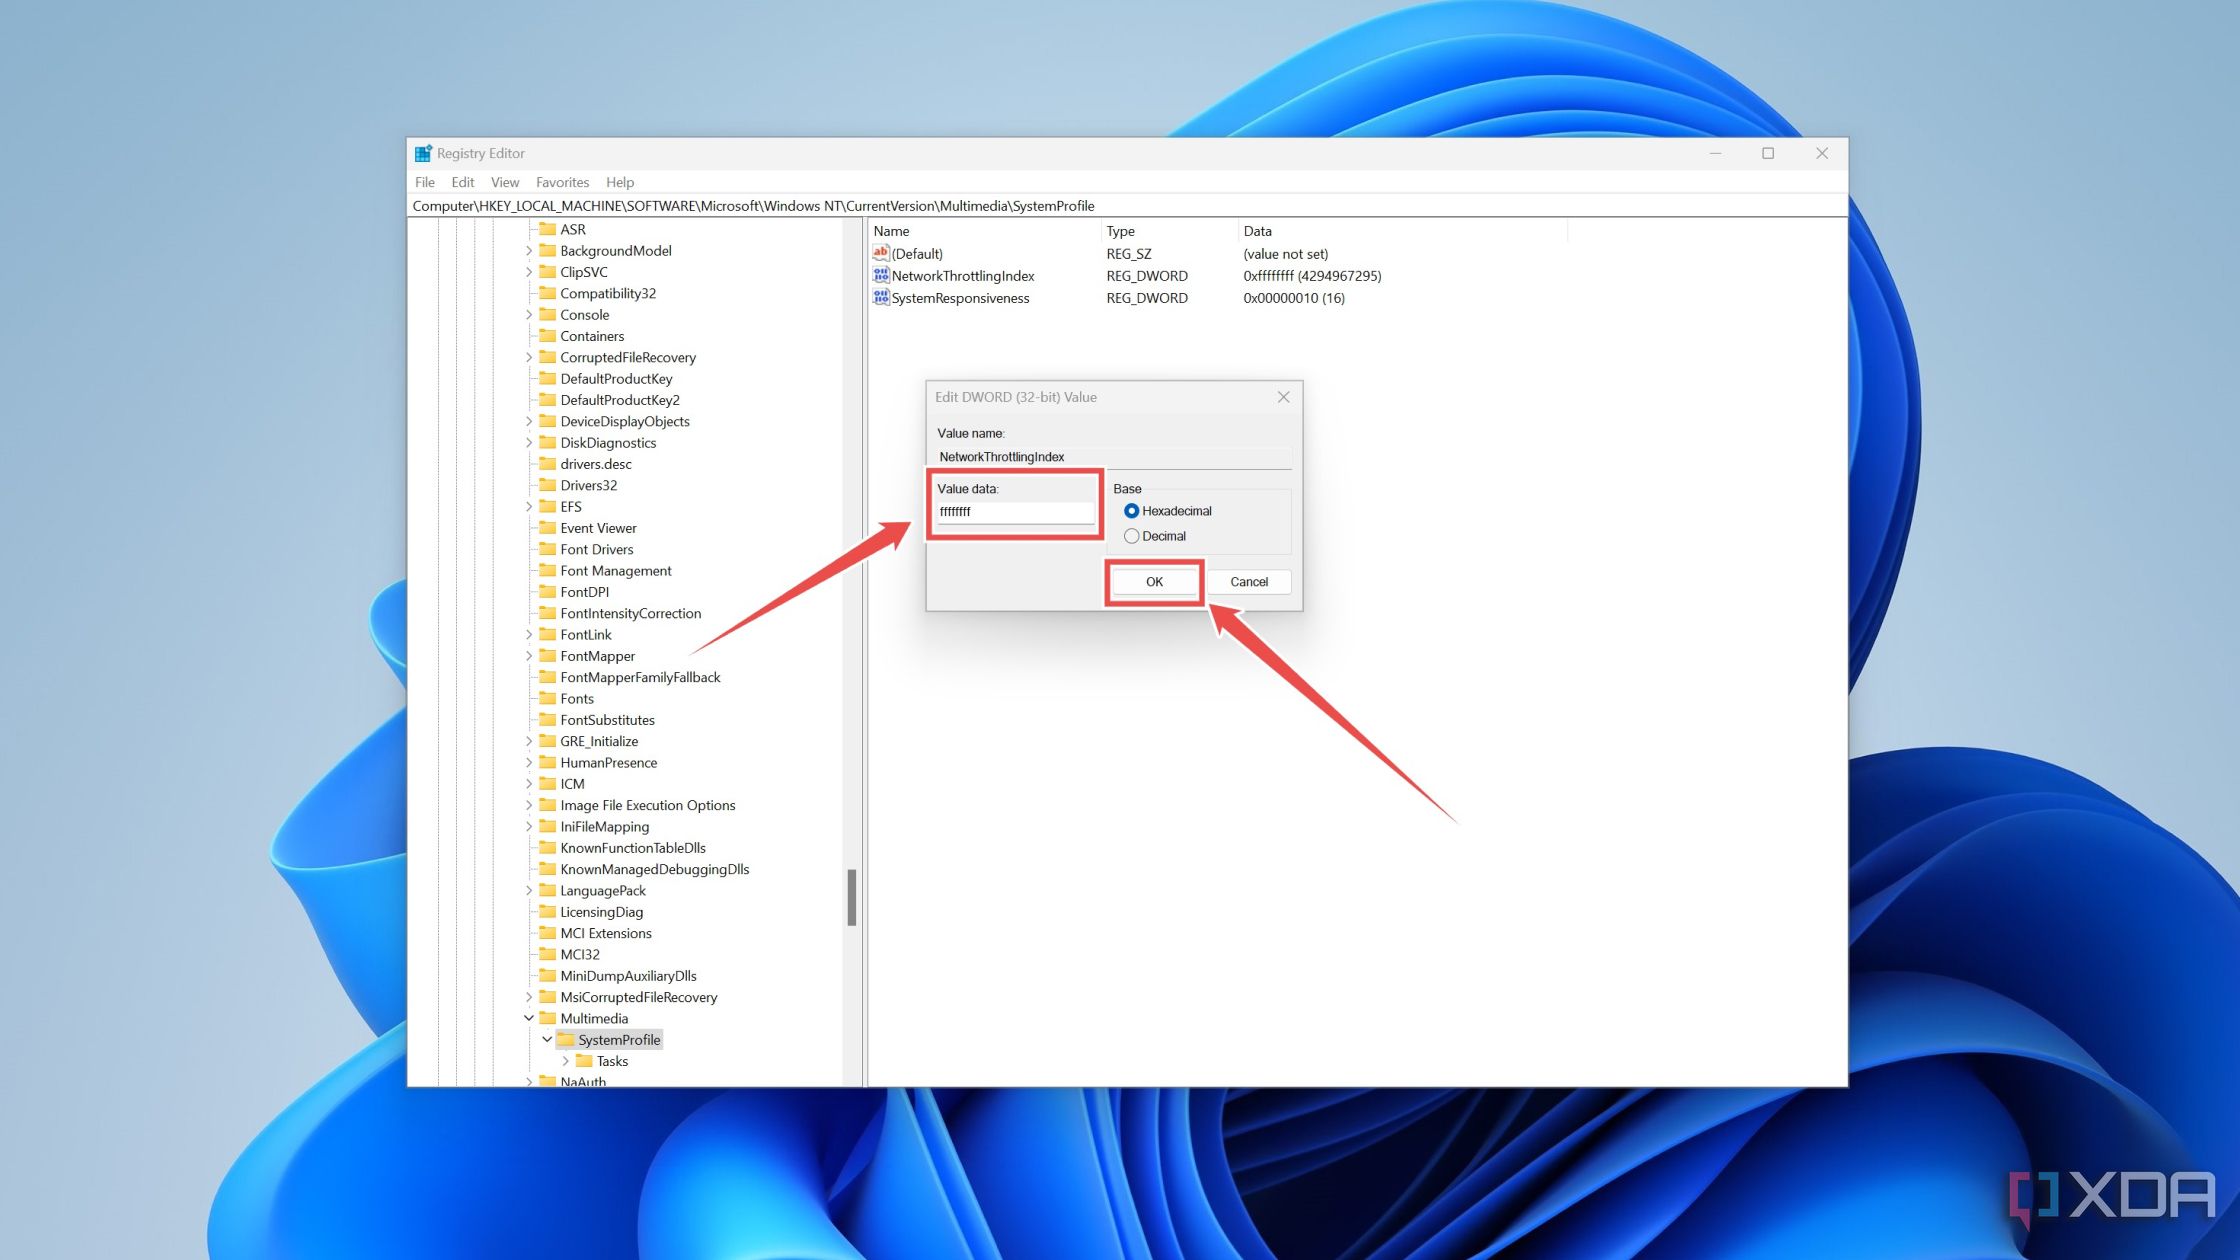
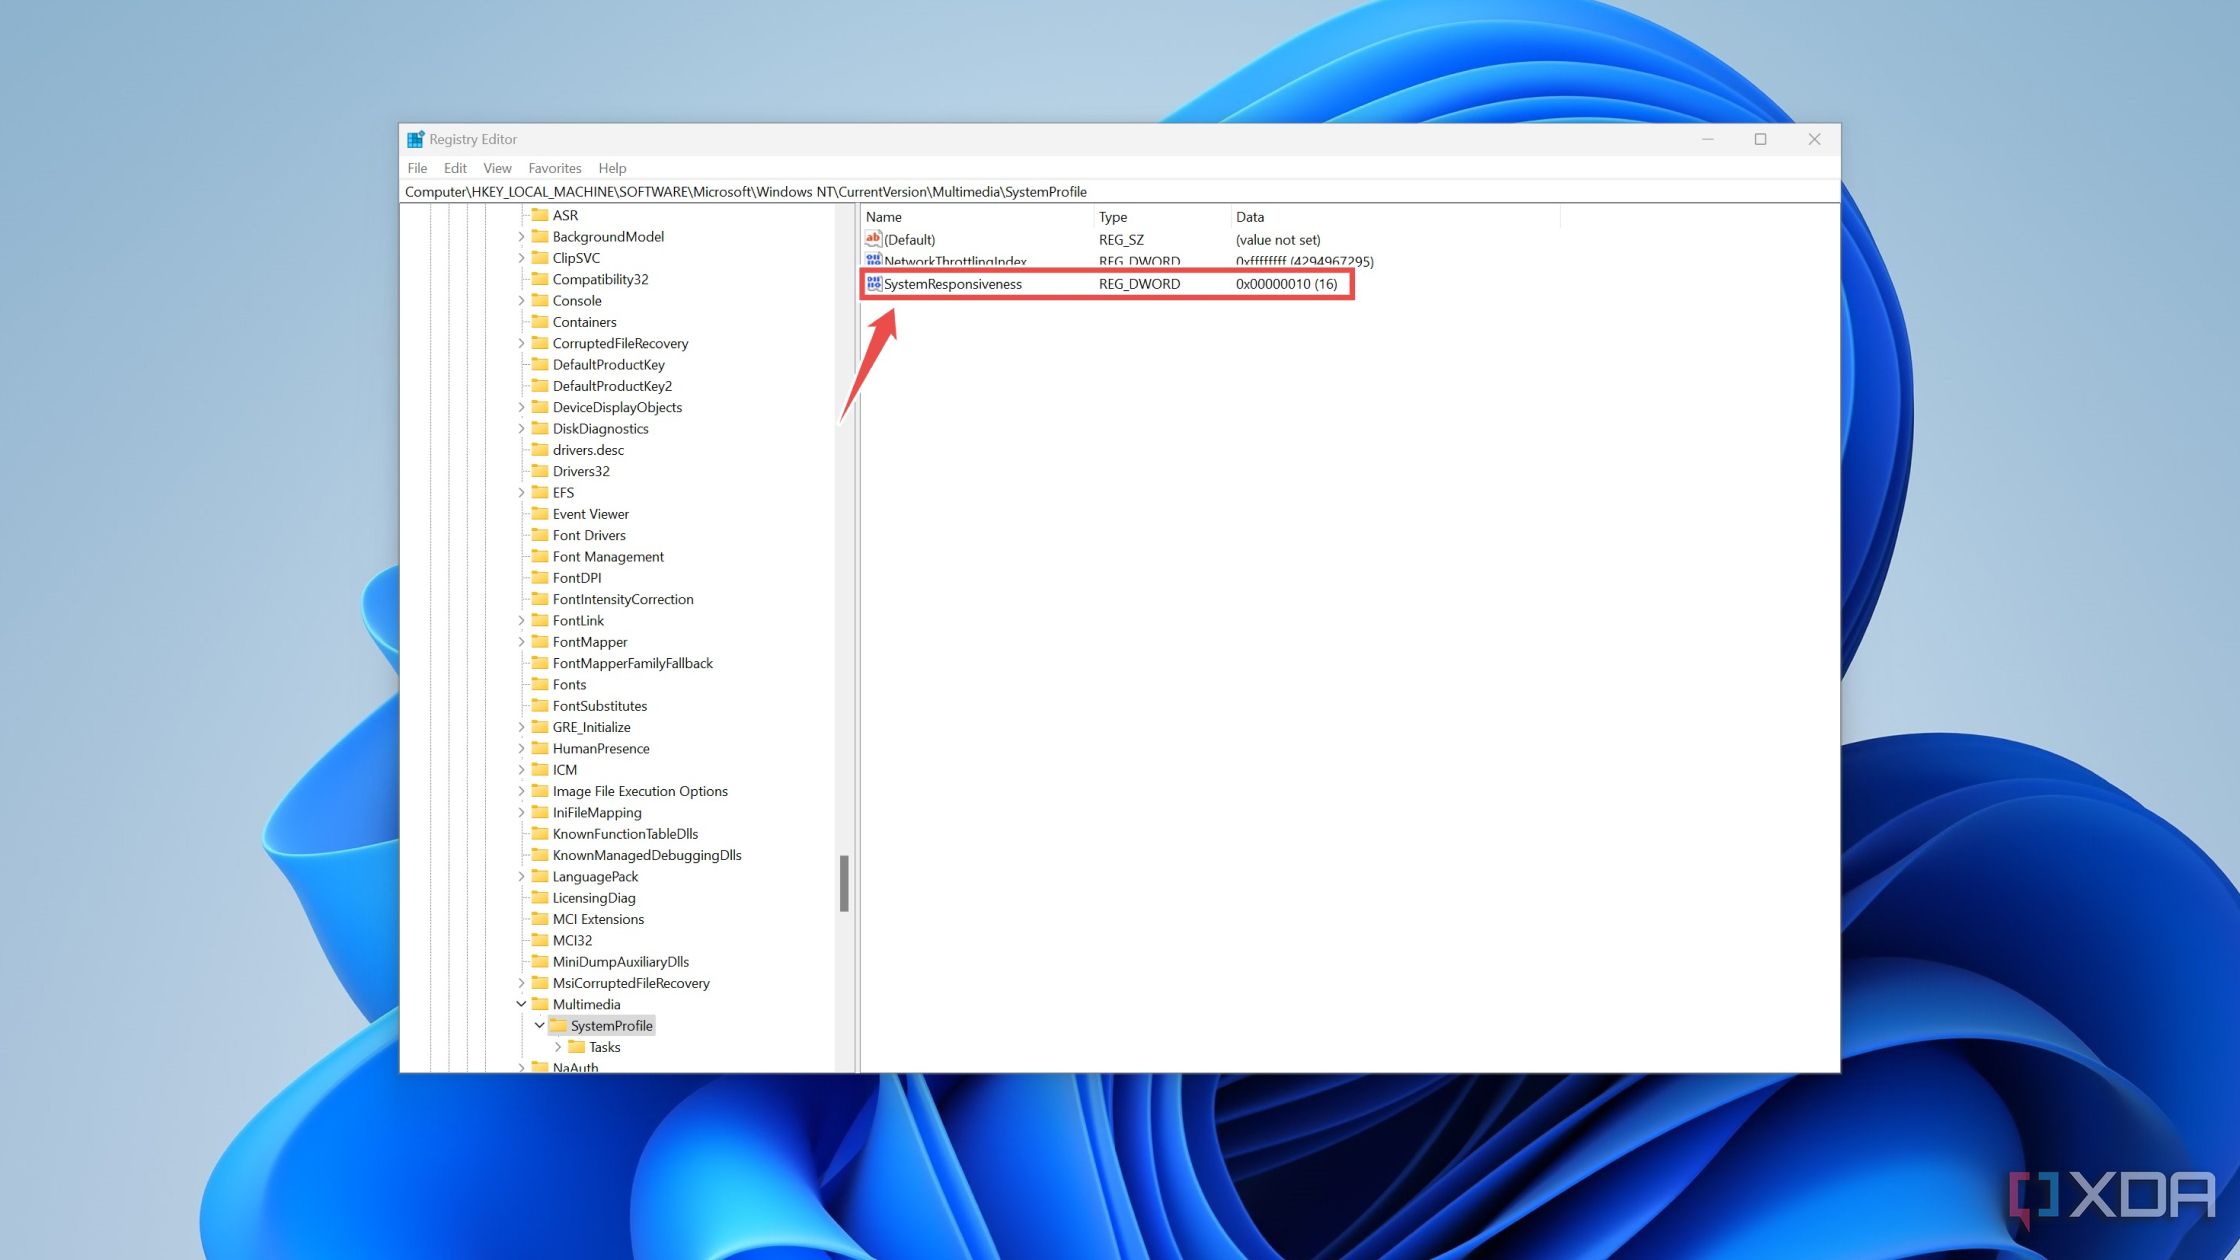

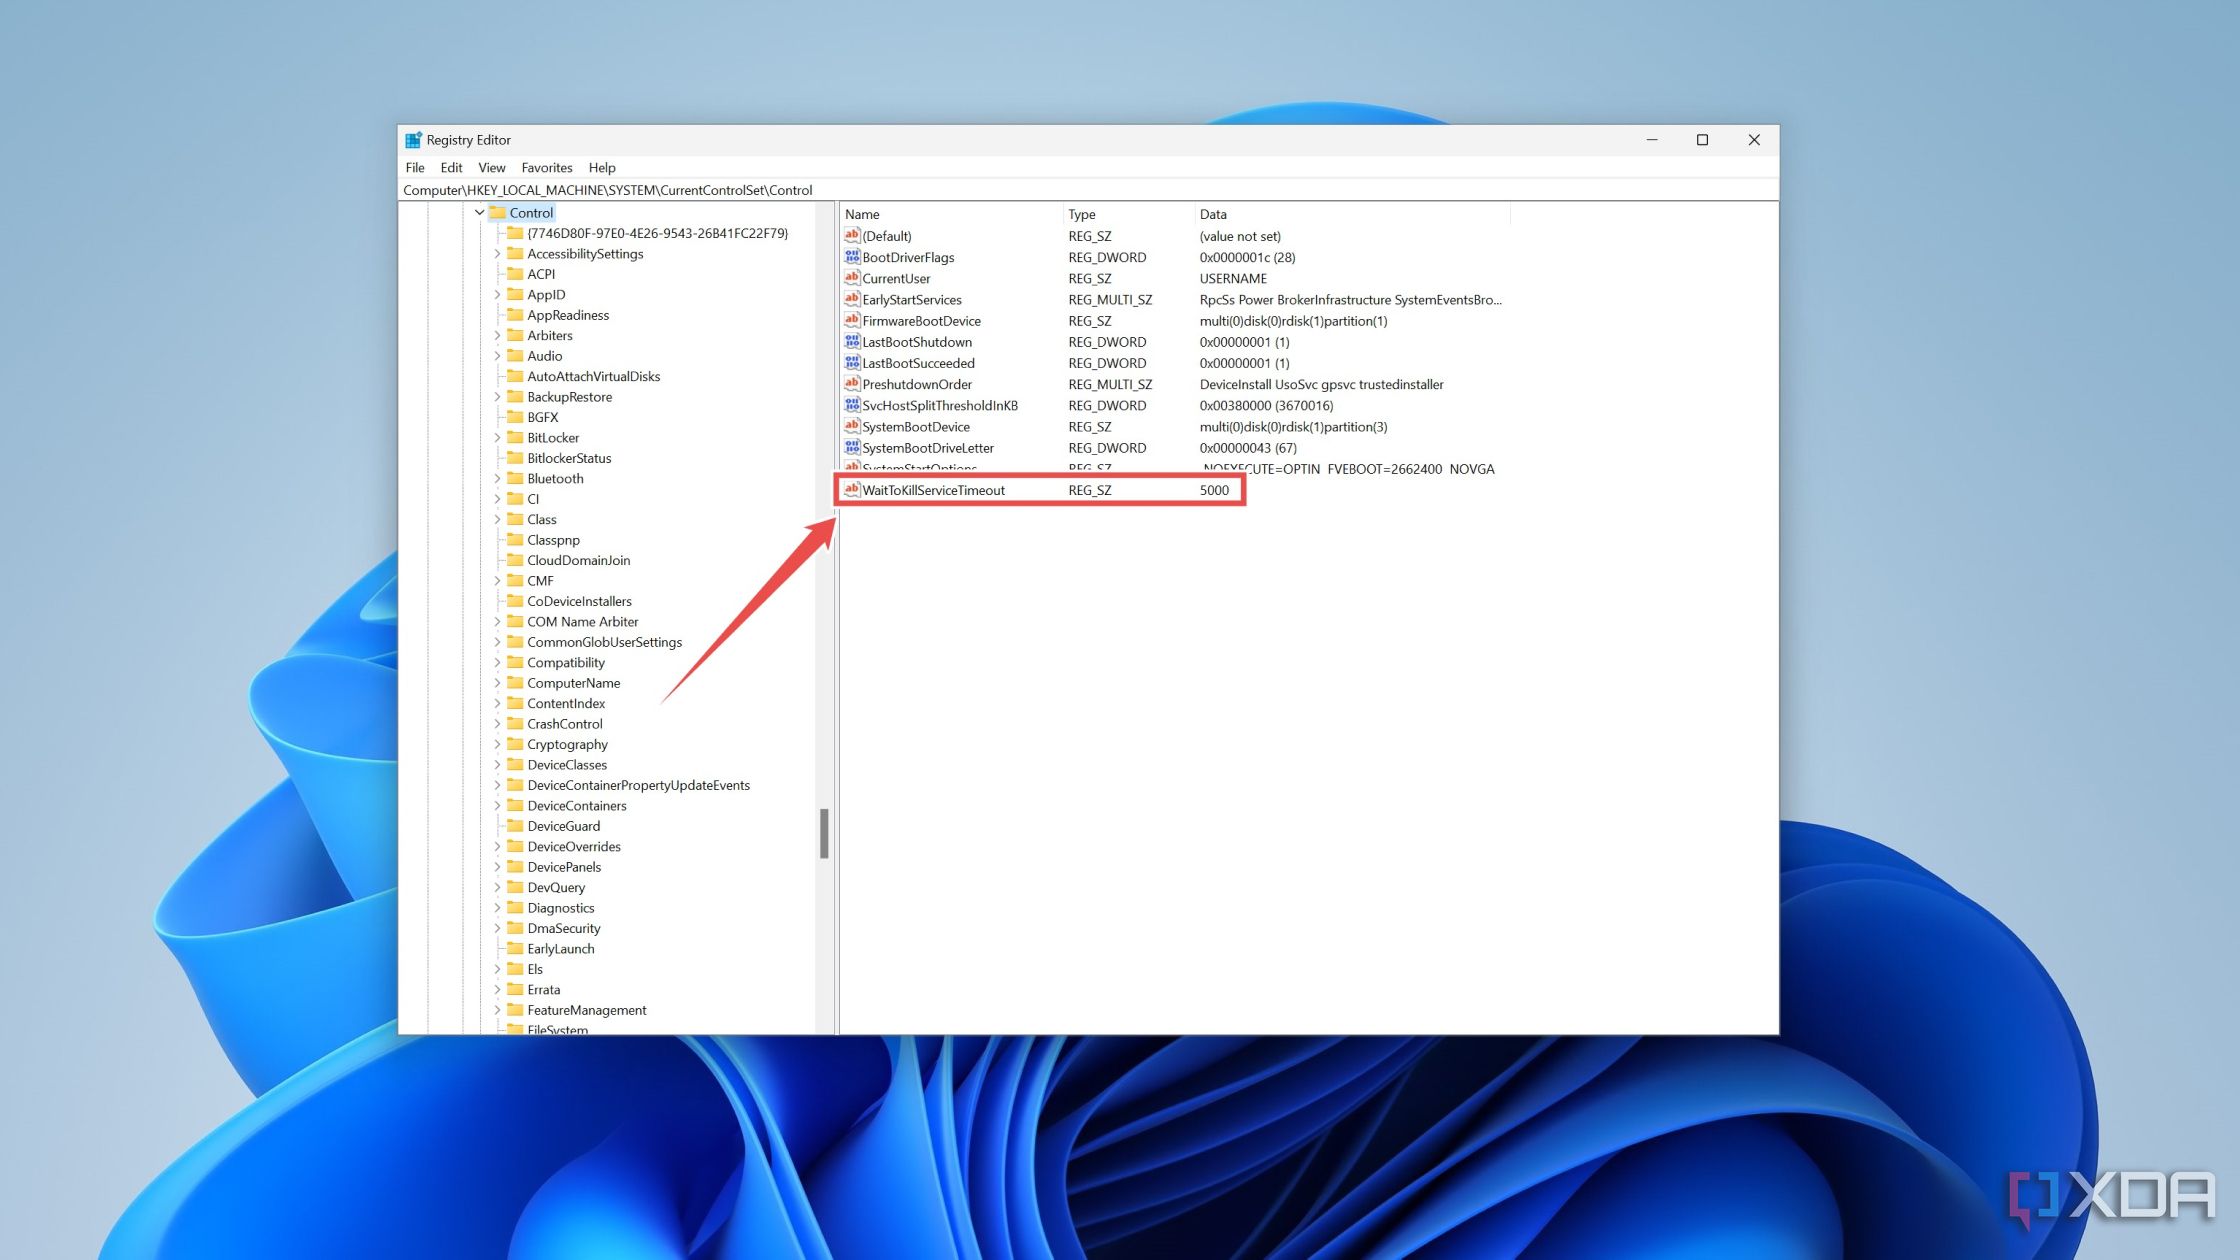
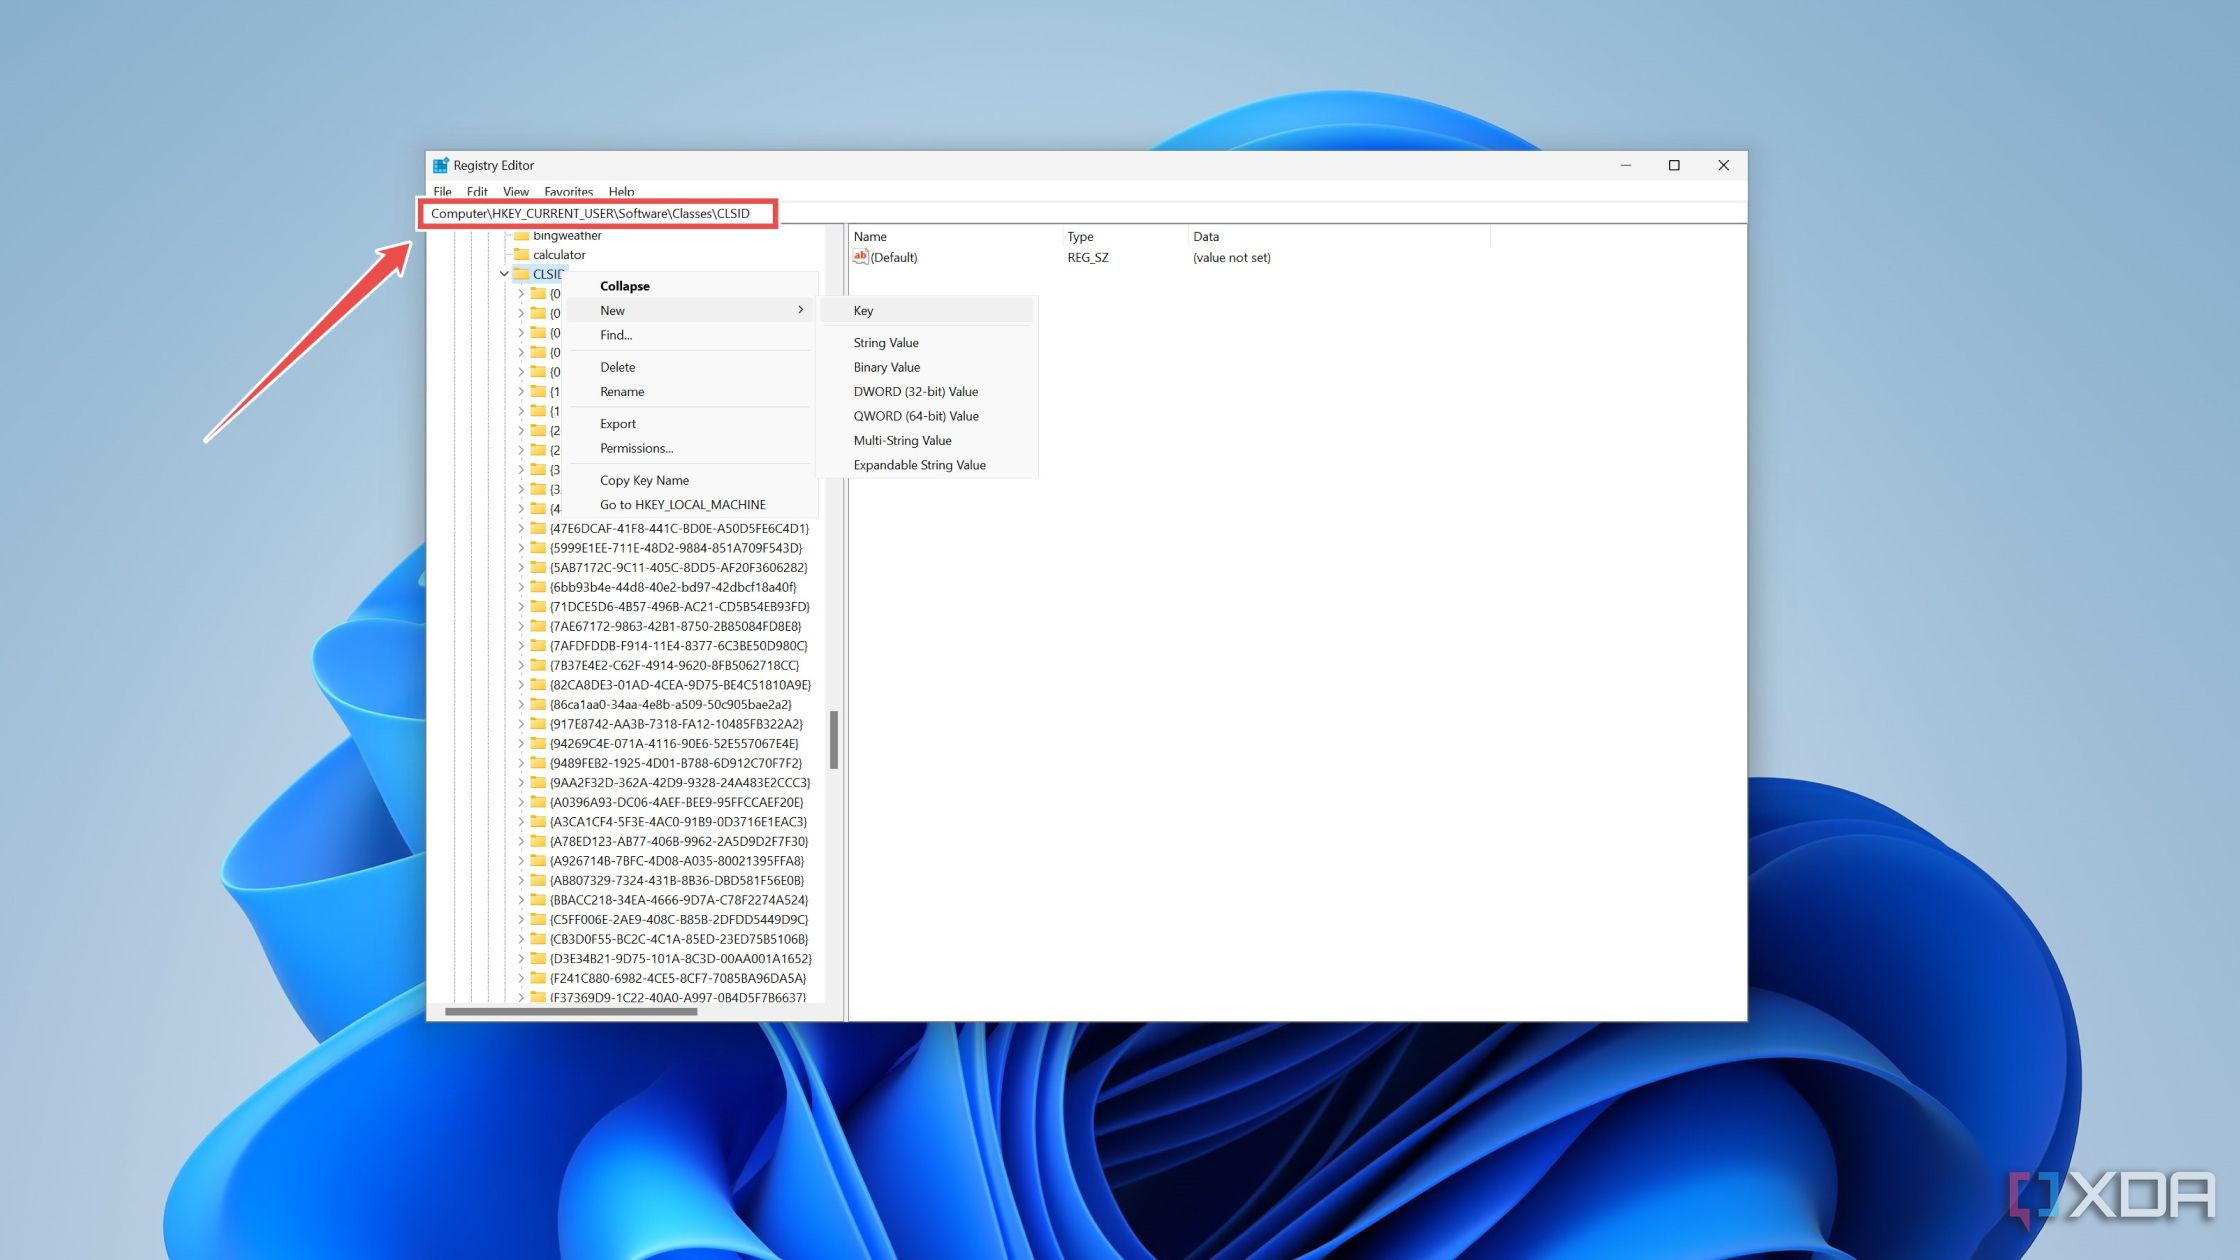
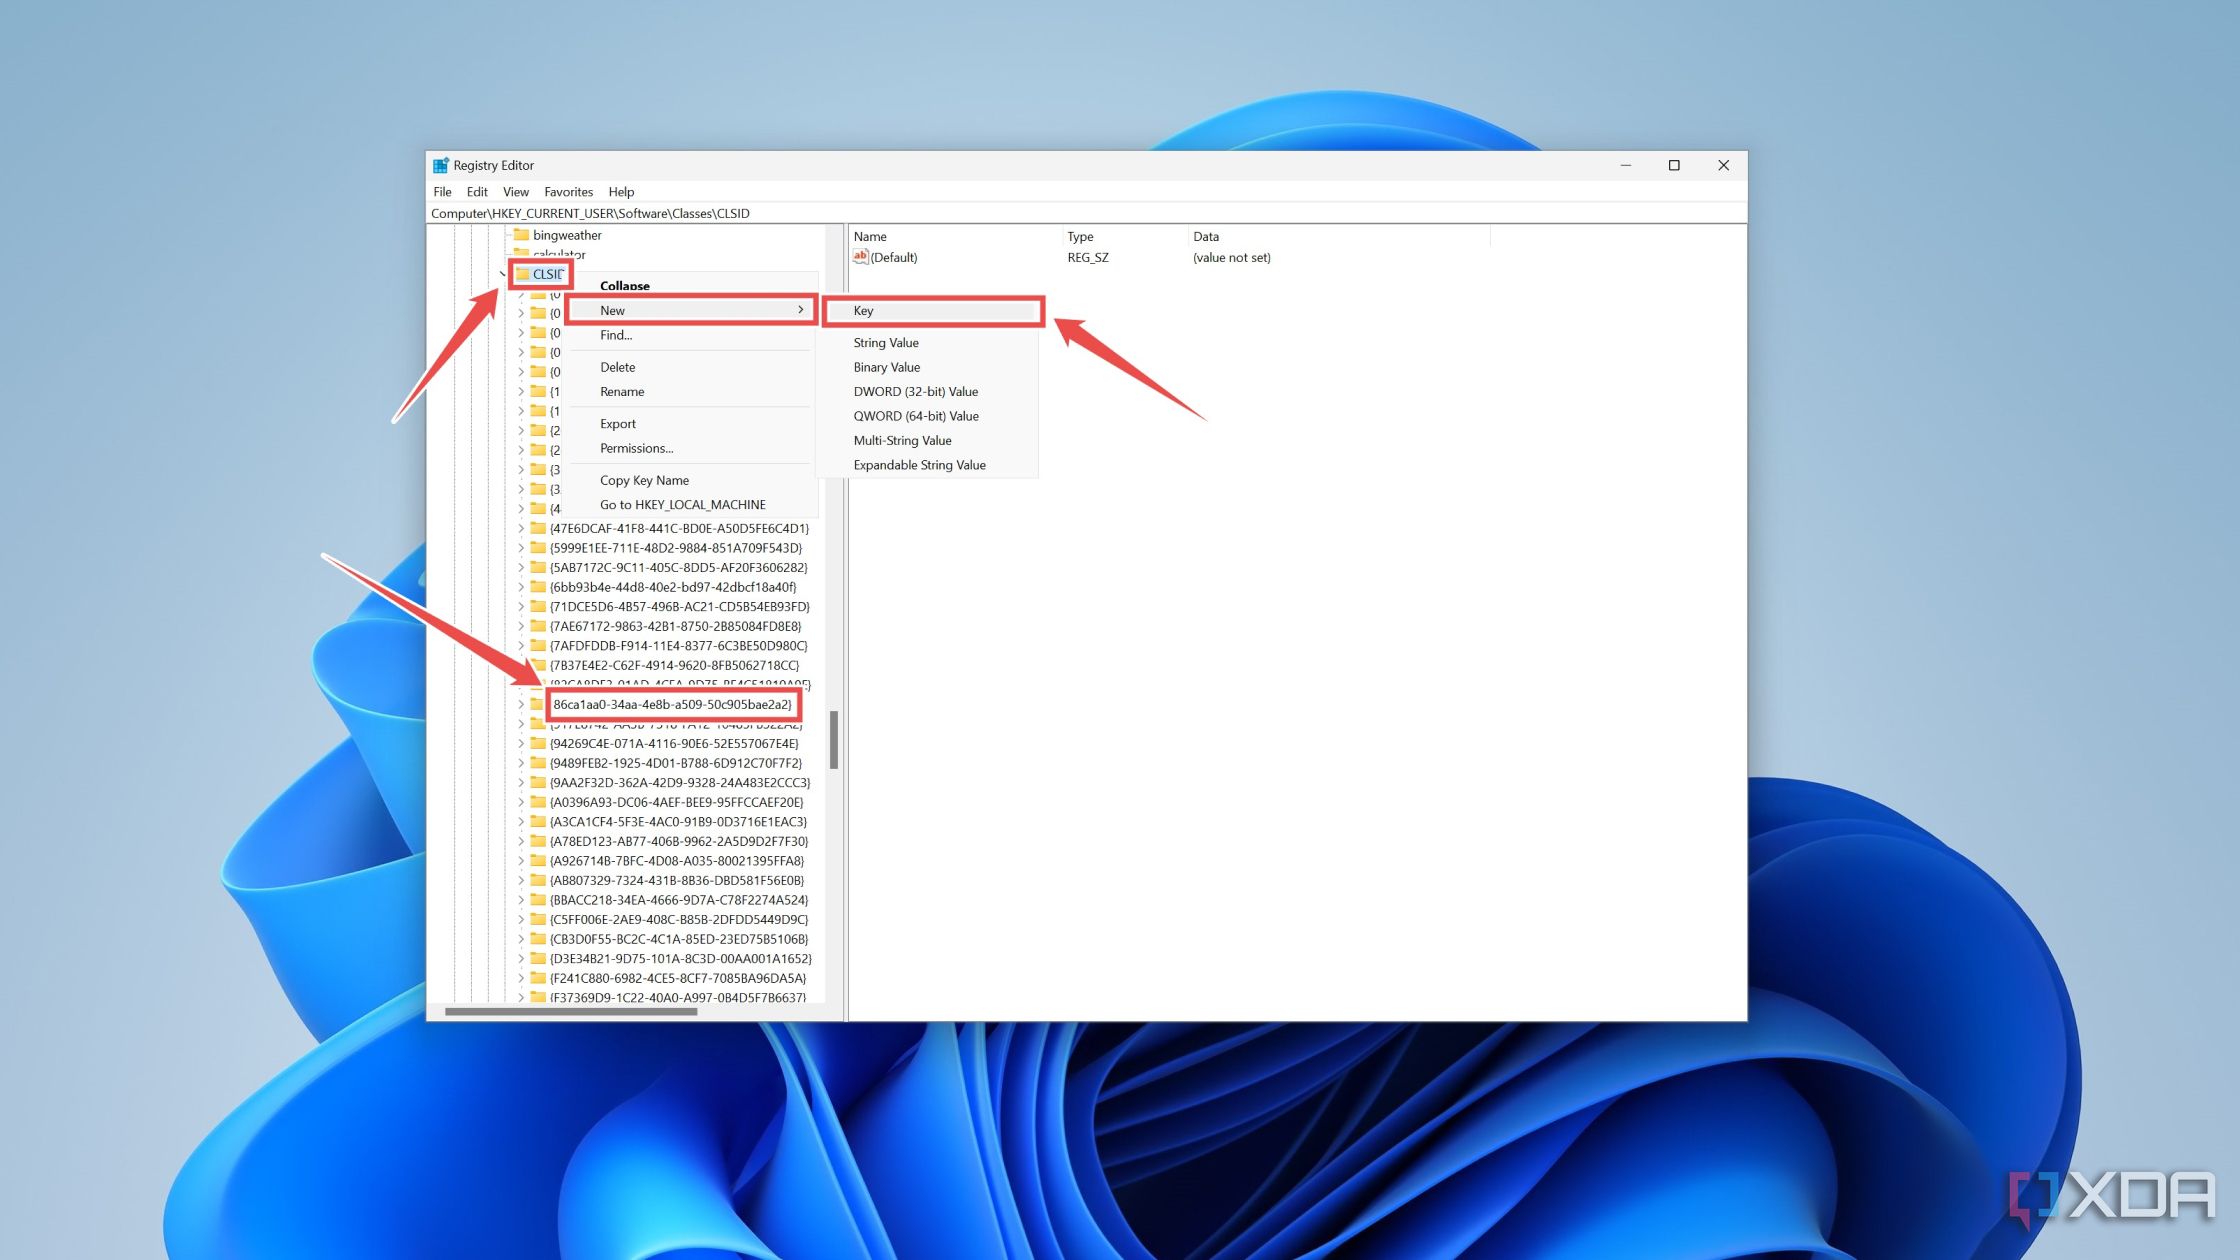
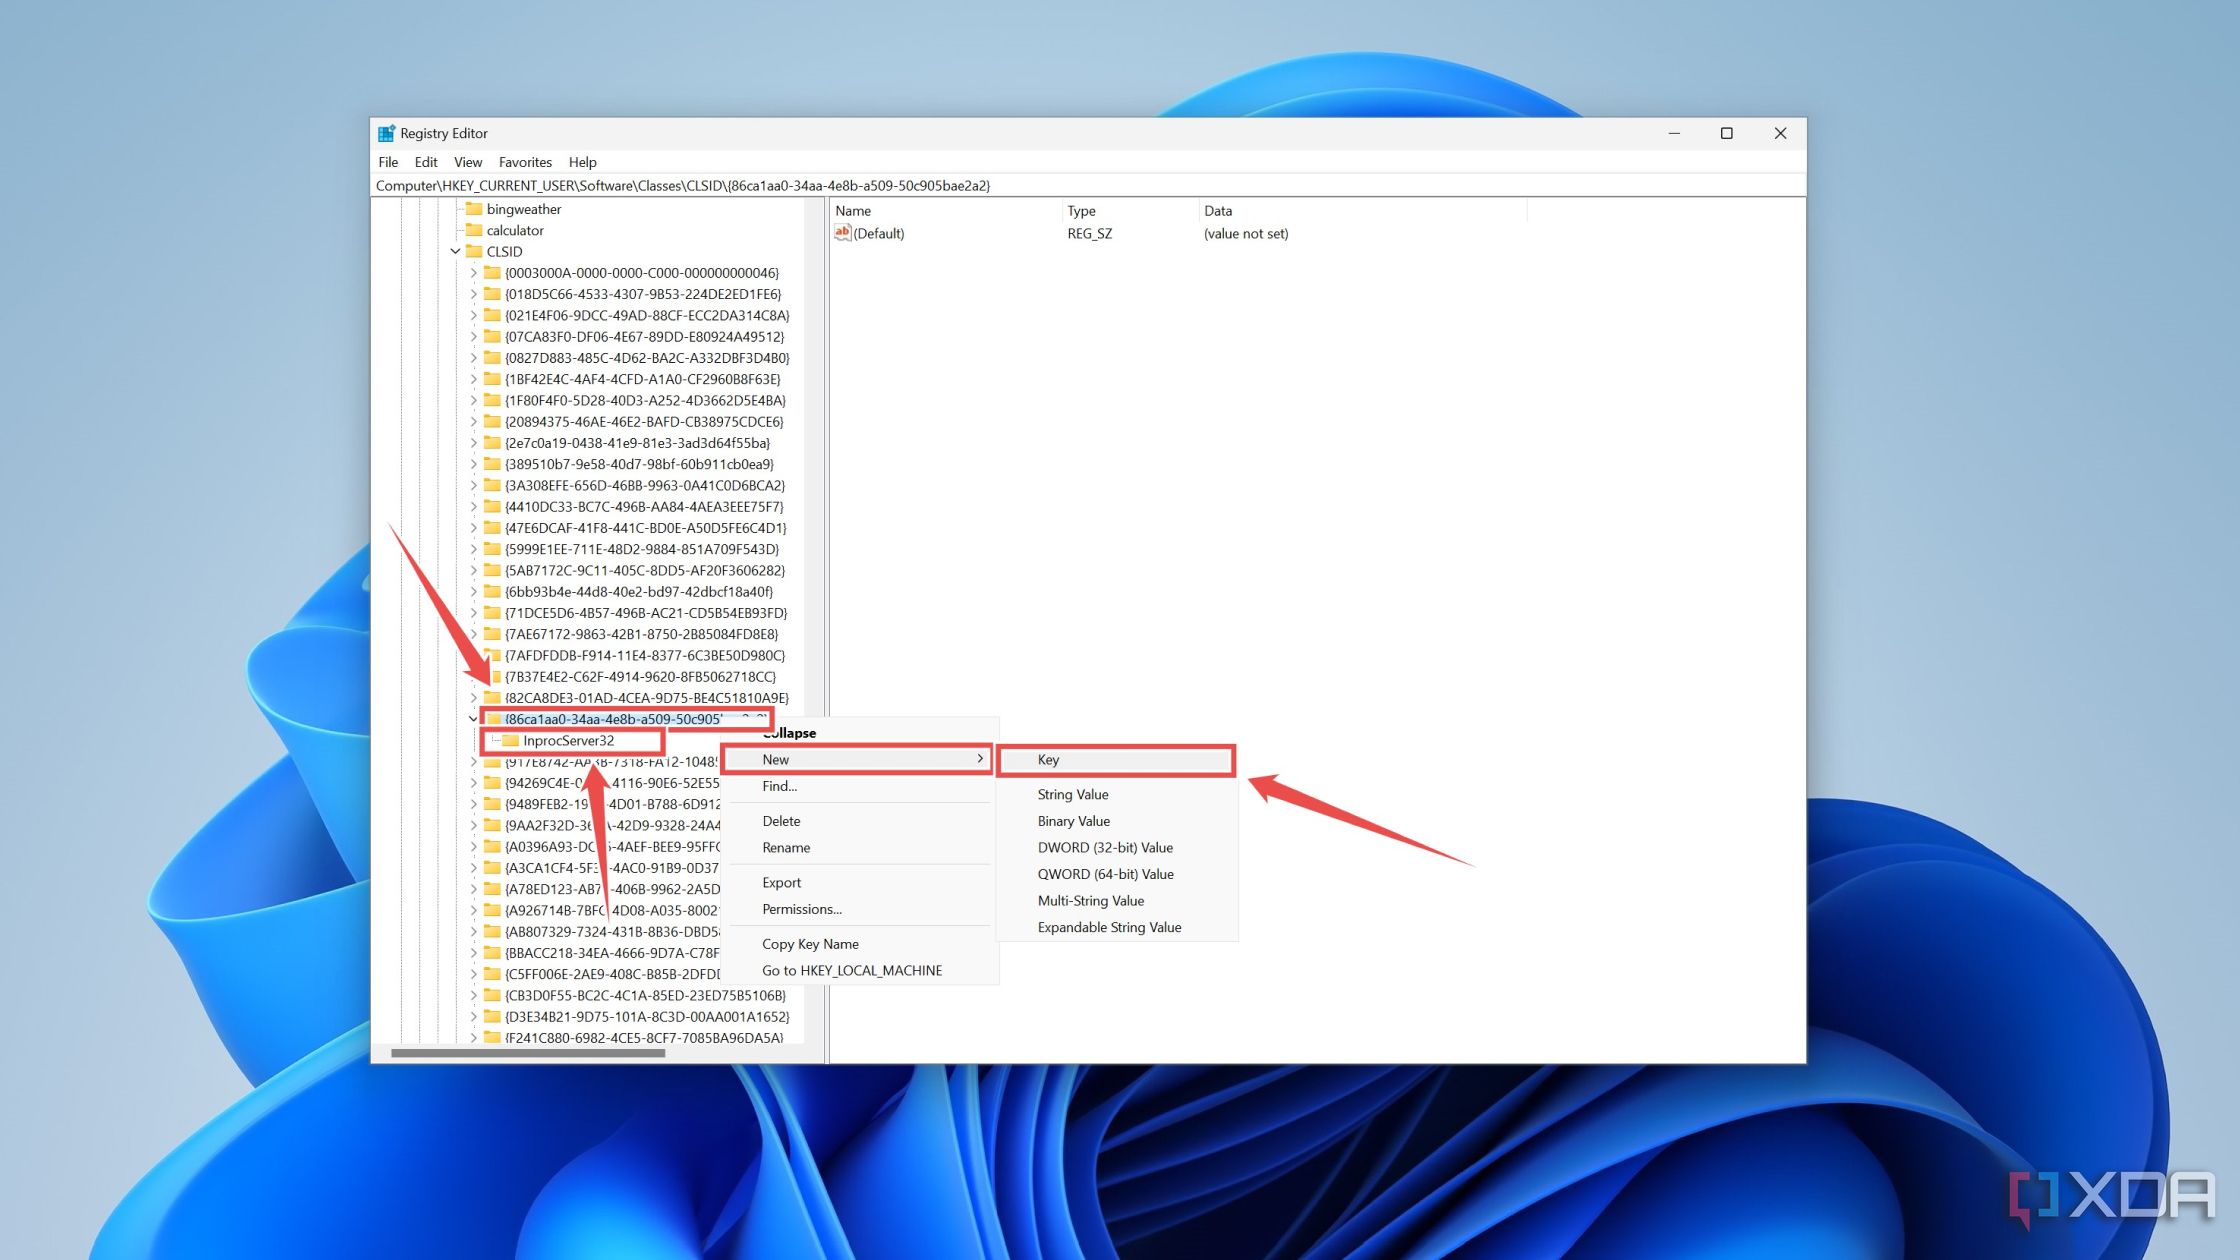
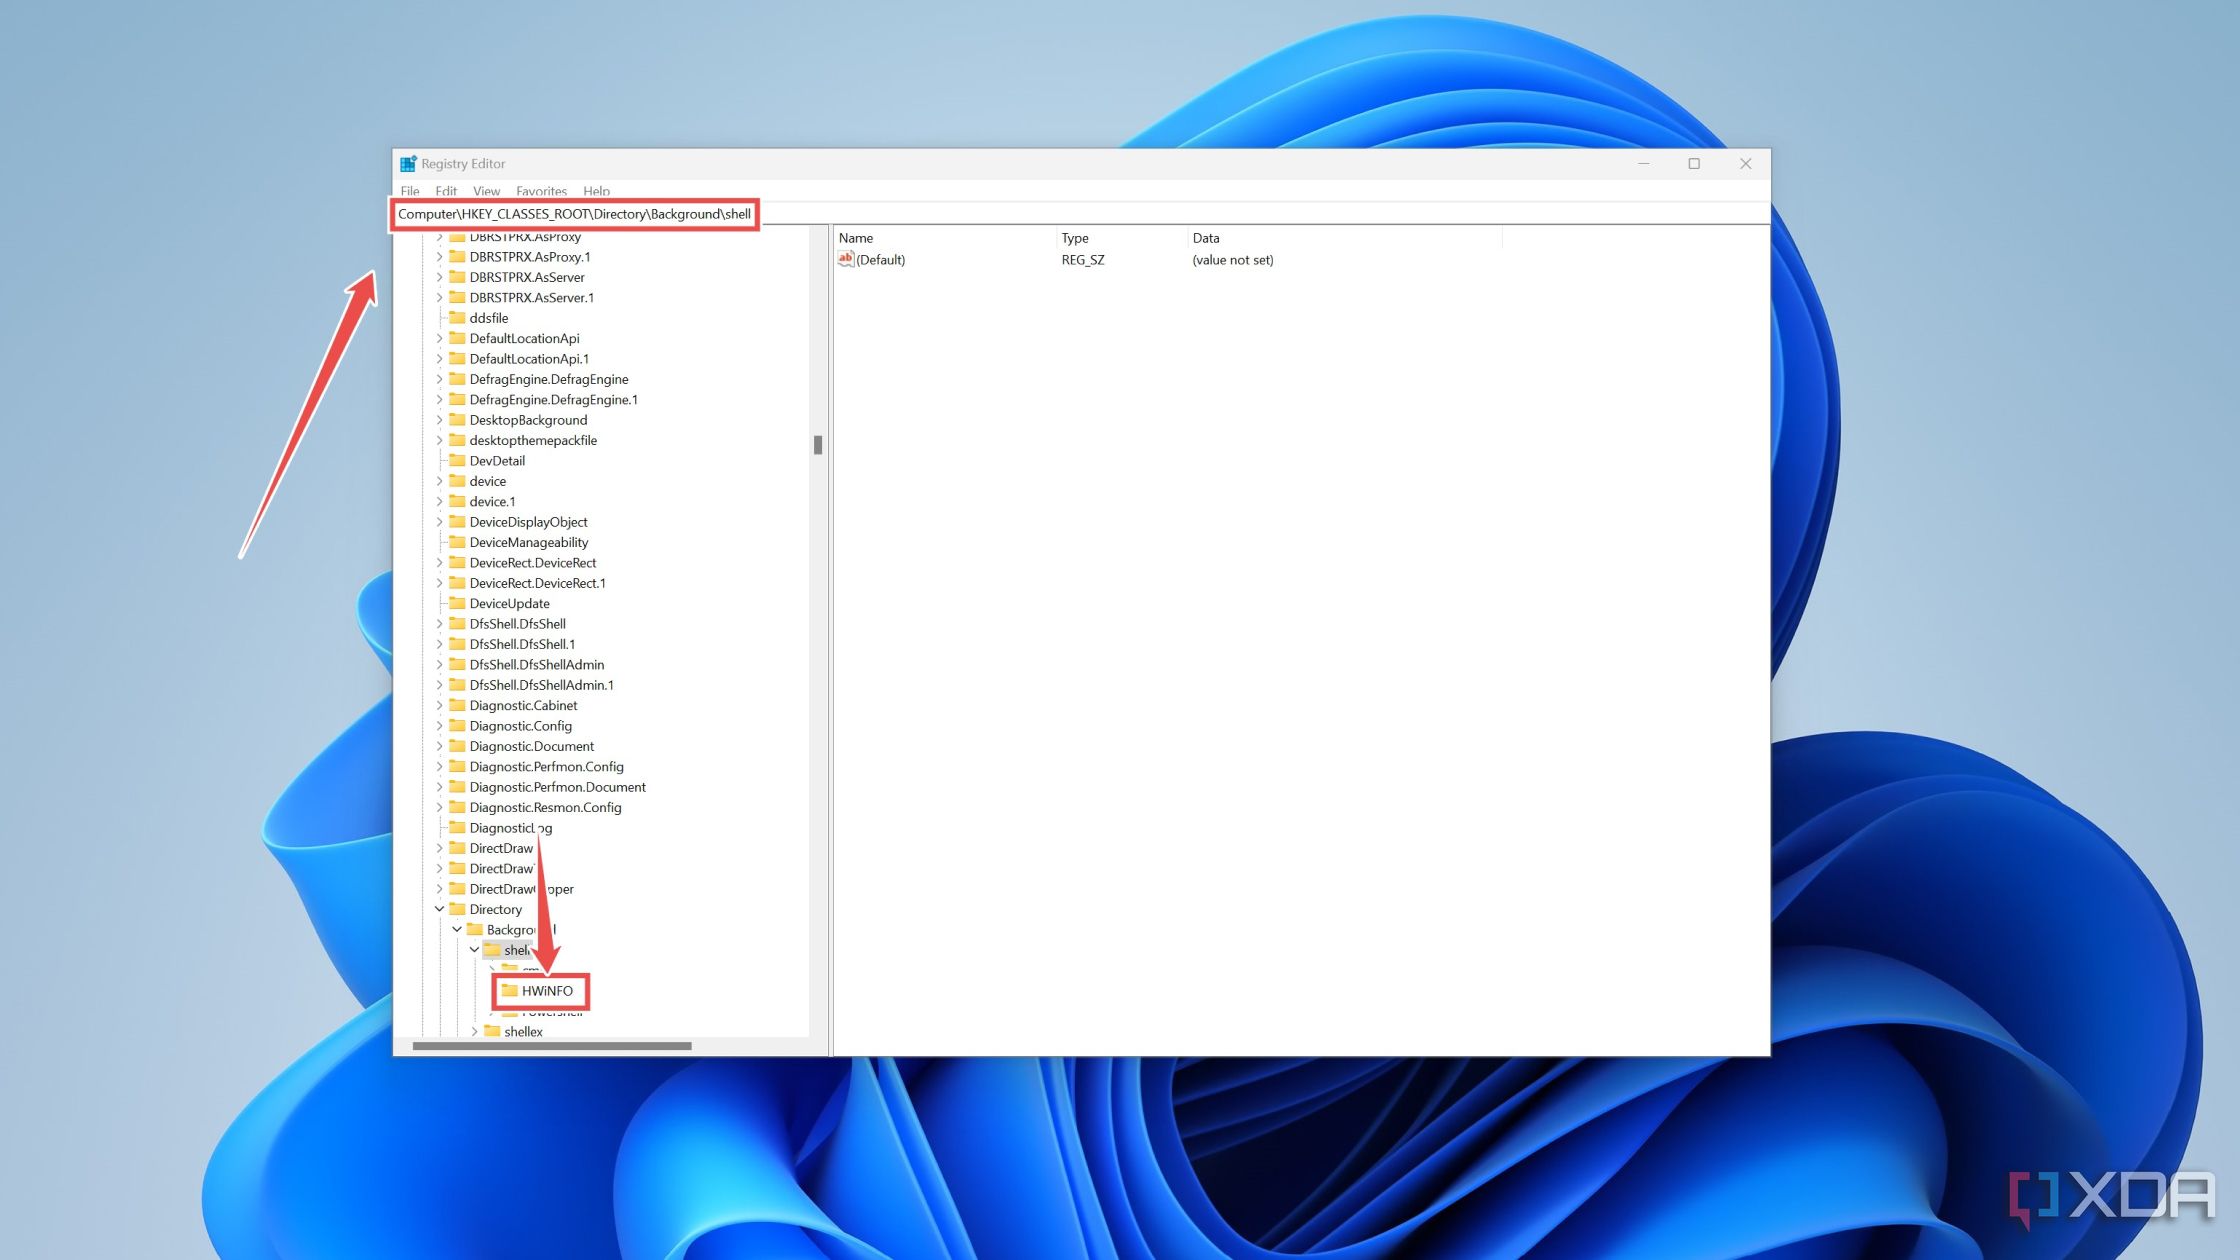
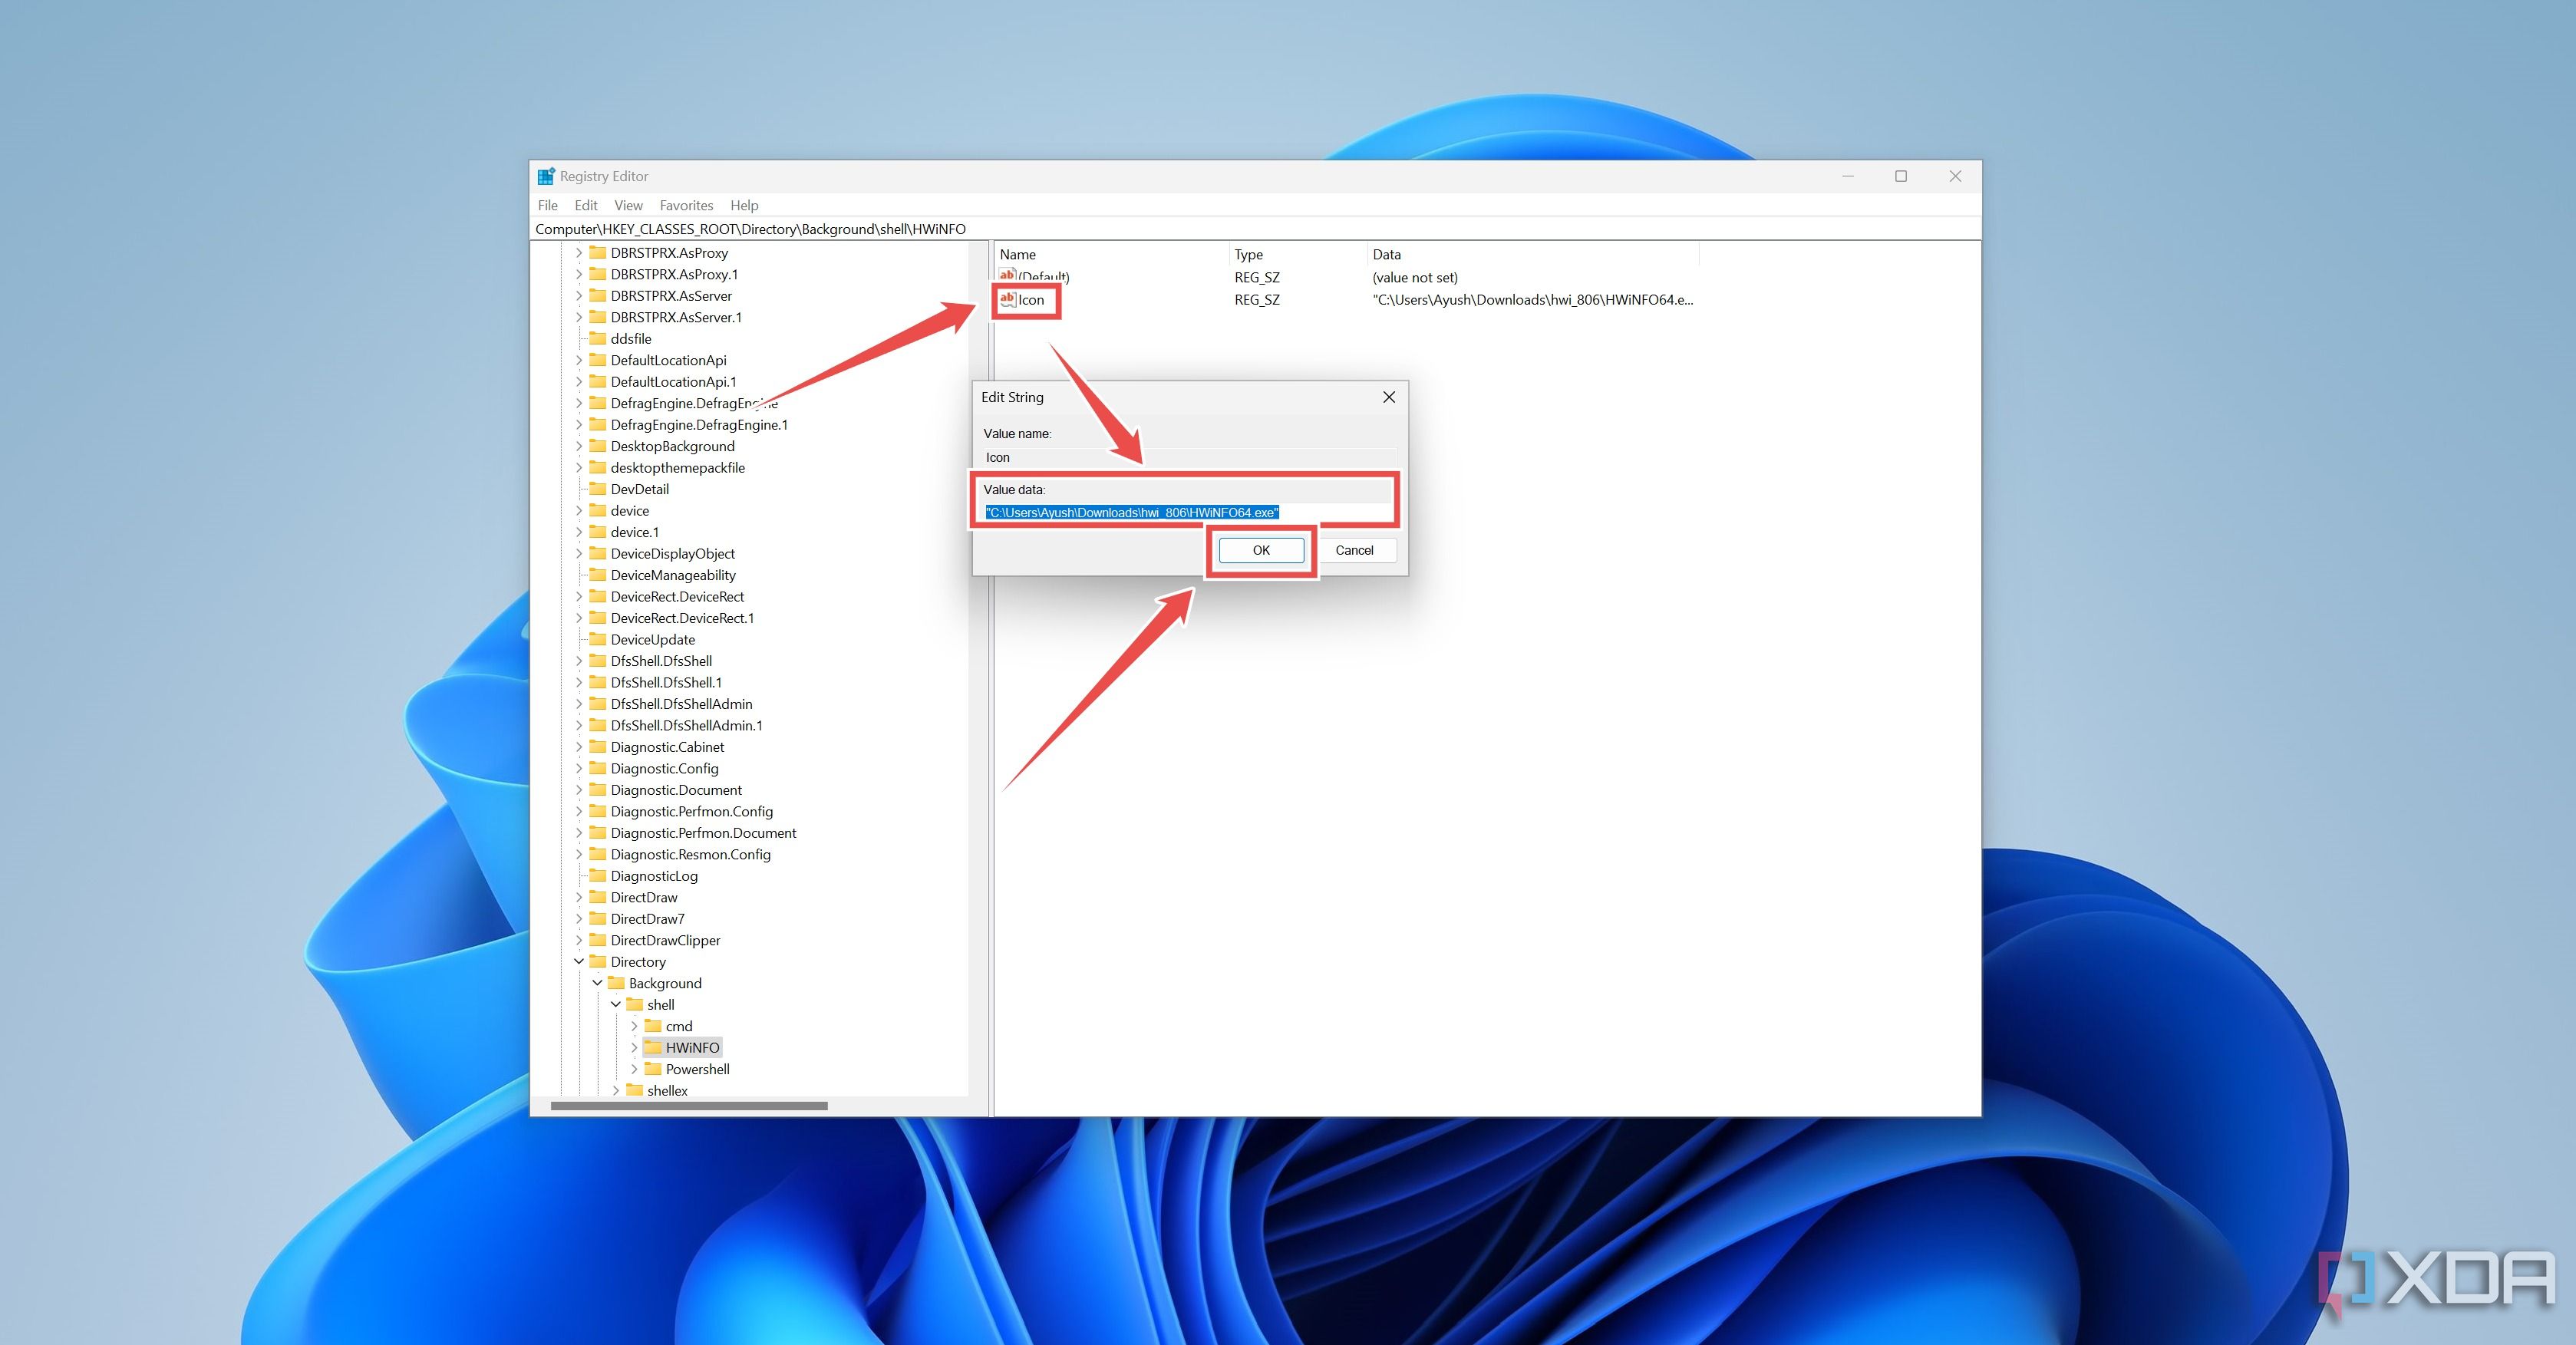
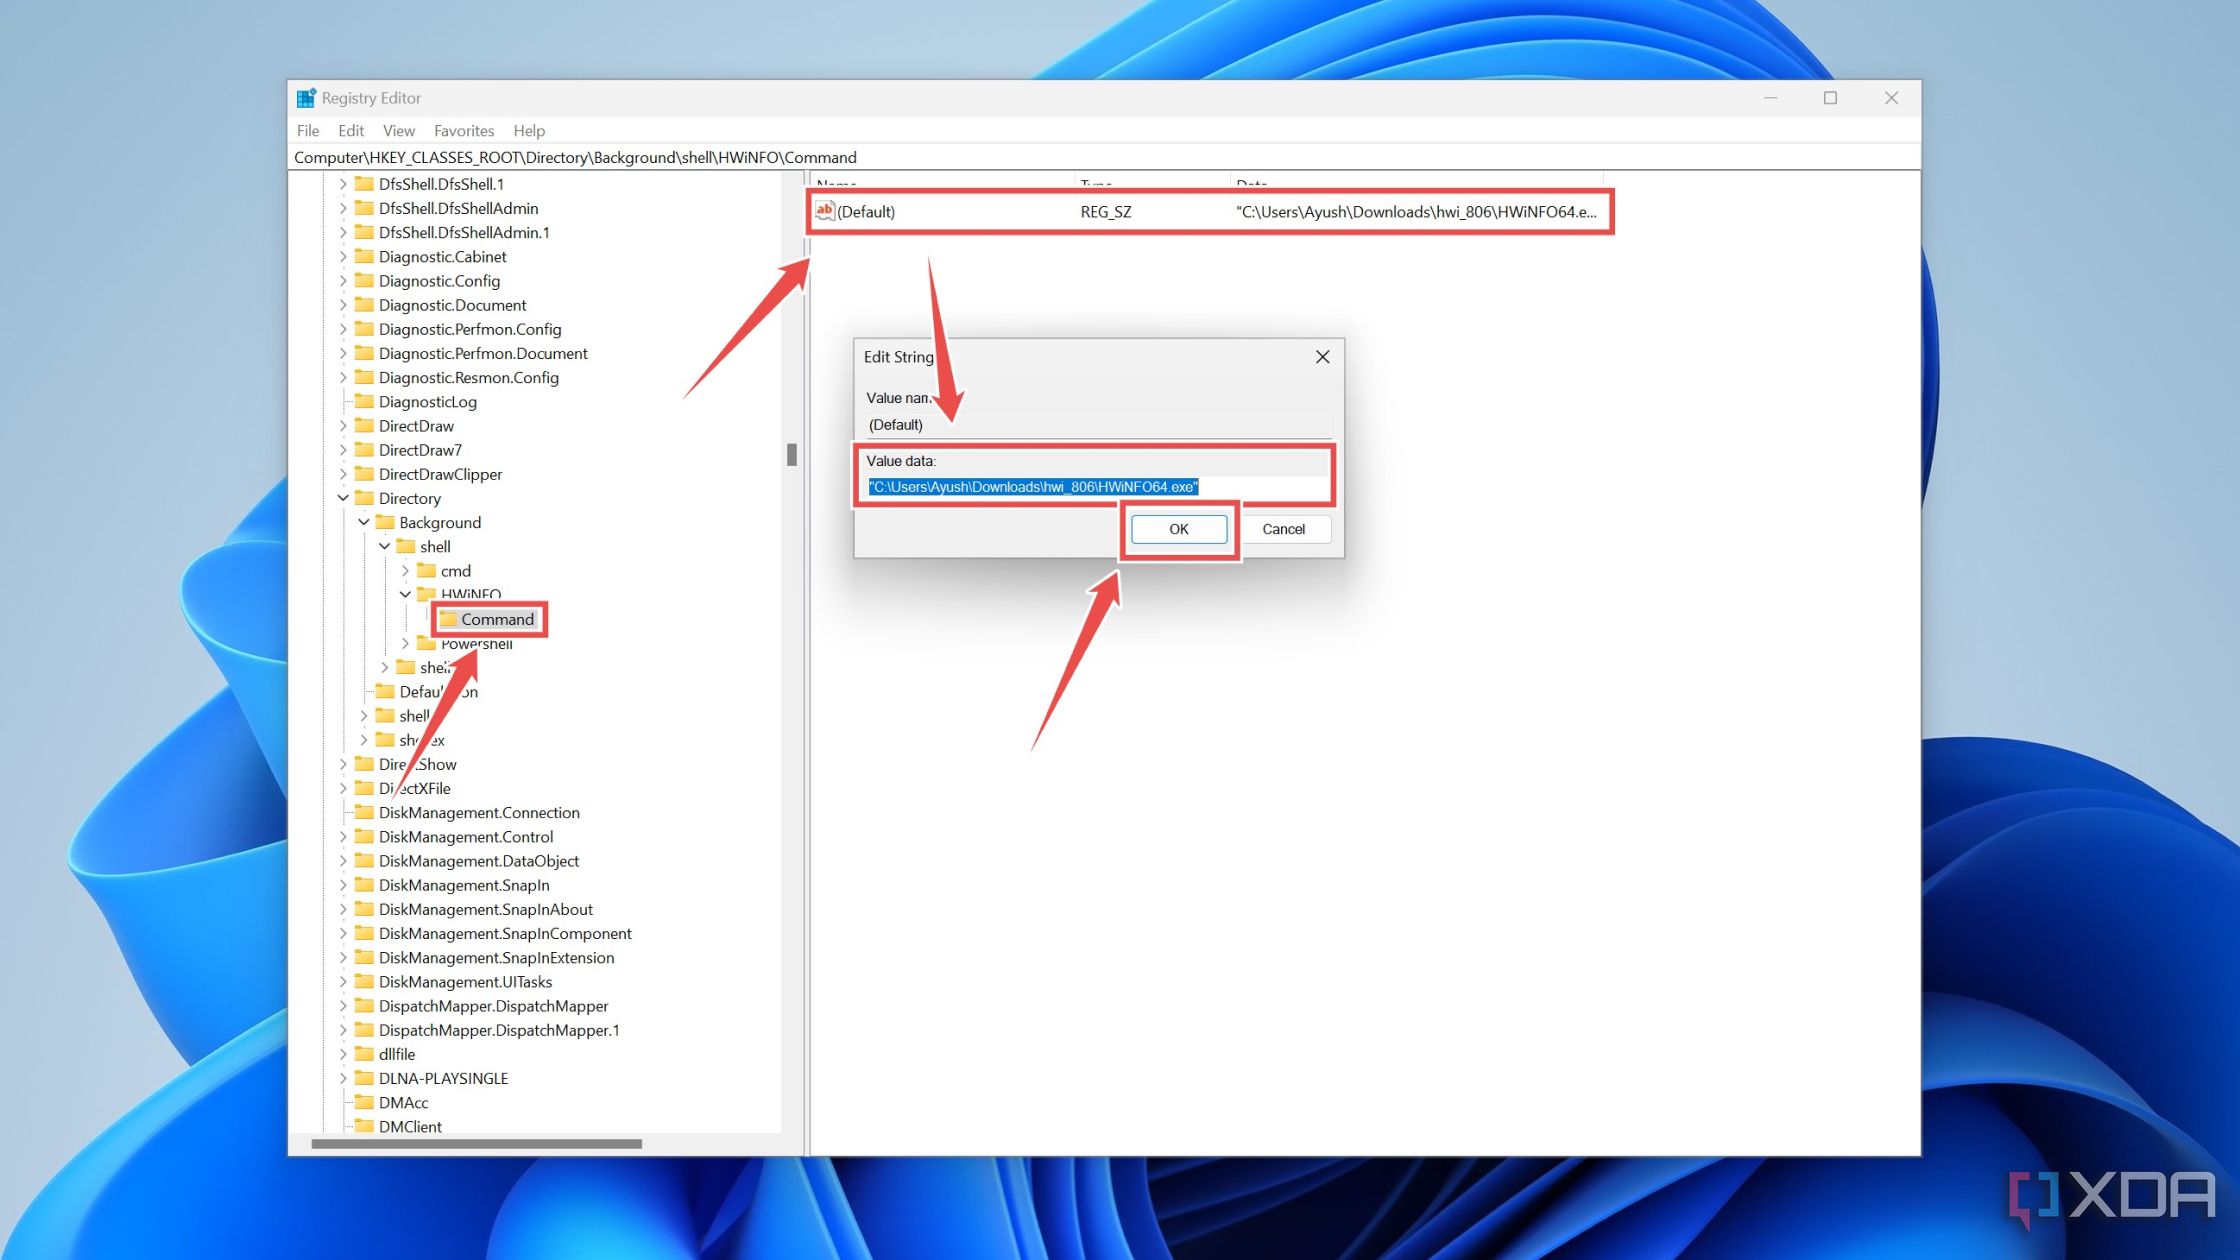
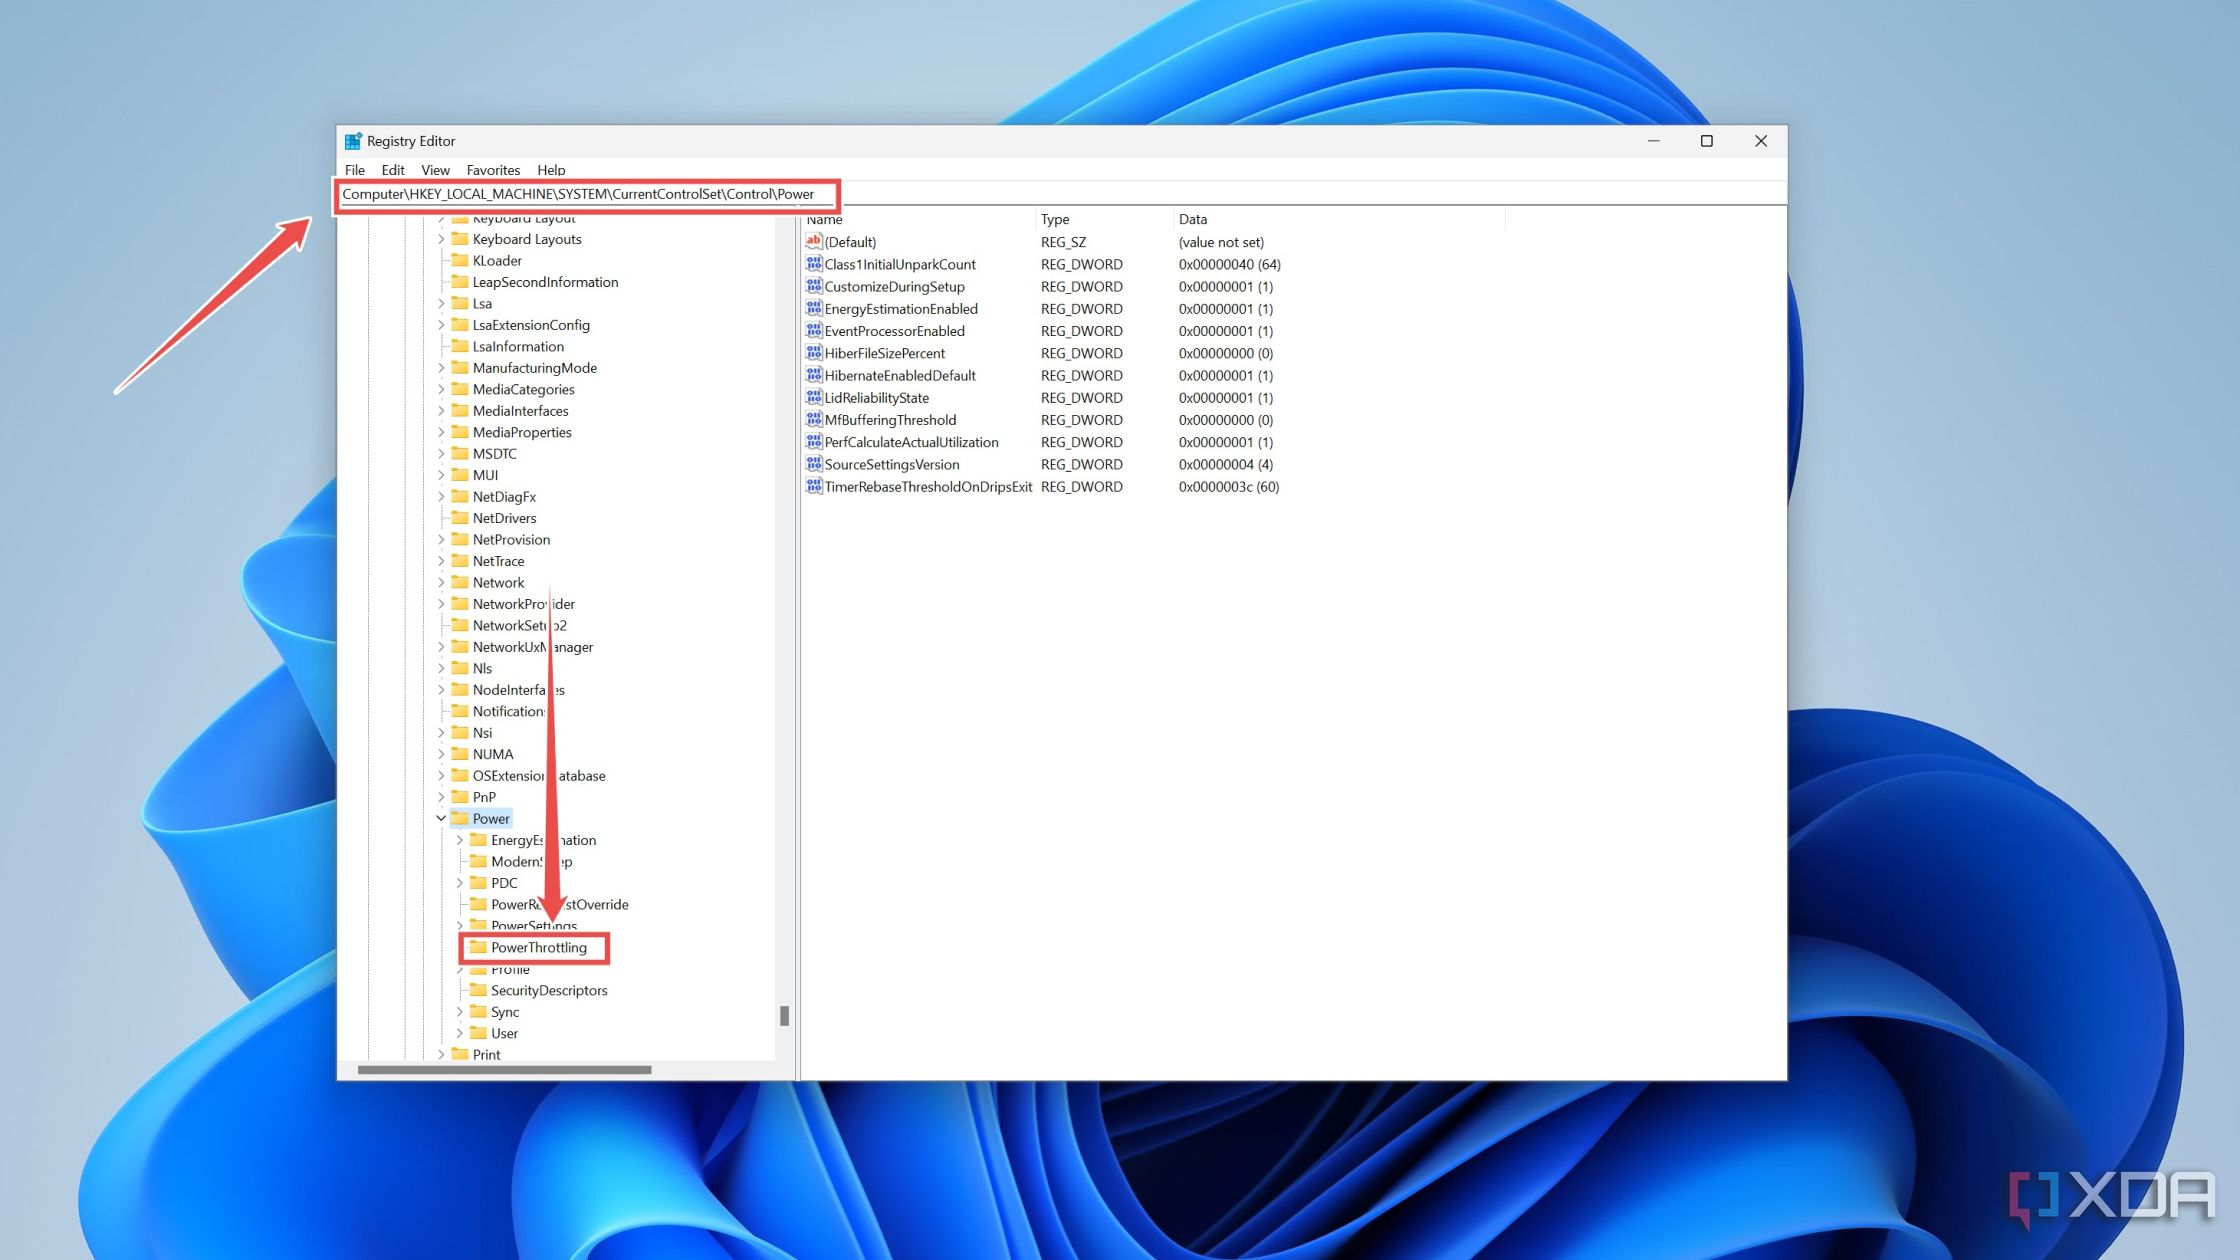
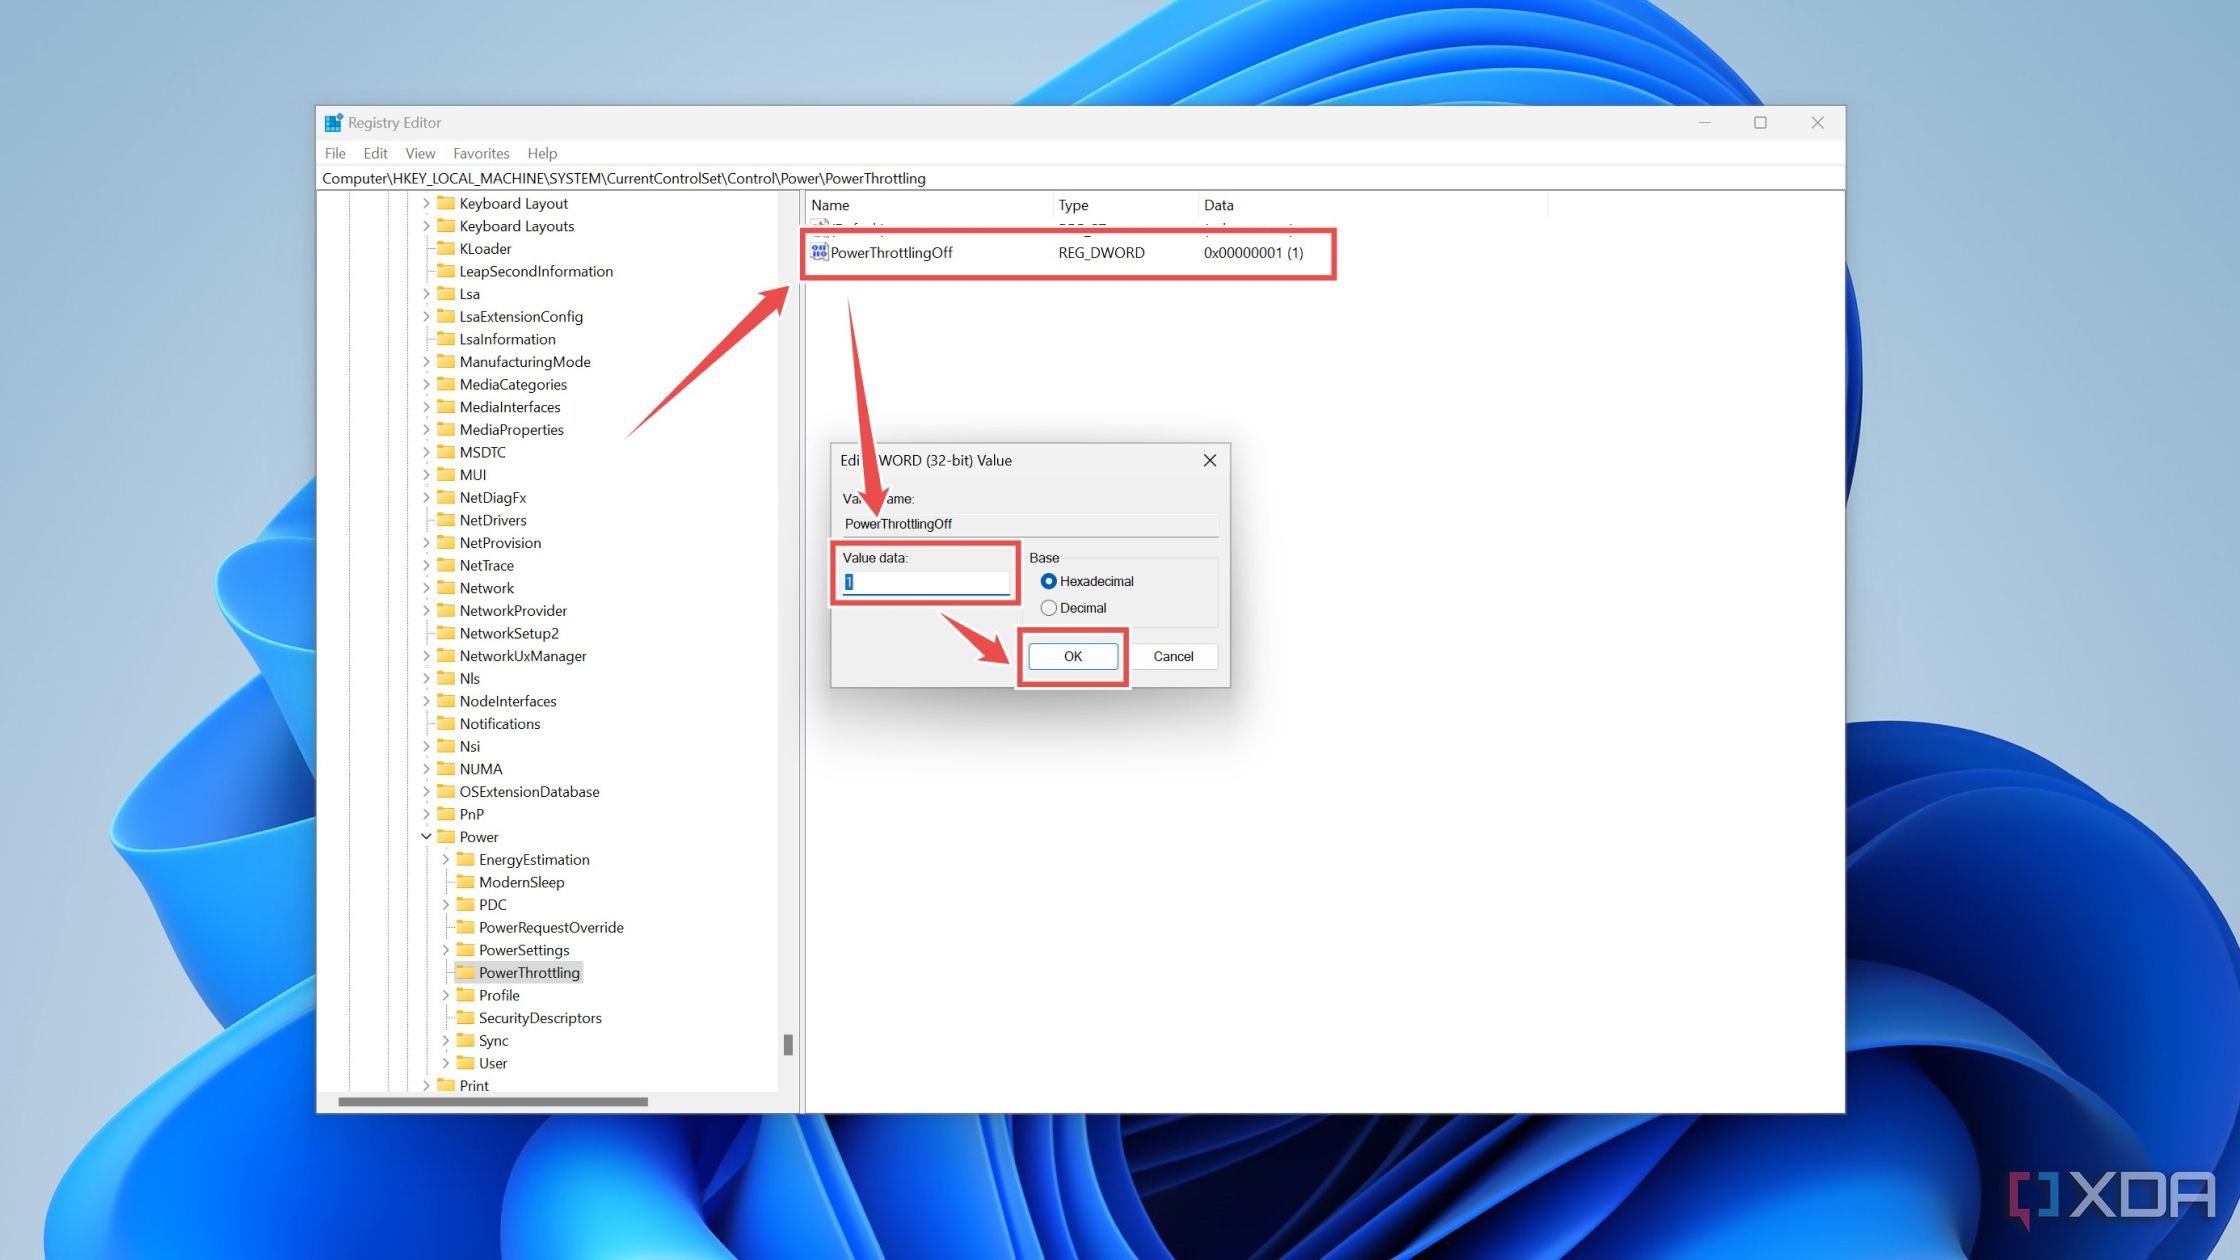
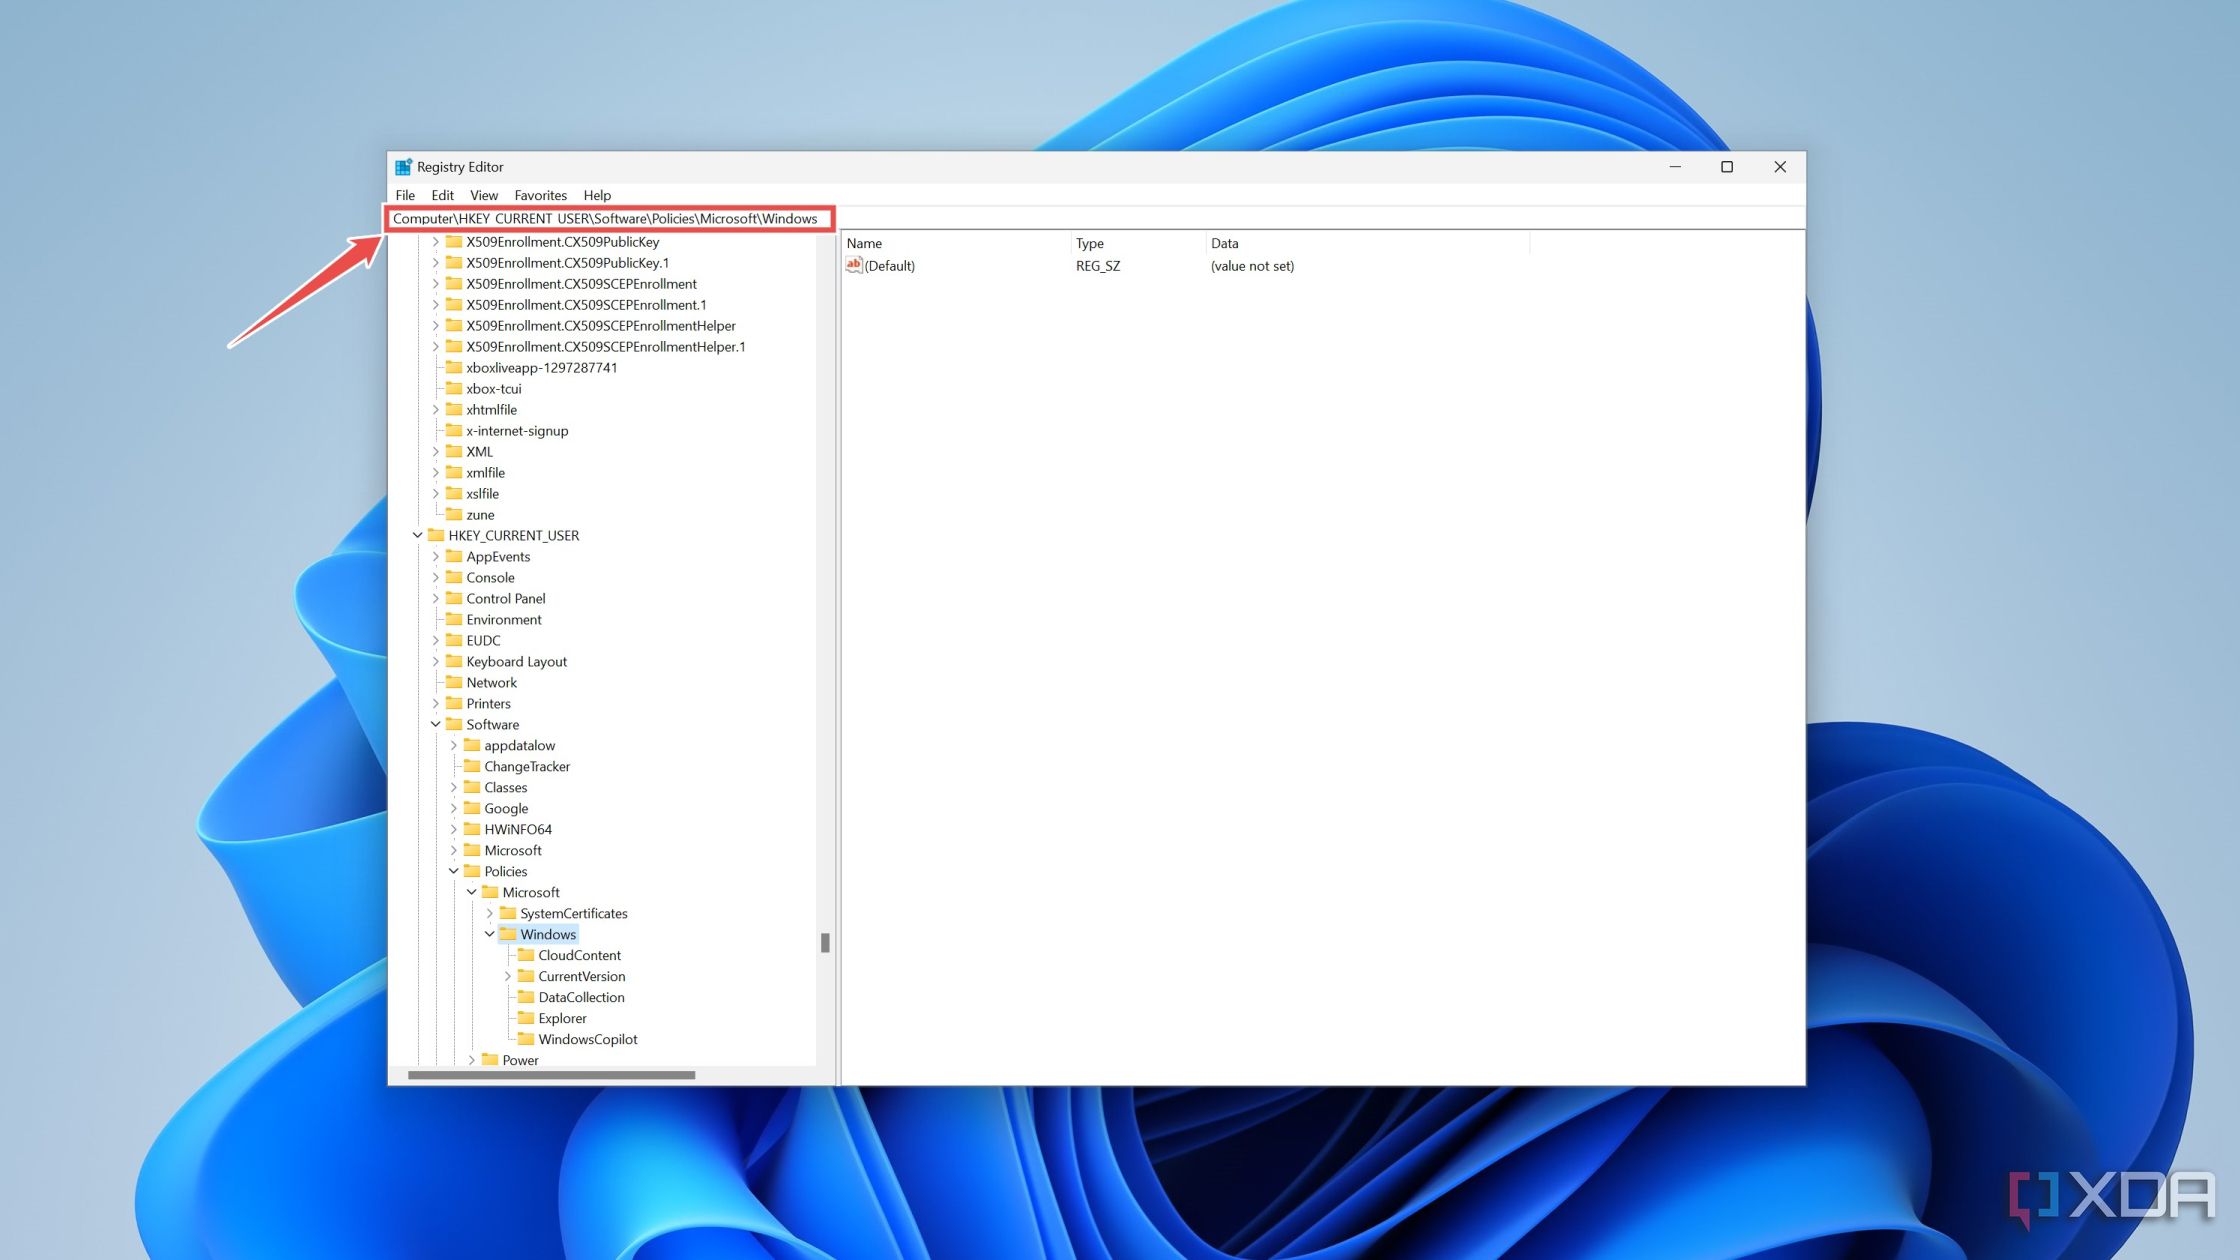
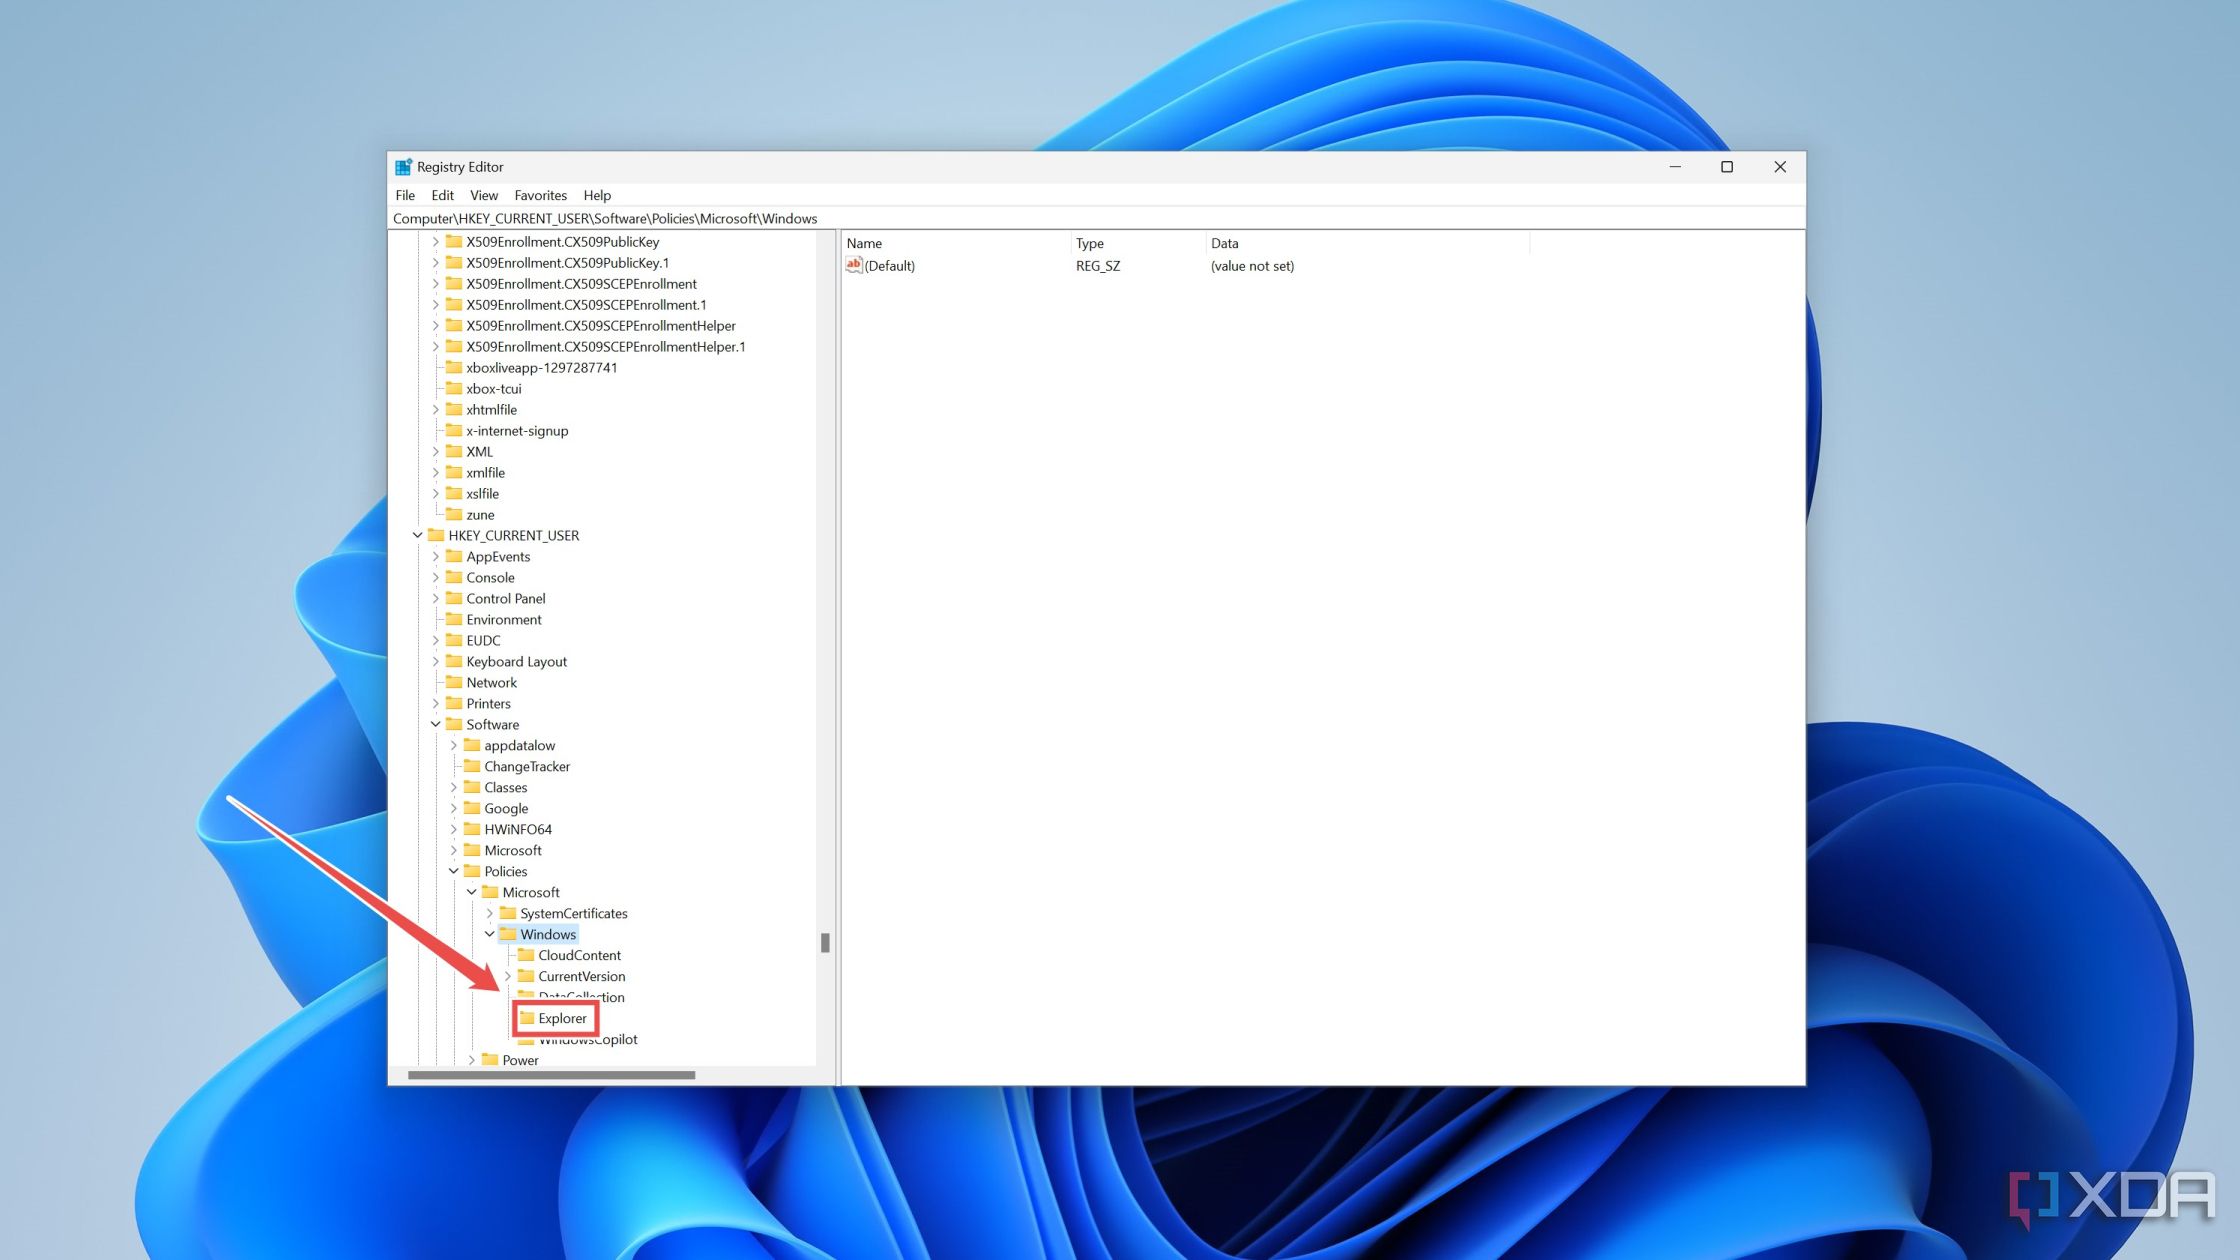
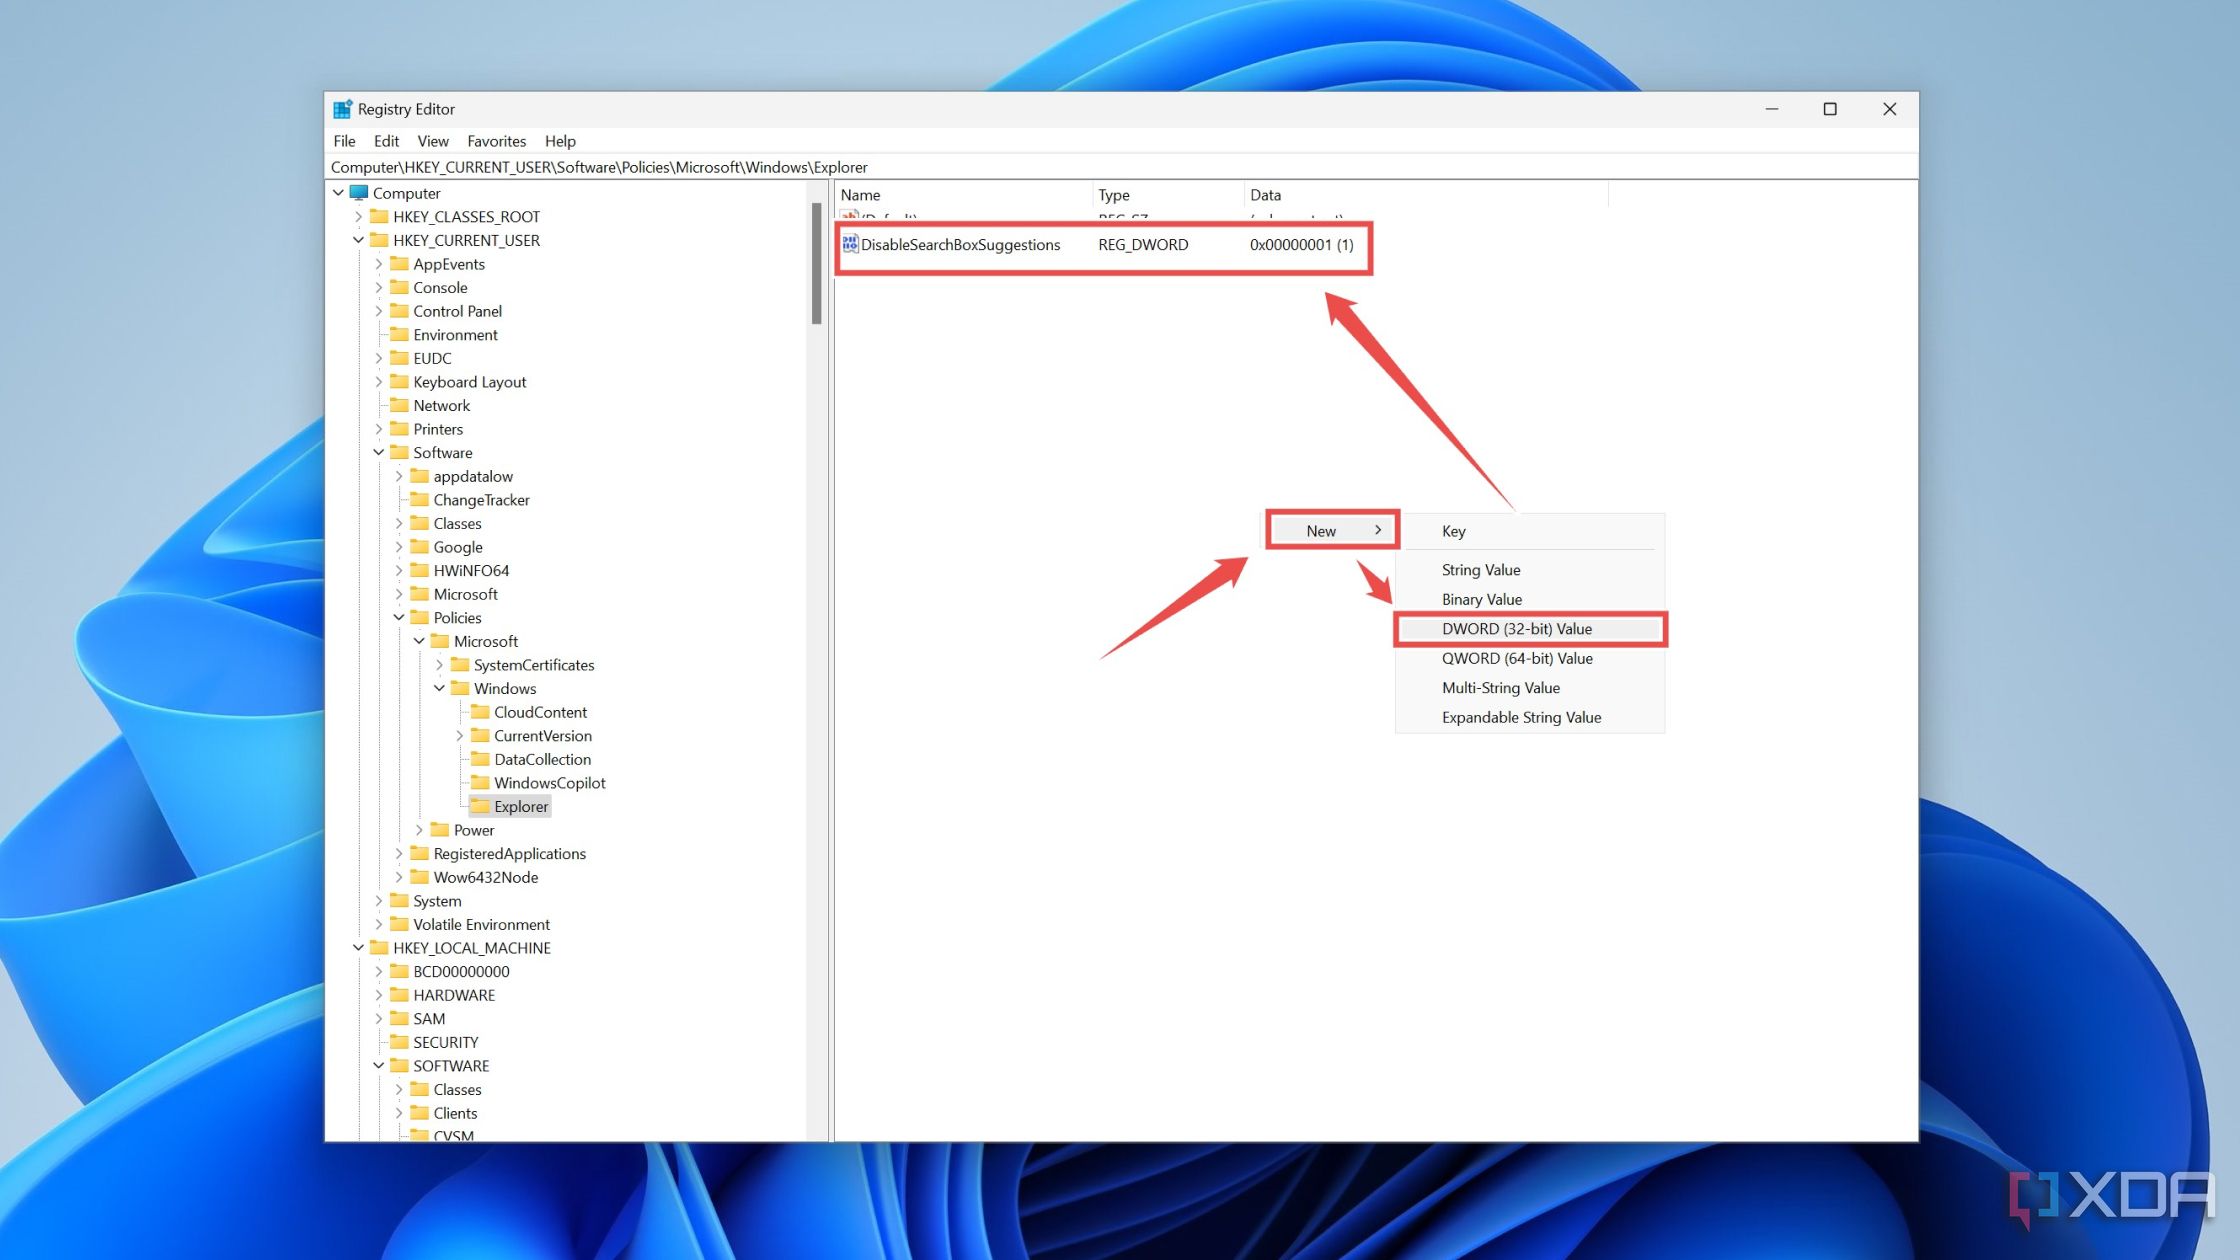
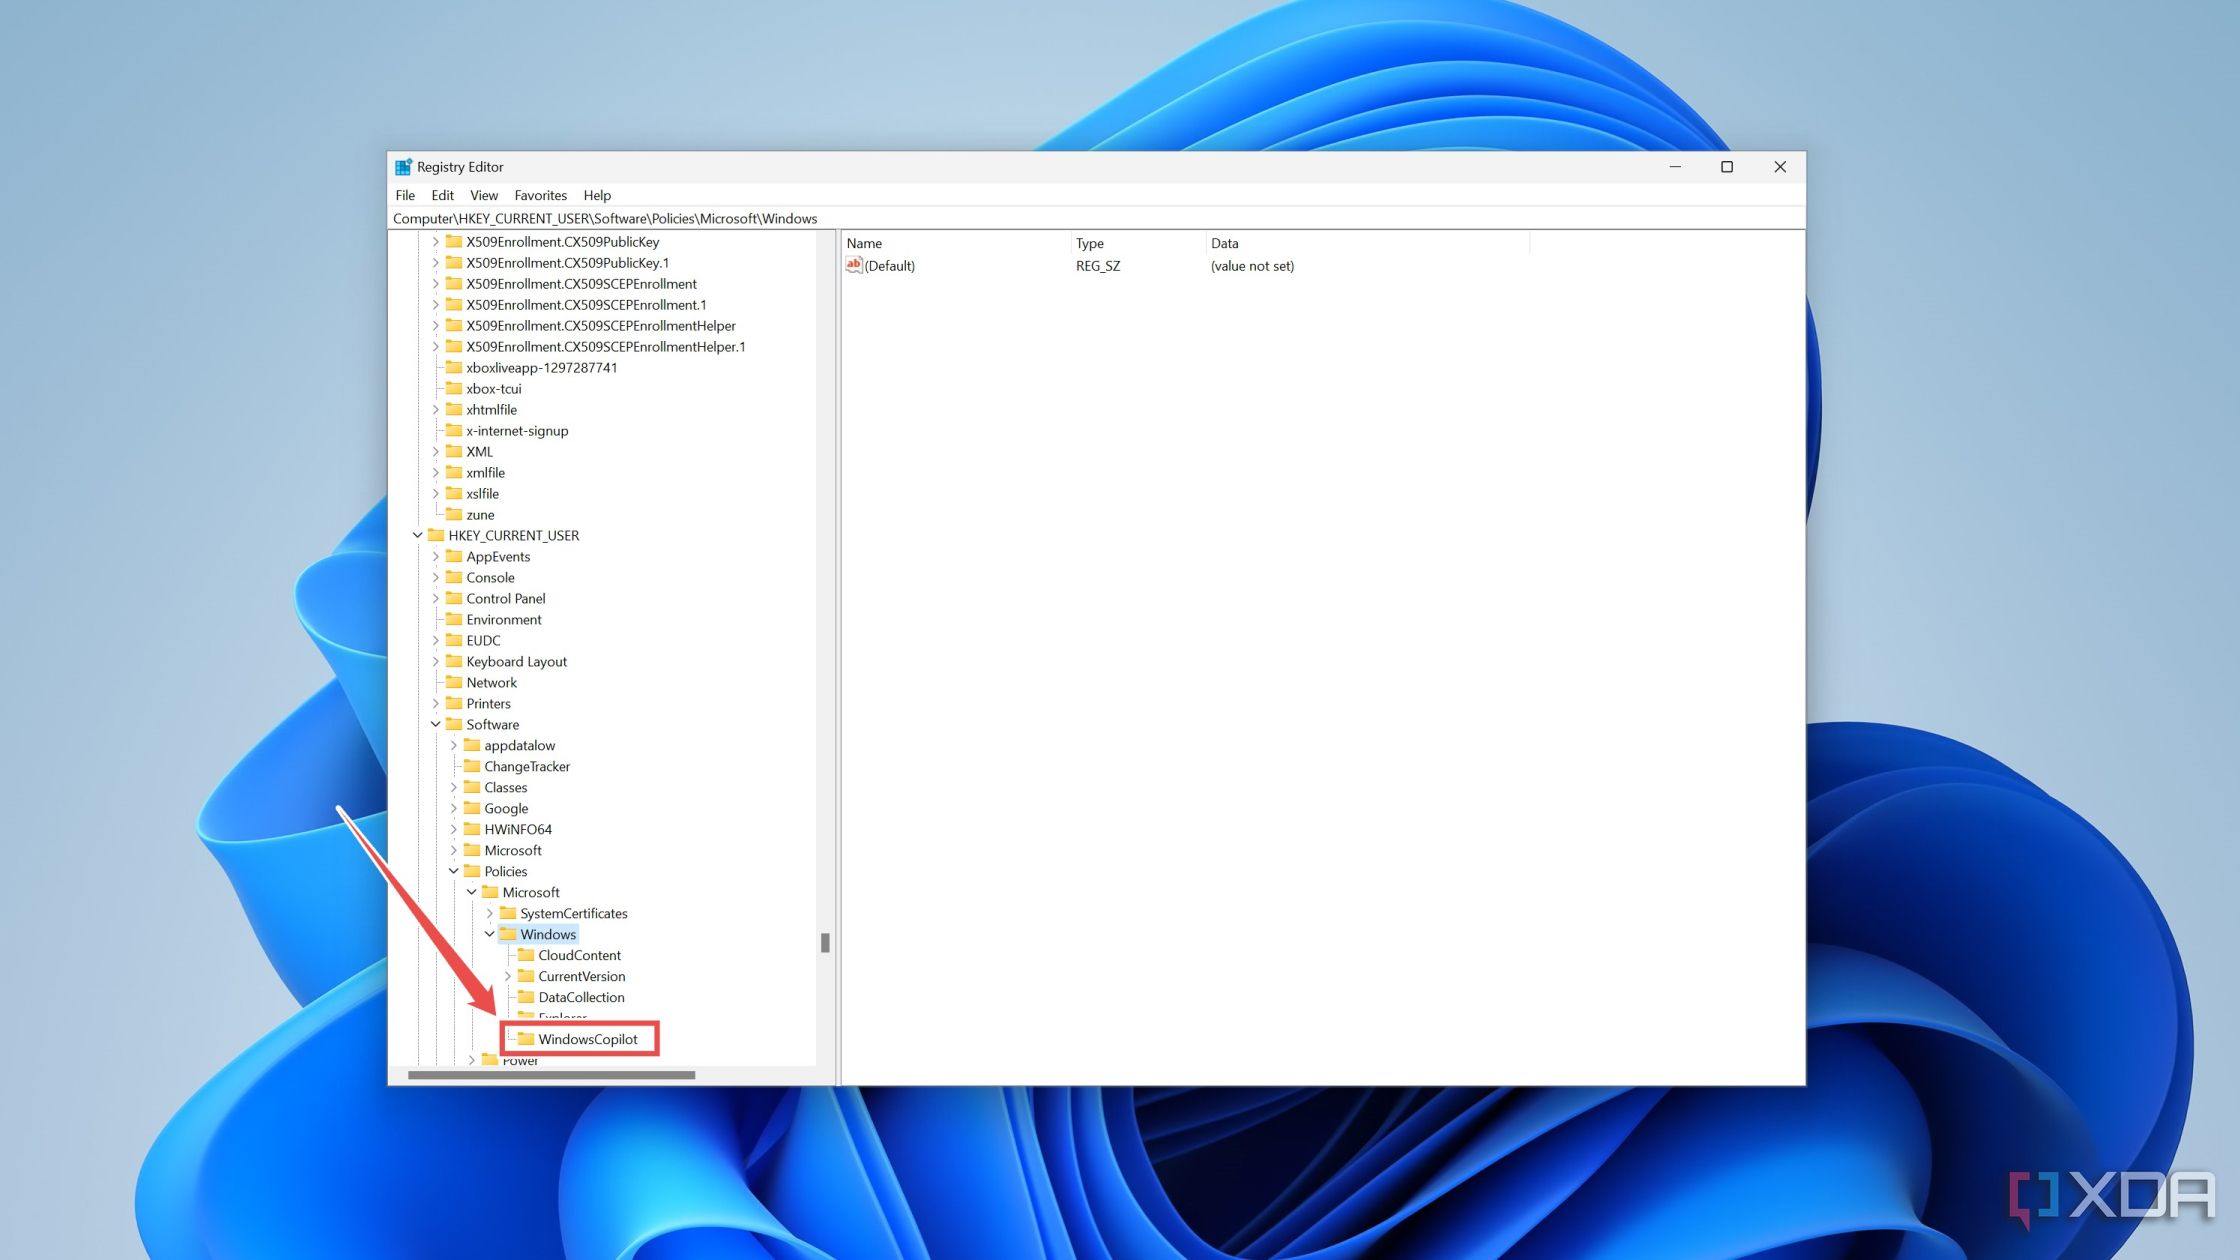
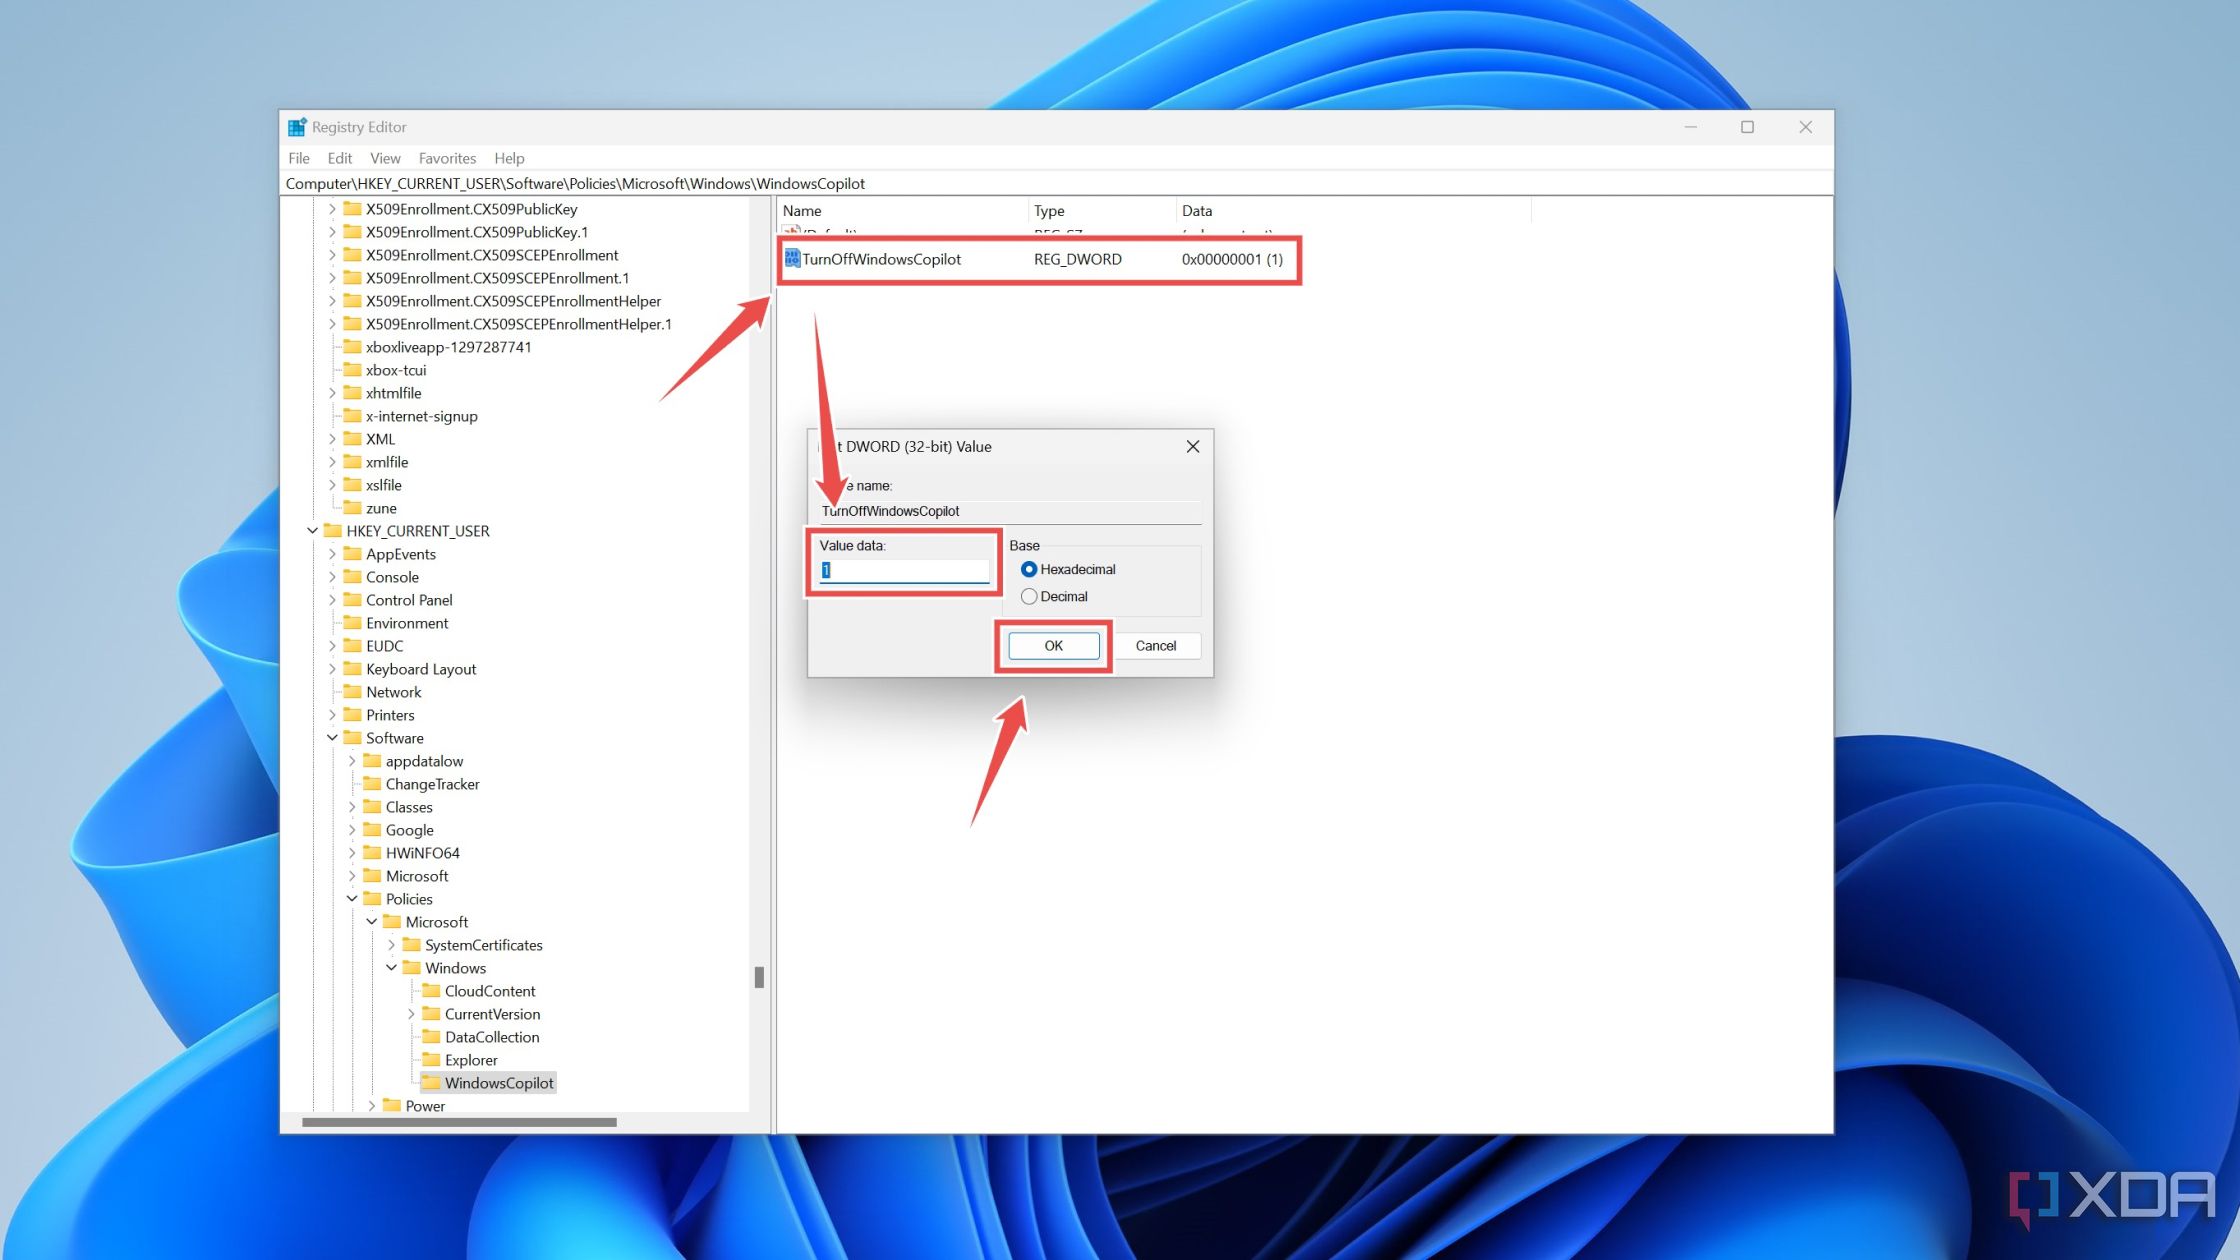
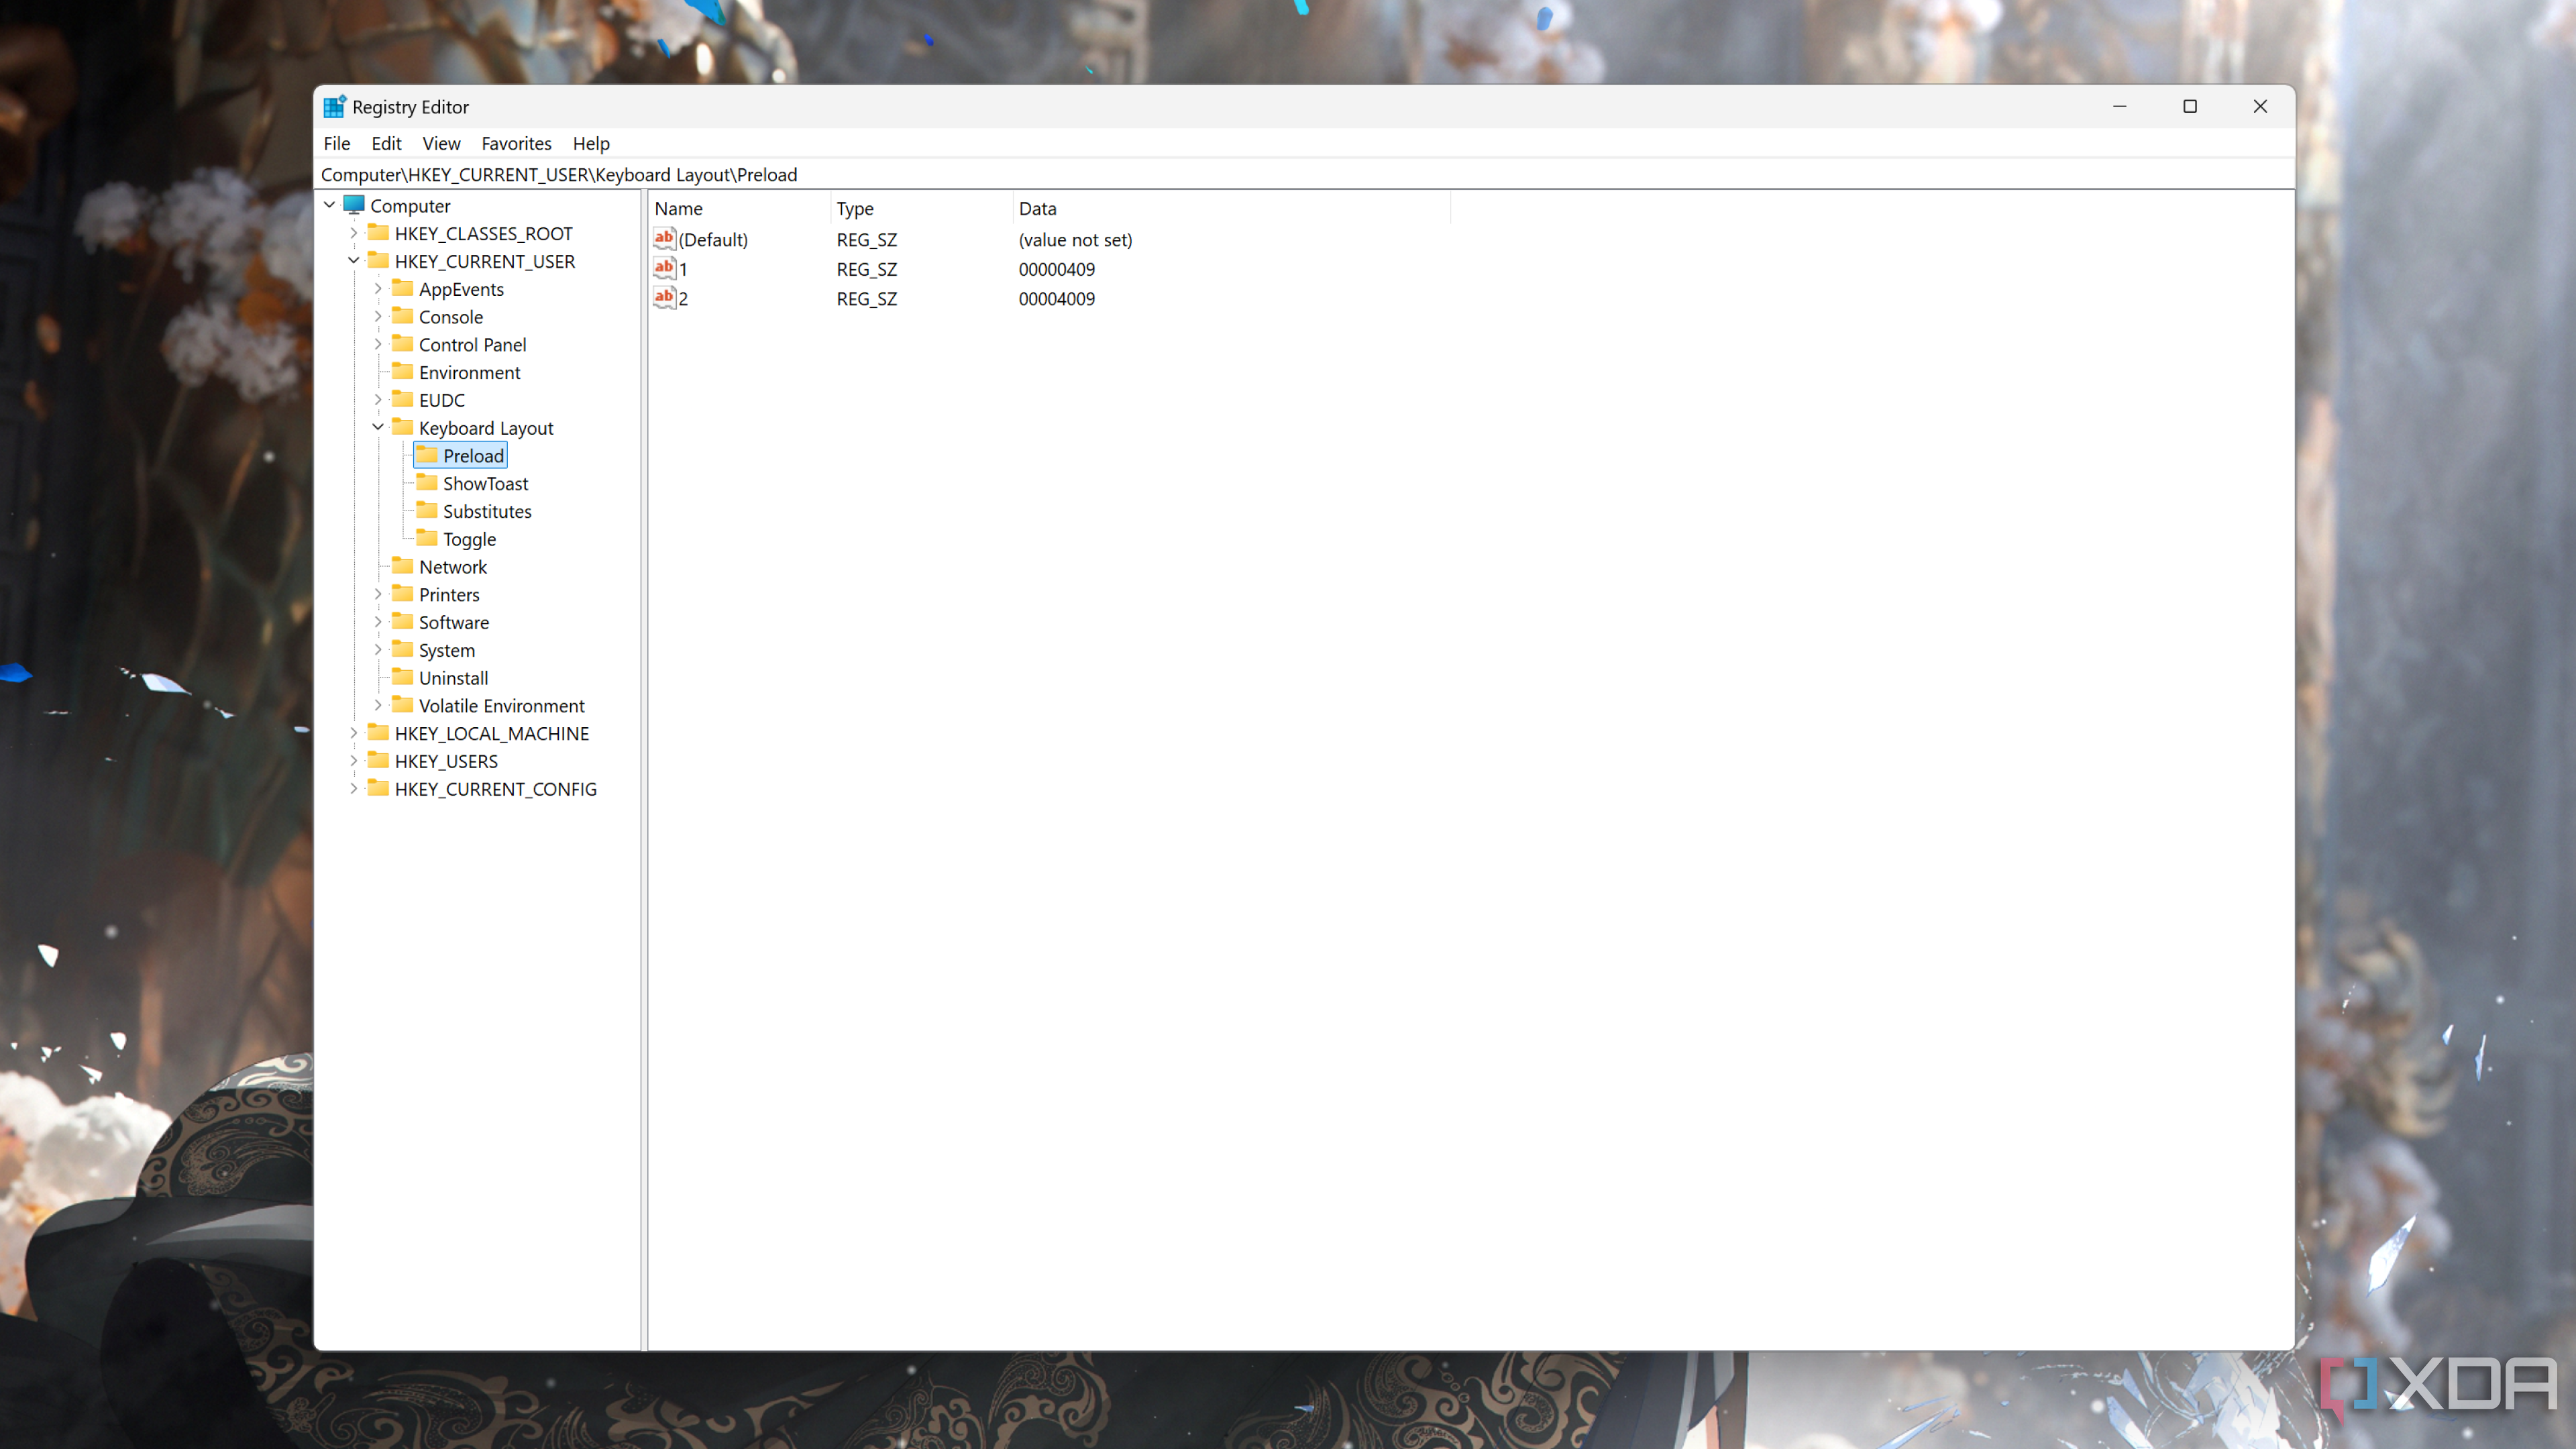
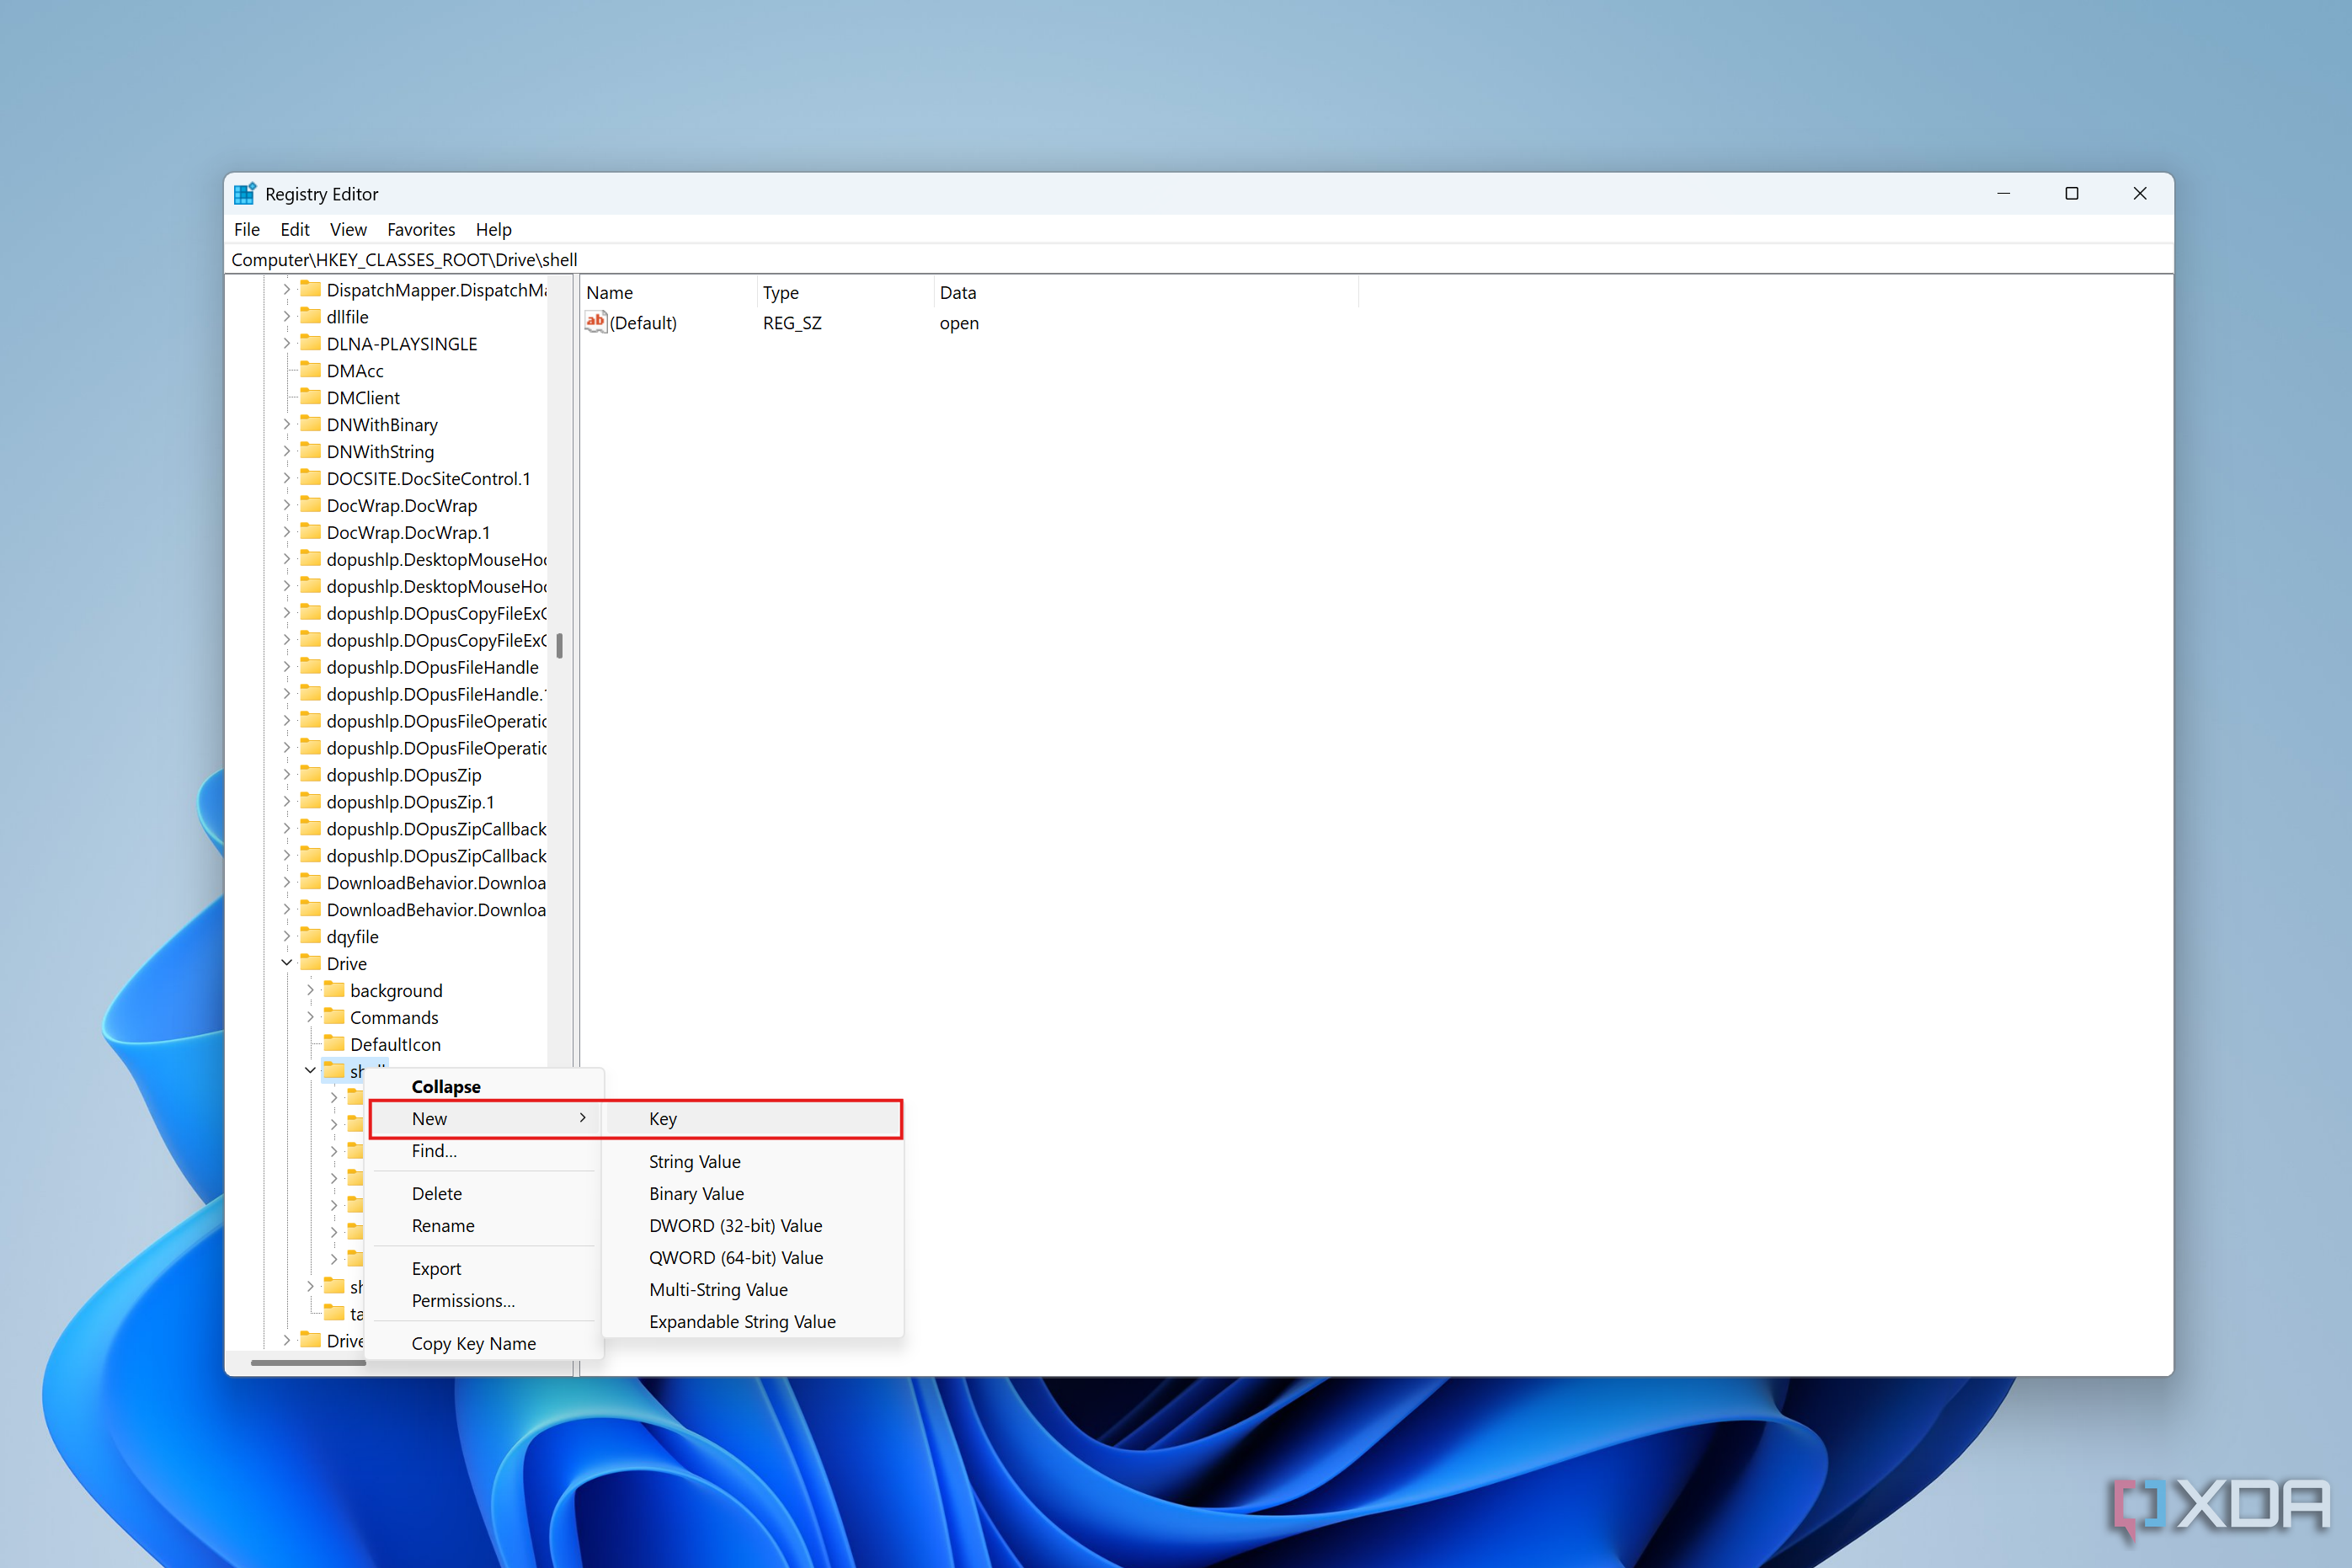
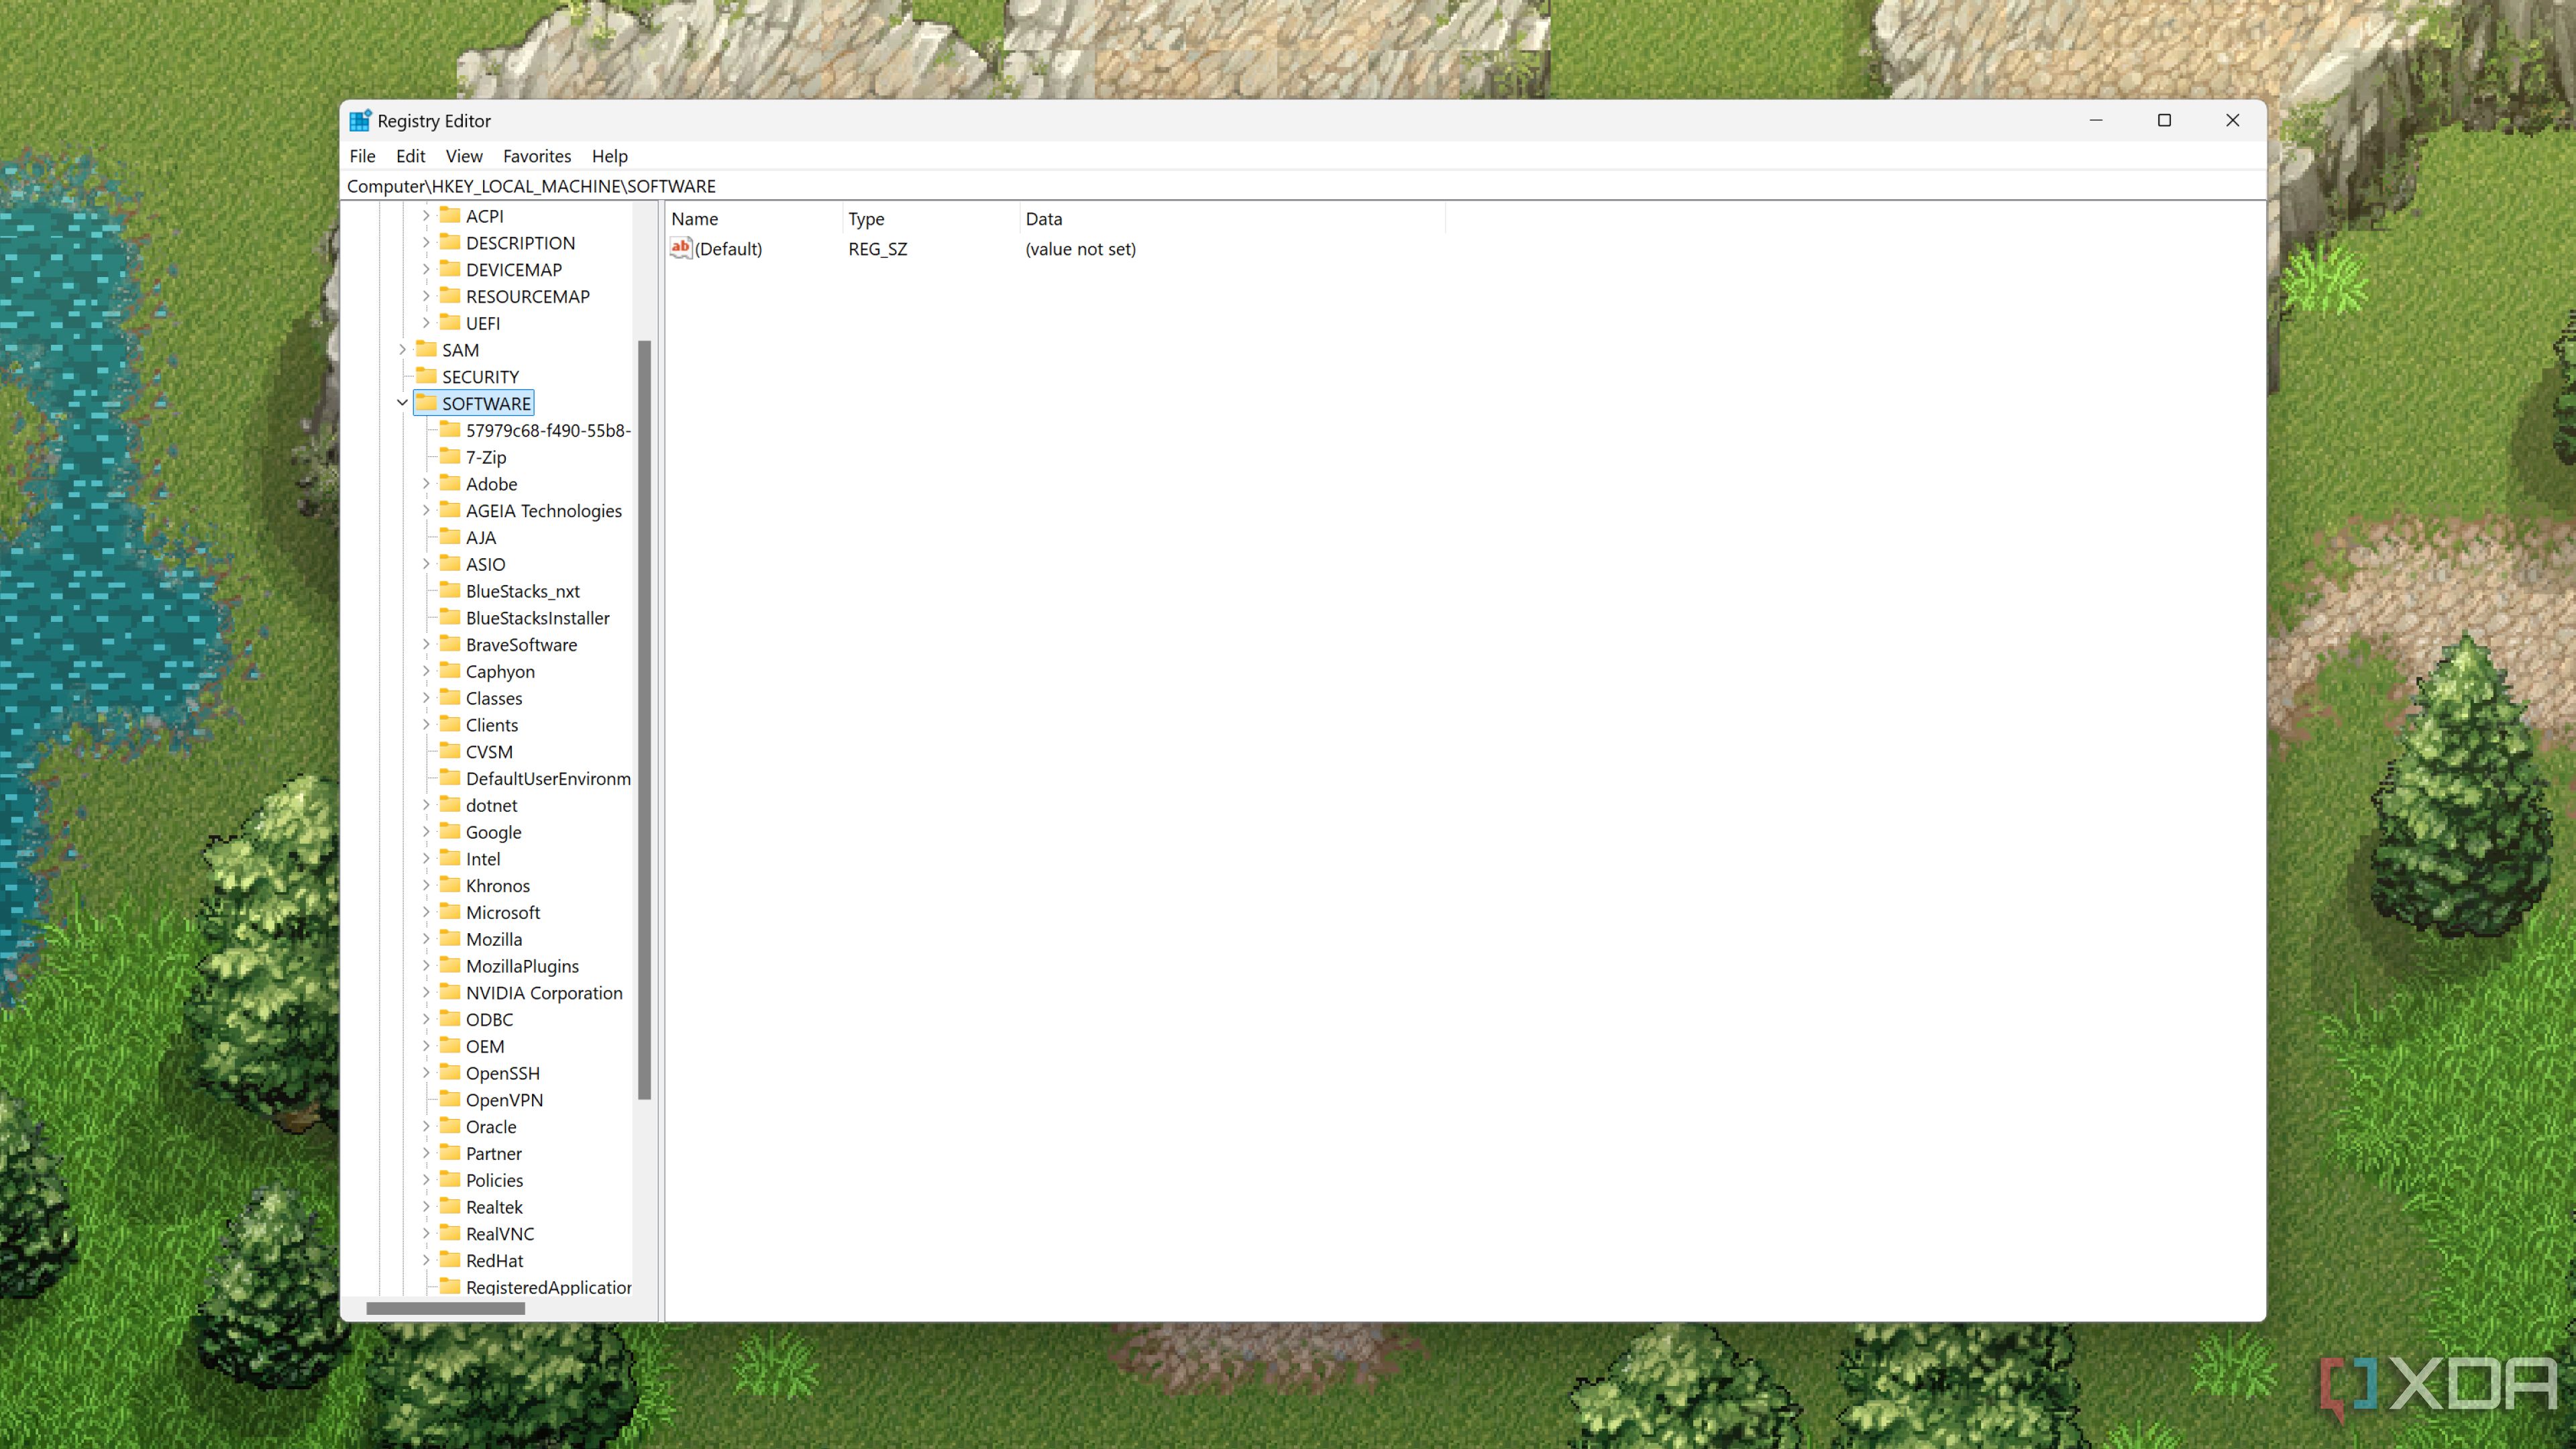


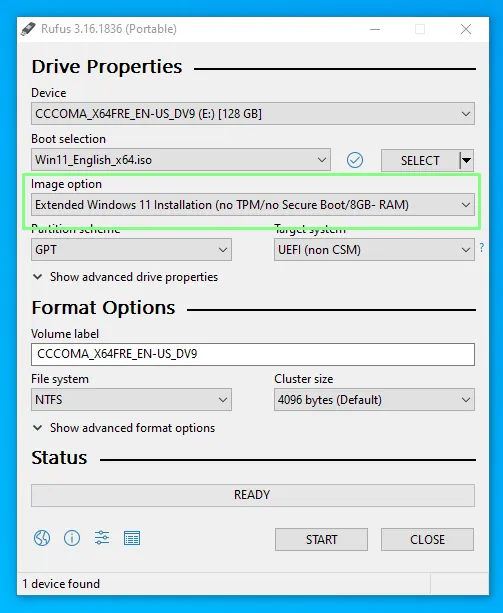


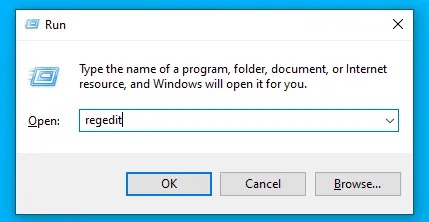

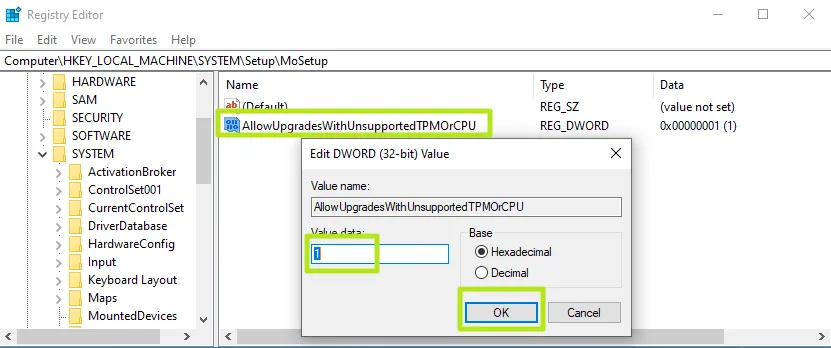


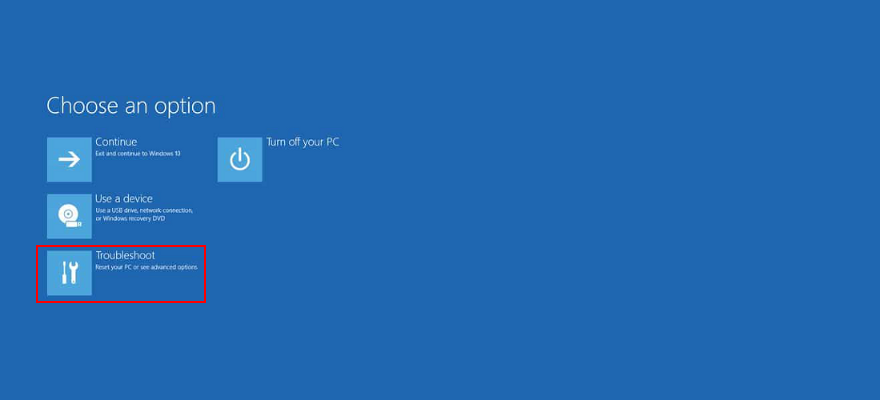

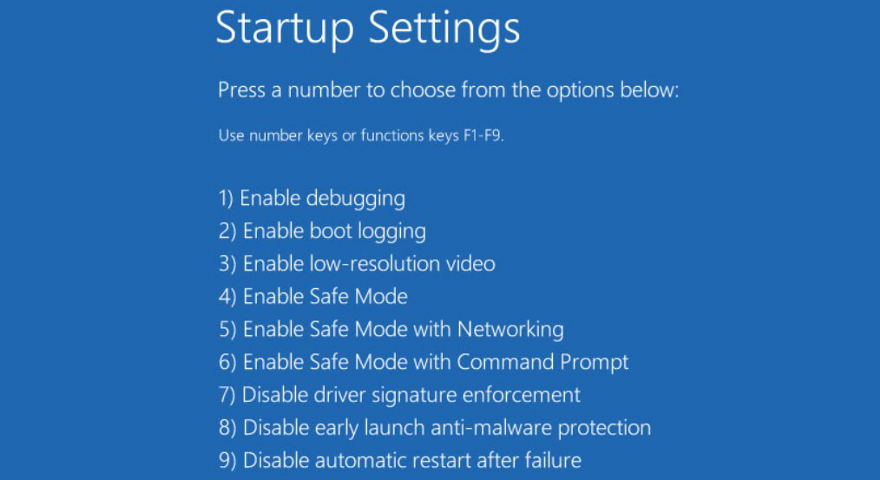

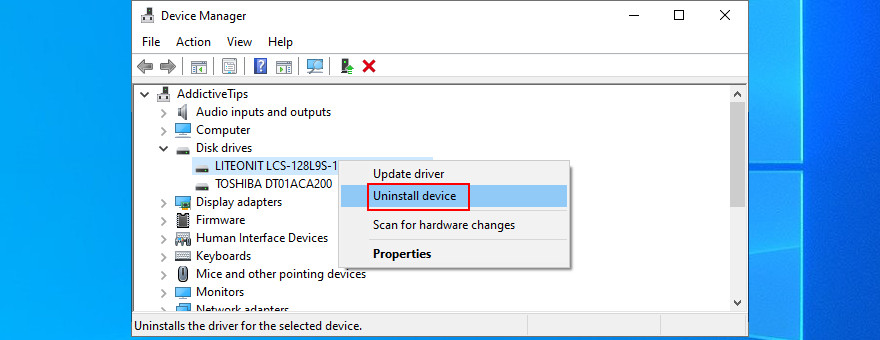
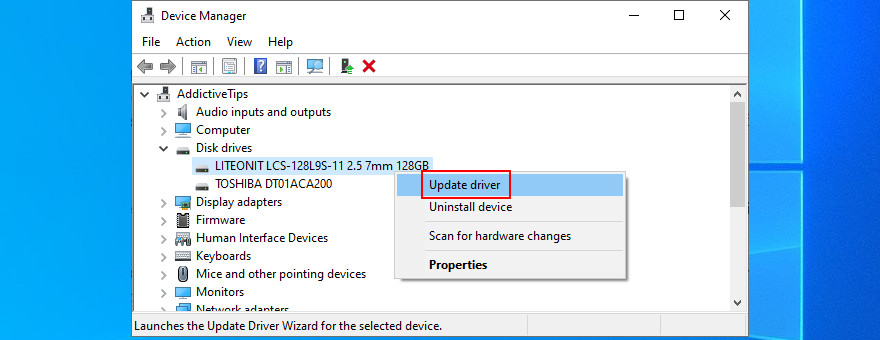
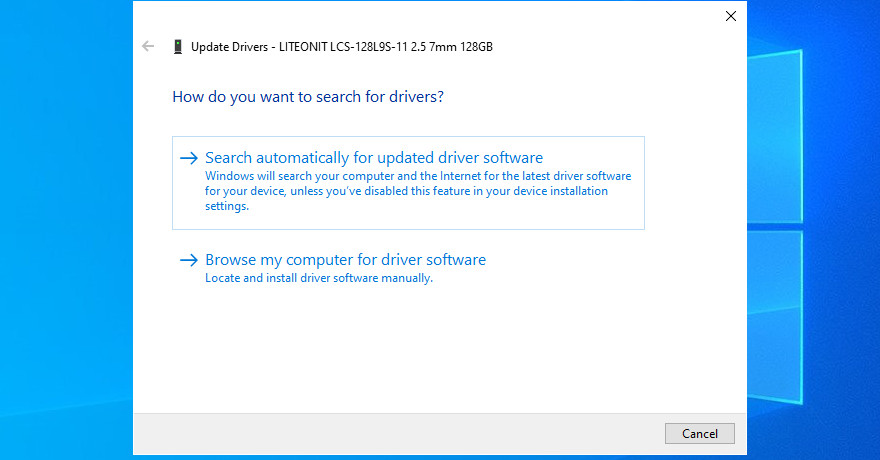
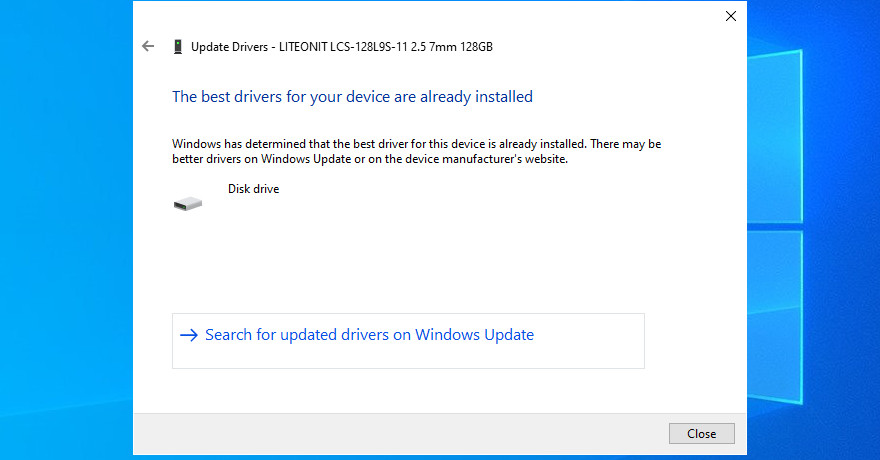
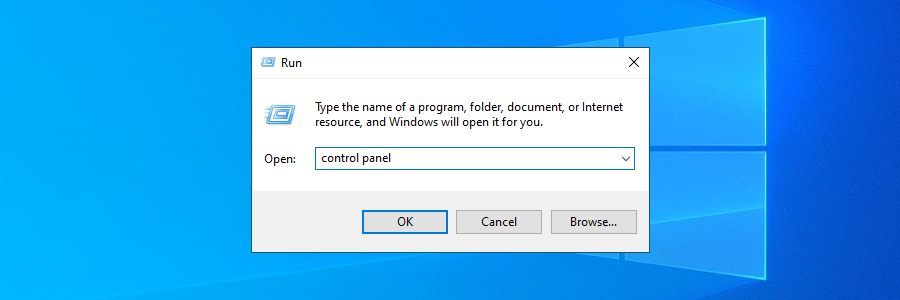
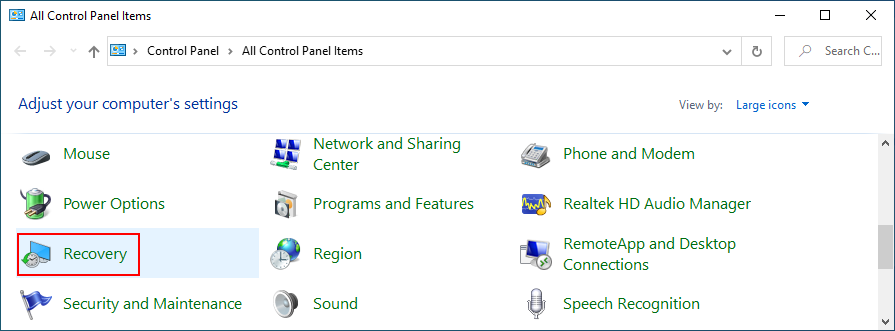
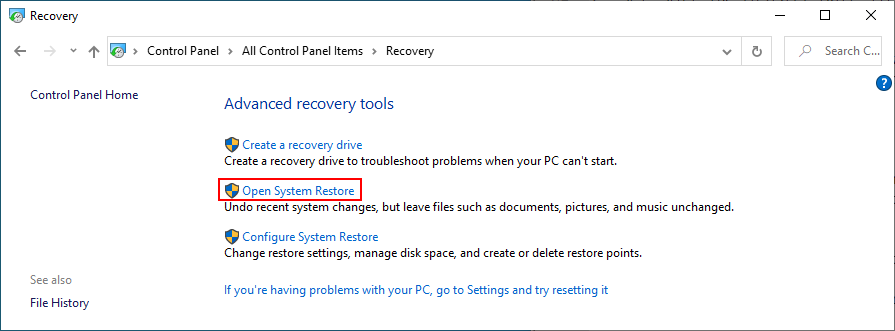
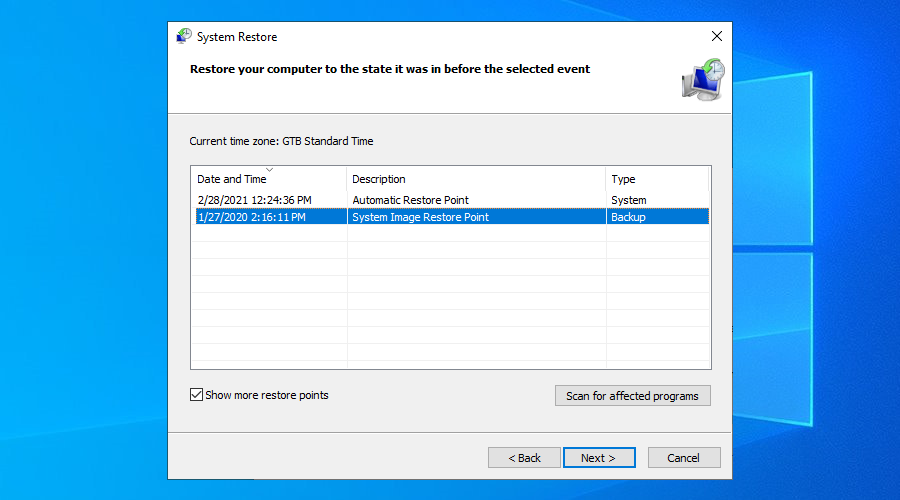

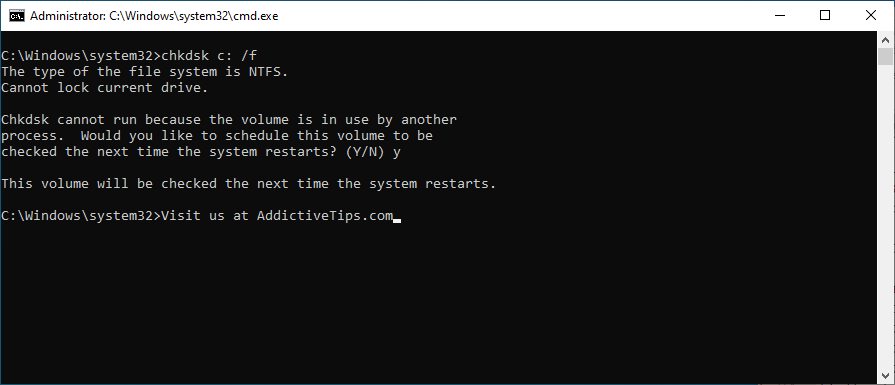
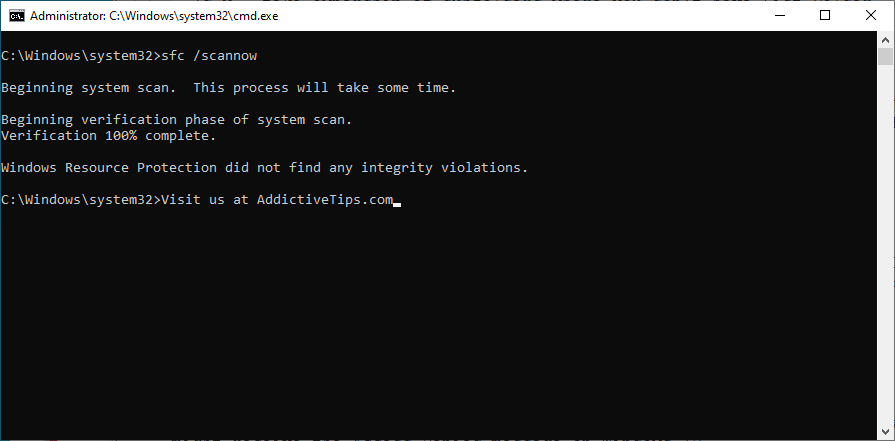
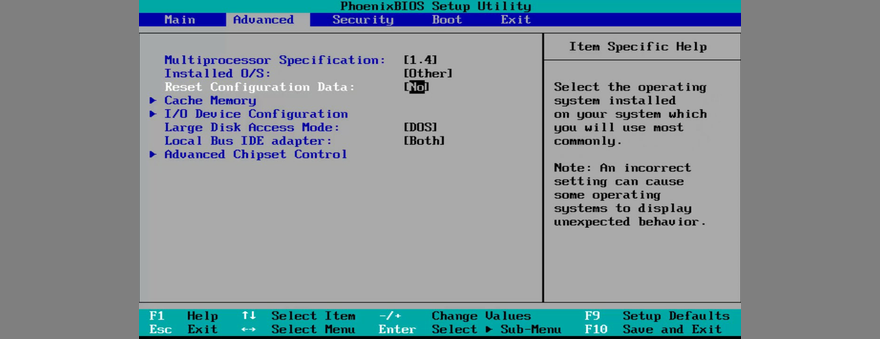
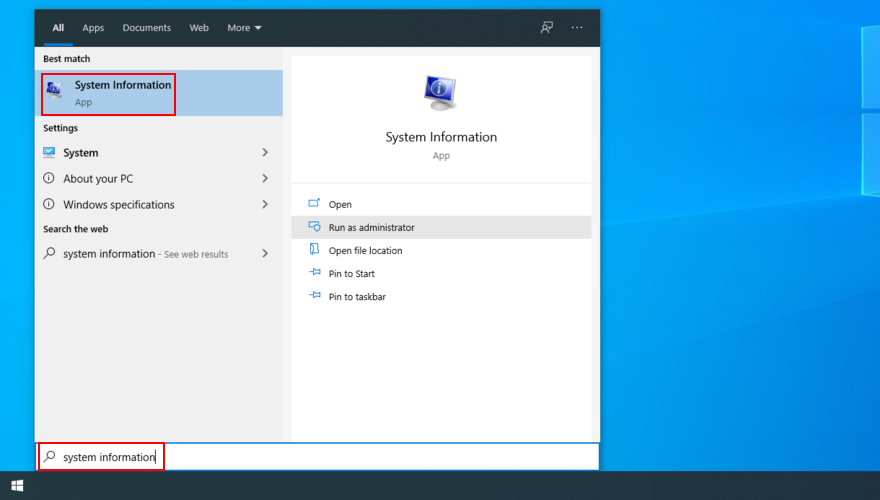
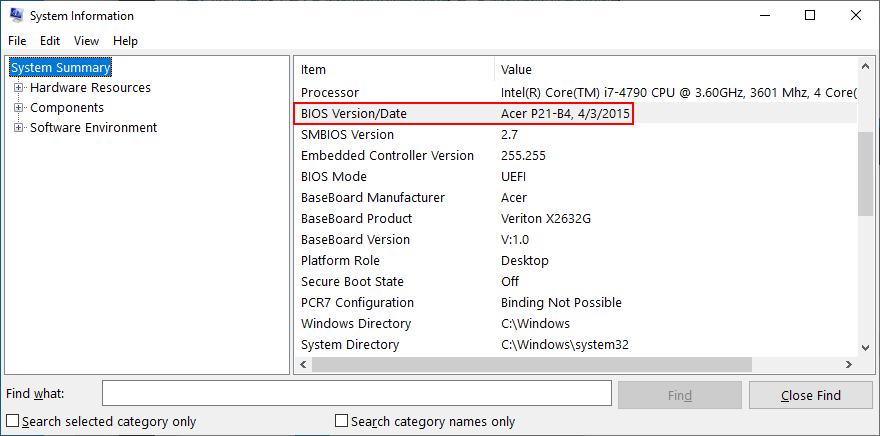
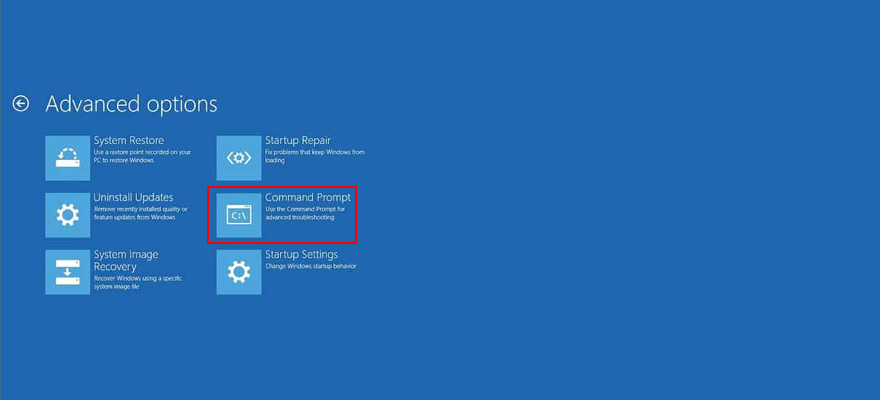


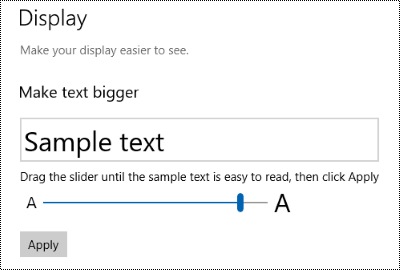
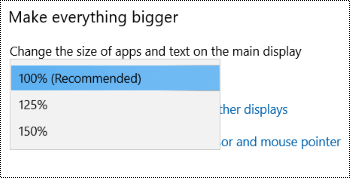
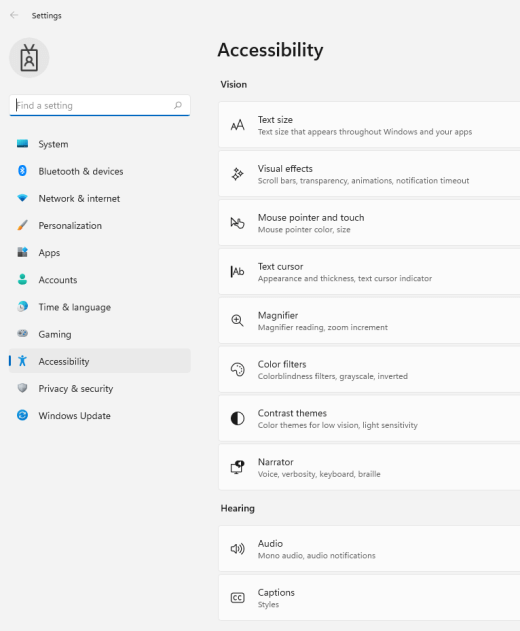
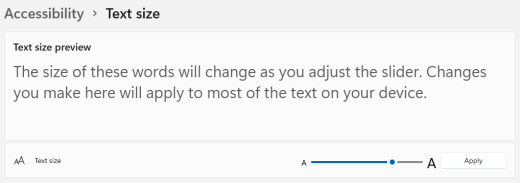
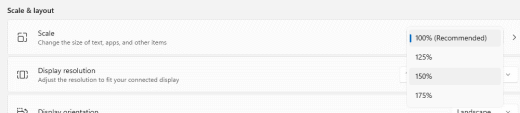

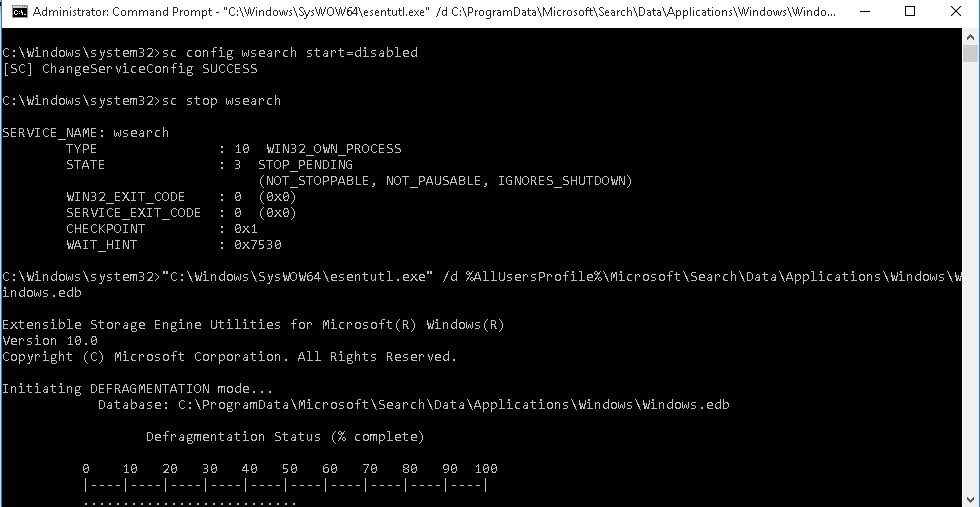
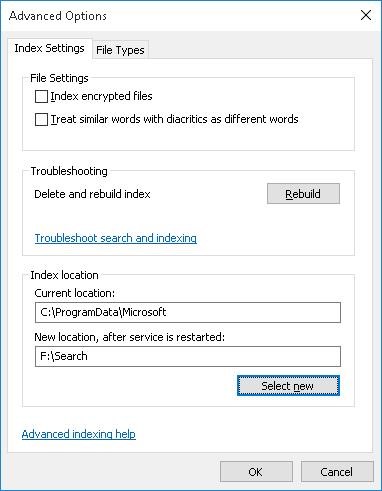
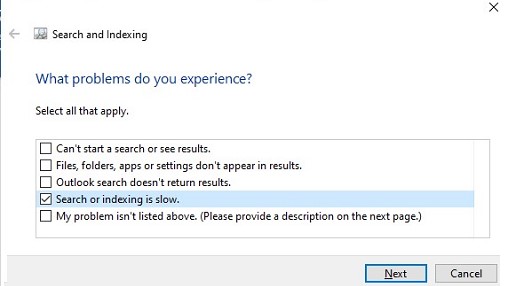
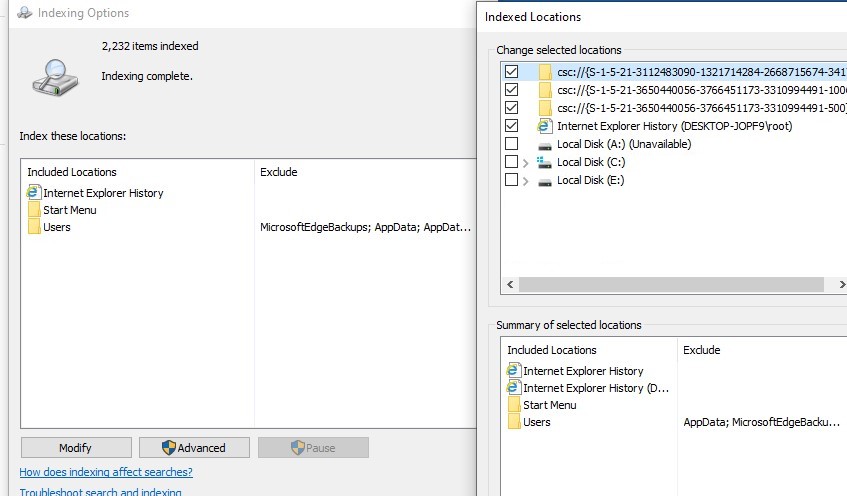
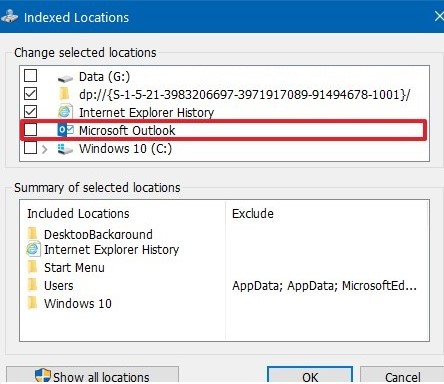


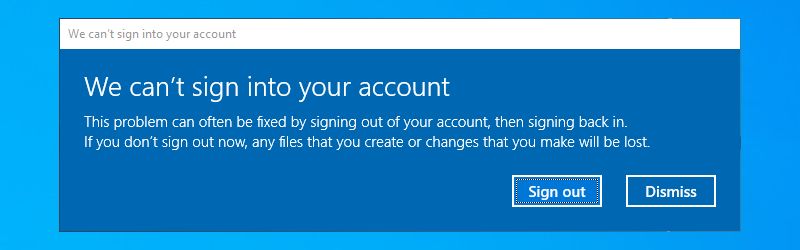
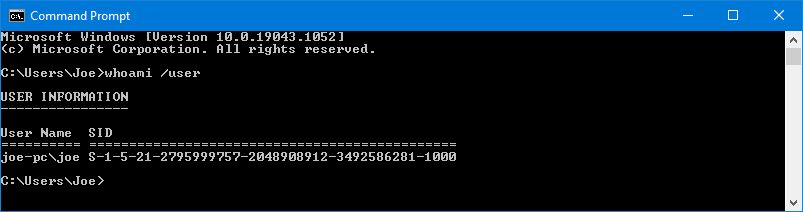
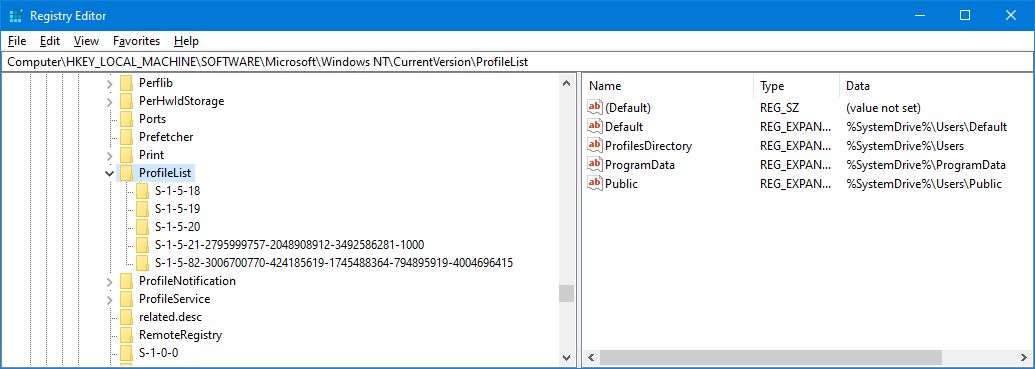
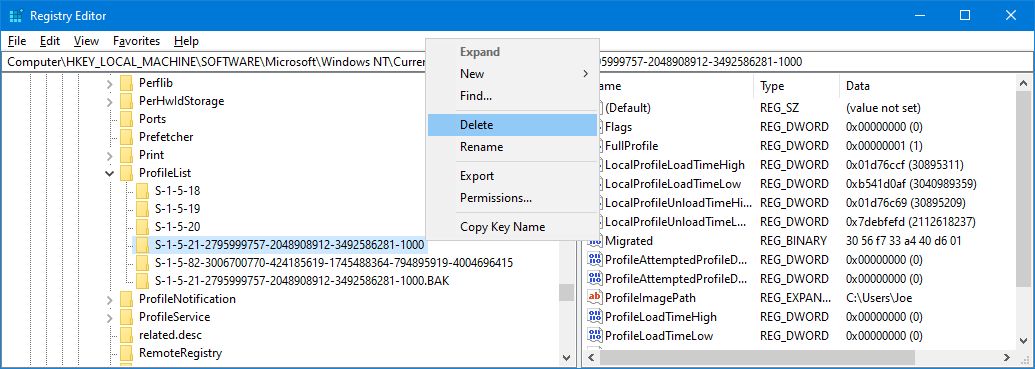
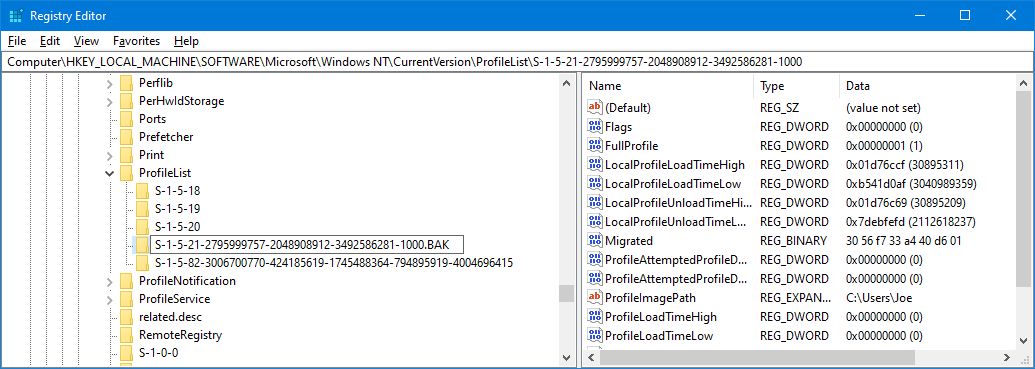
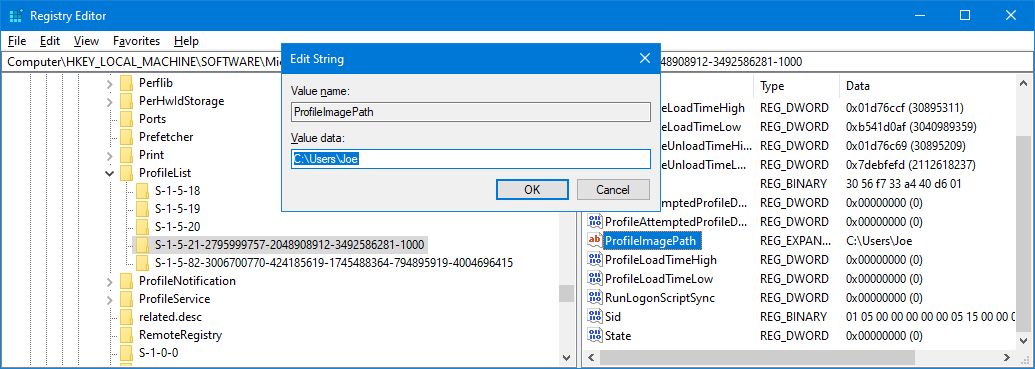


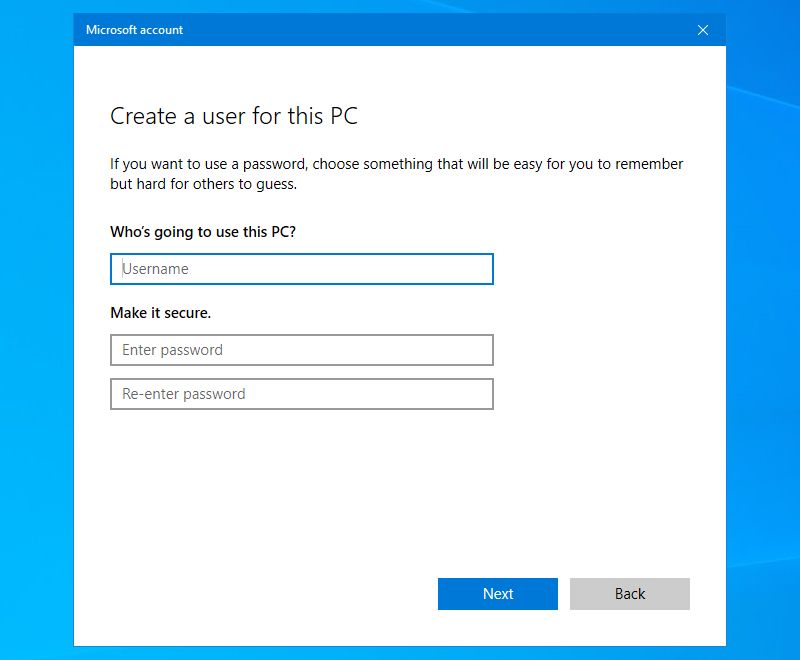
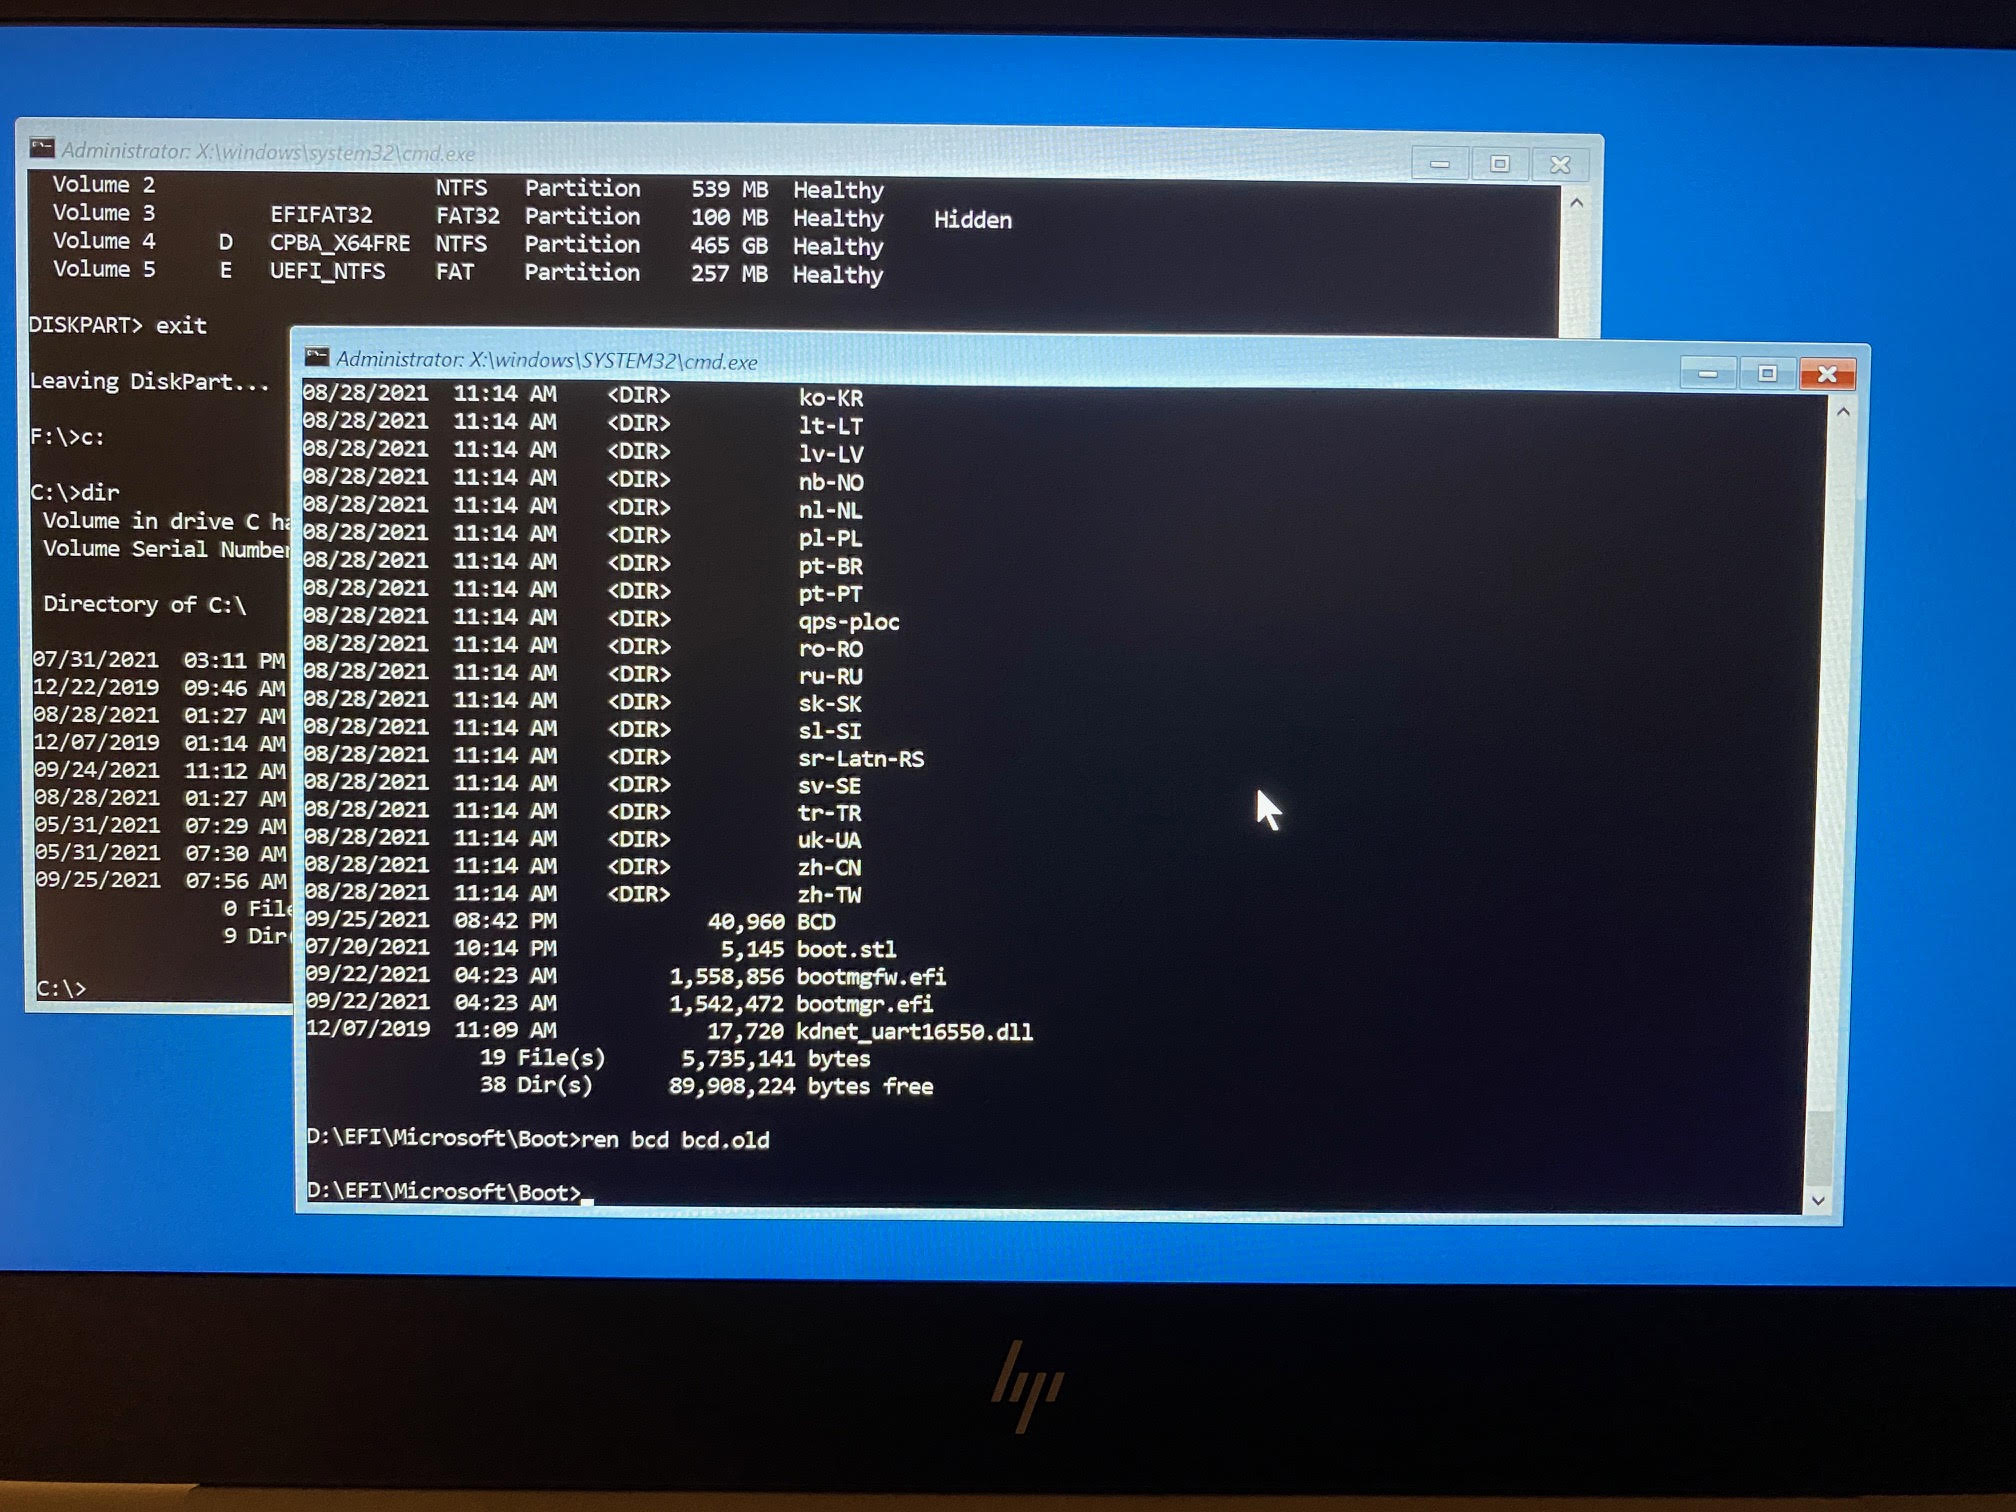
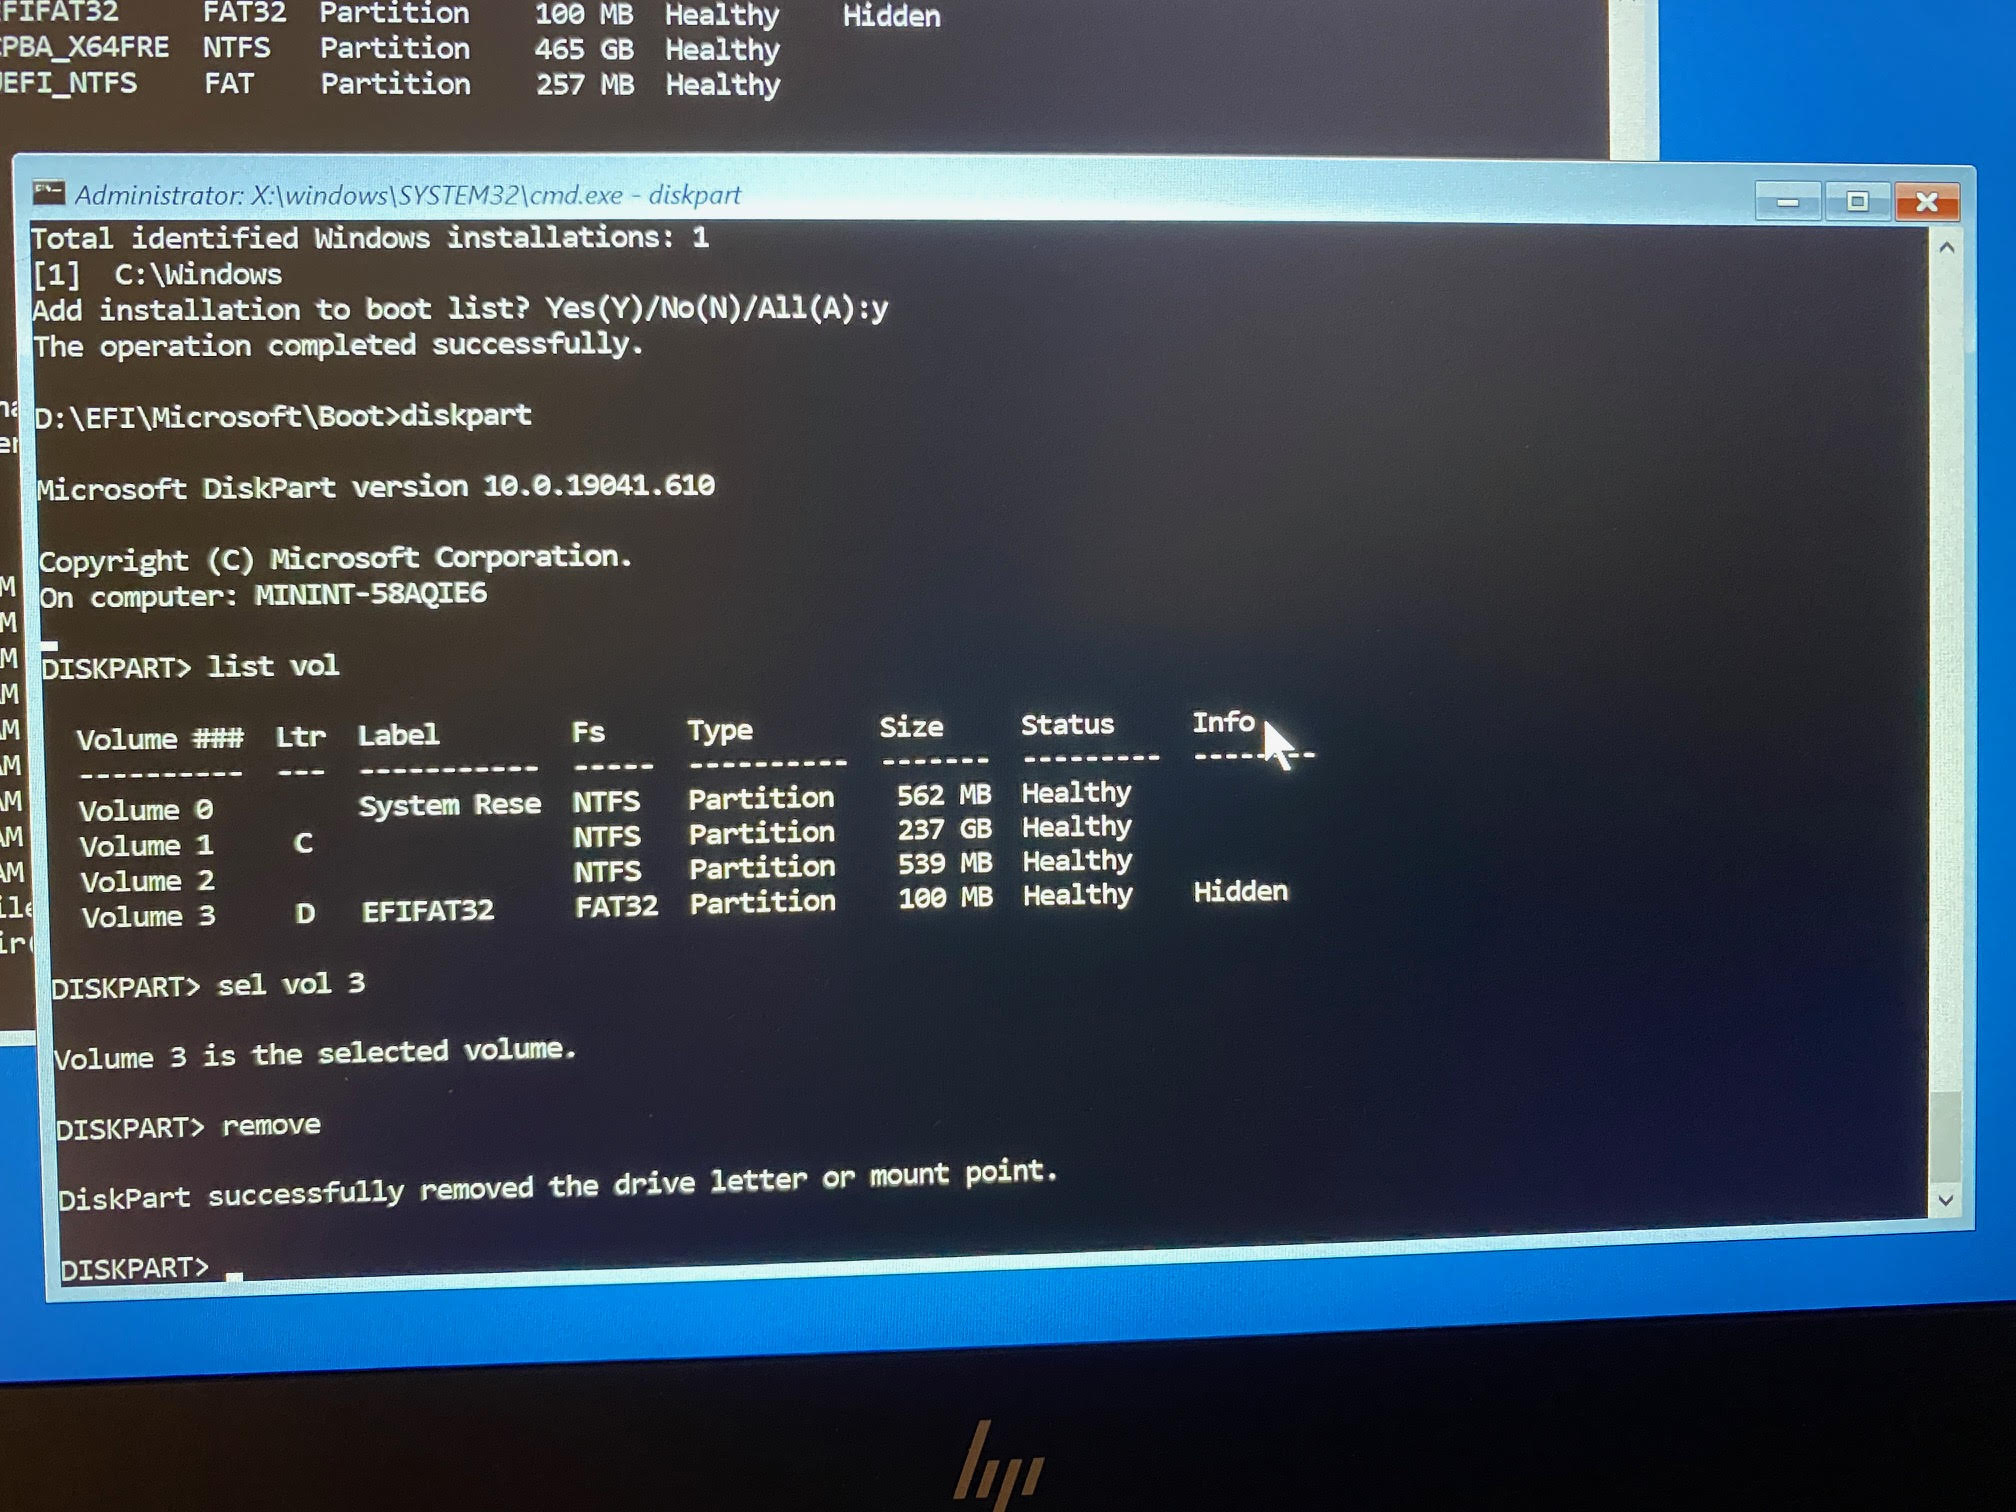
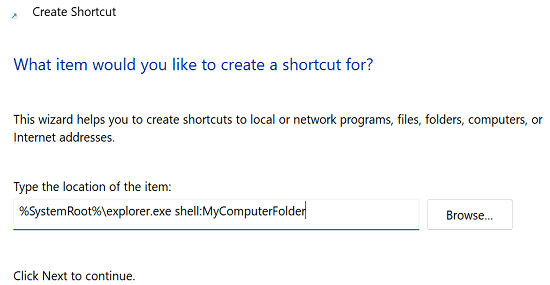


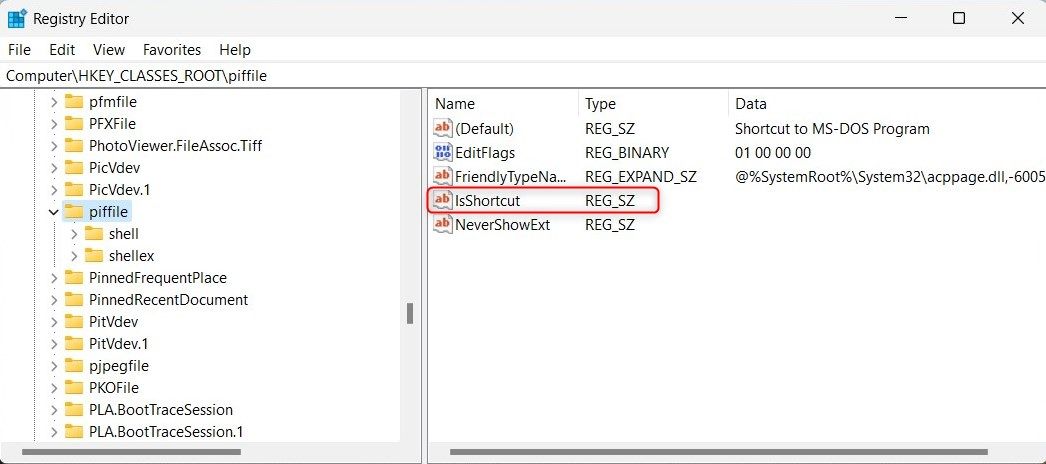

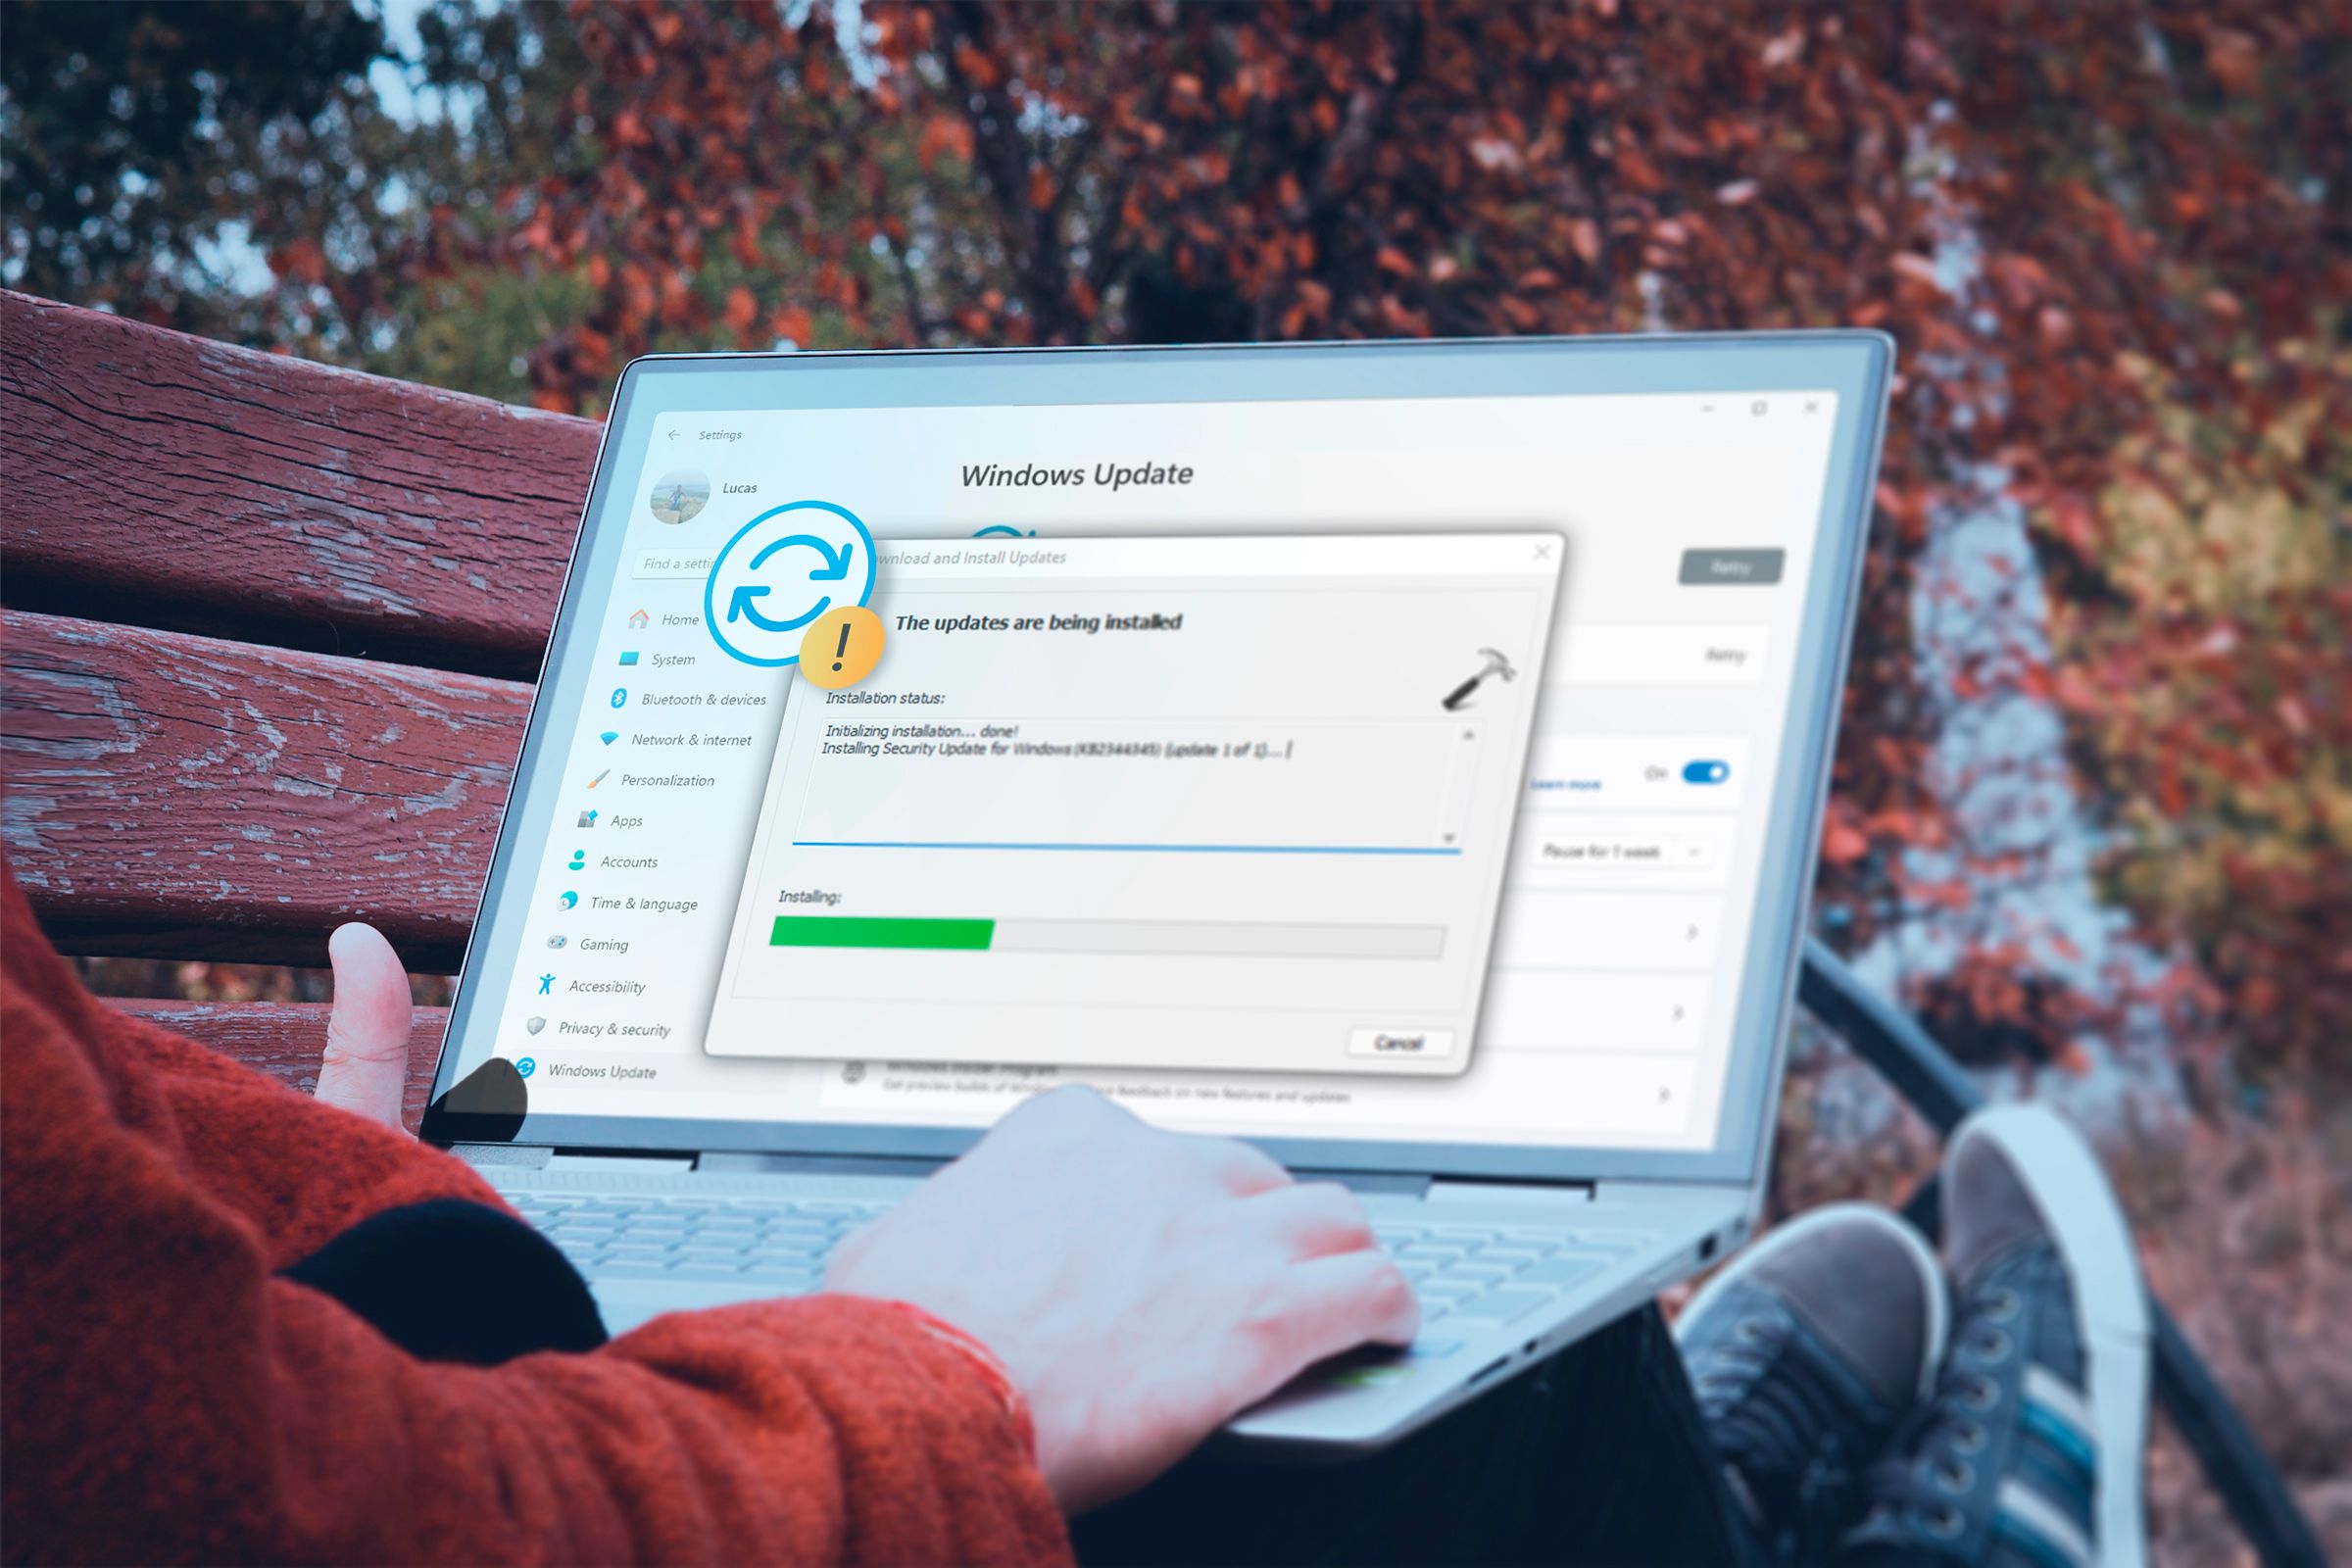

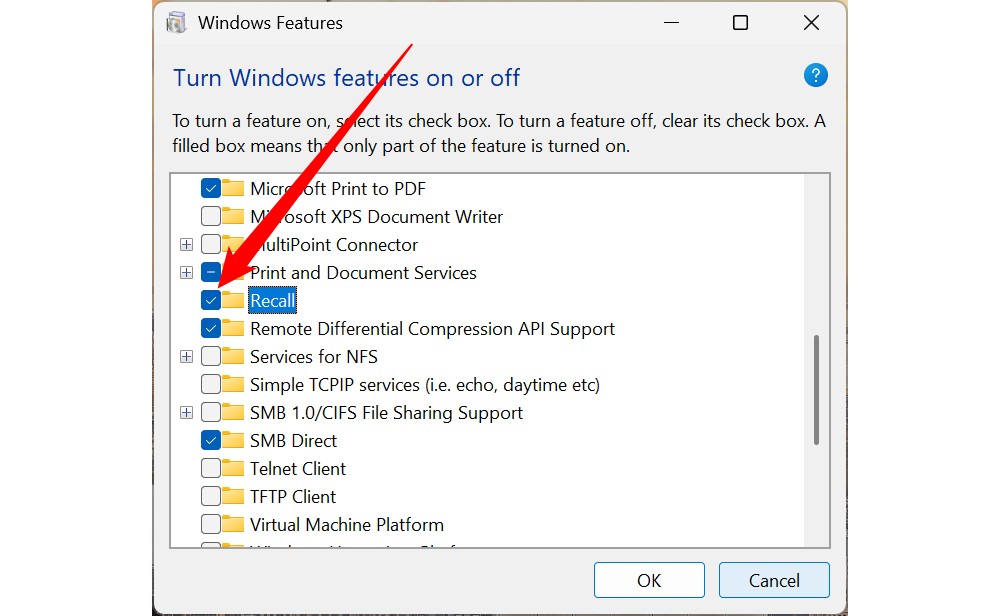


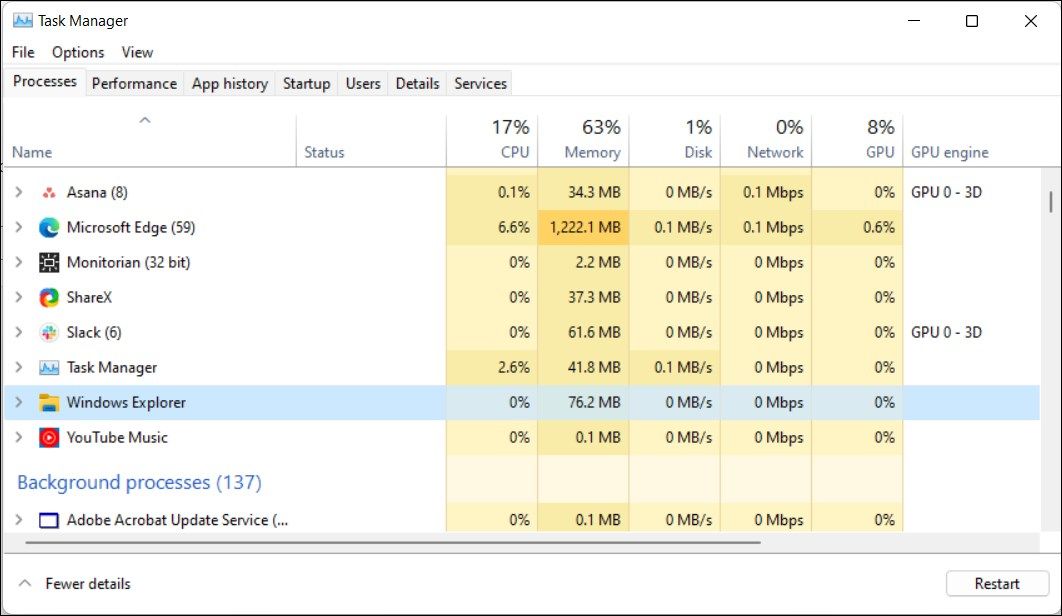

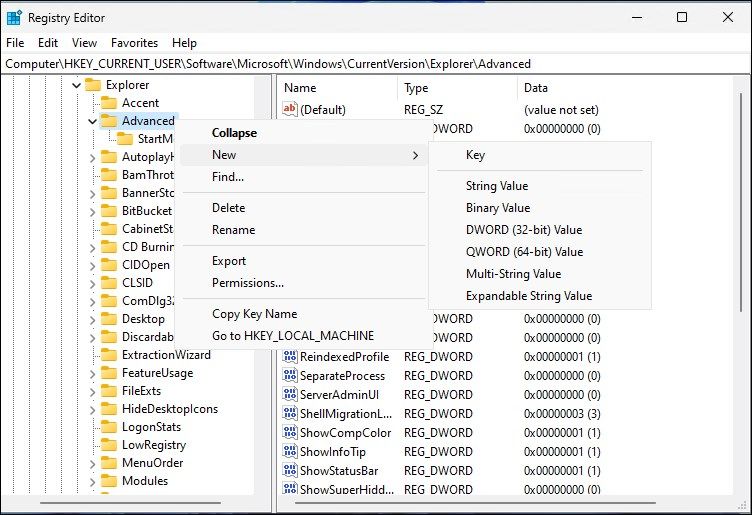
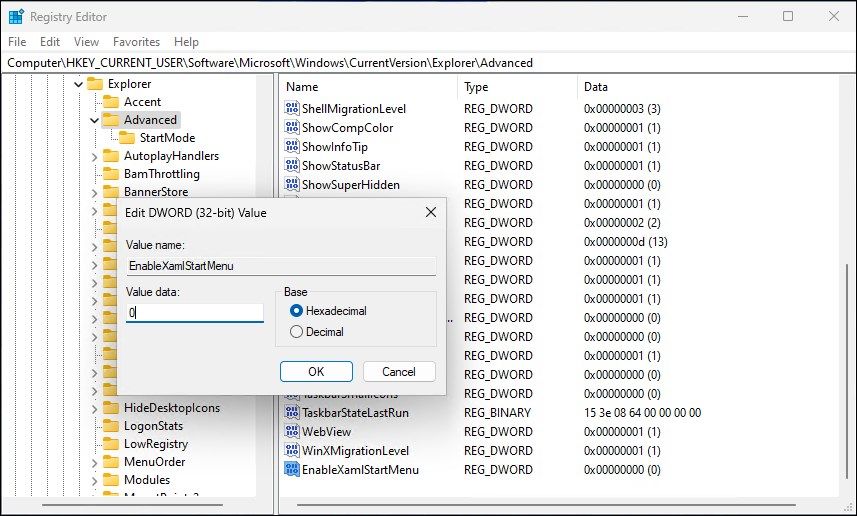


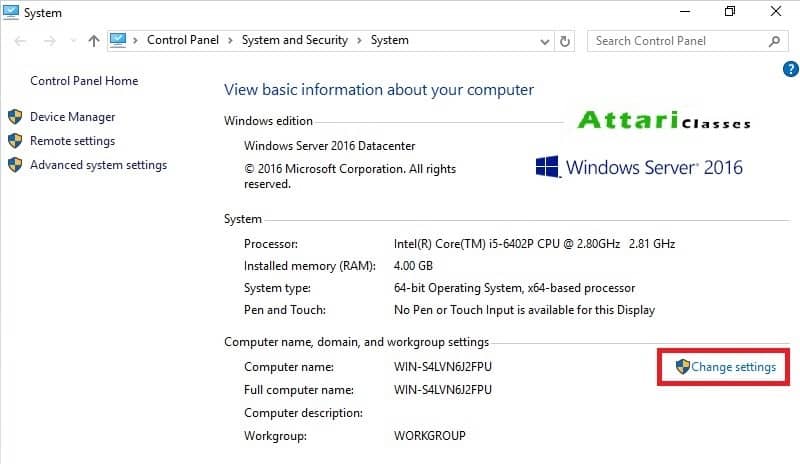


 > Add Account > Add Email Account.


")
")
")
")
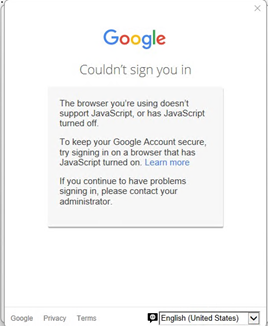
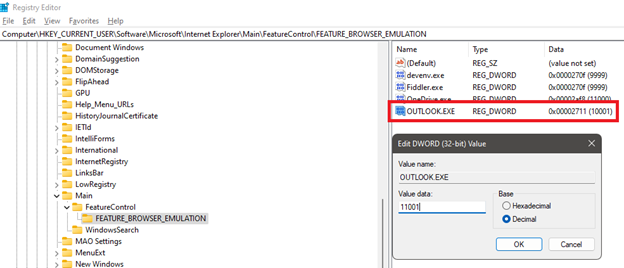


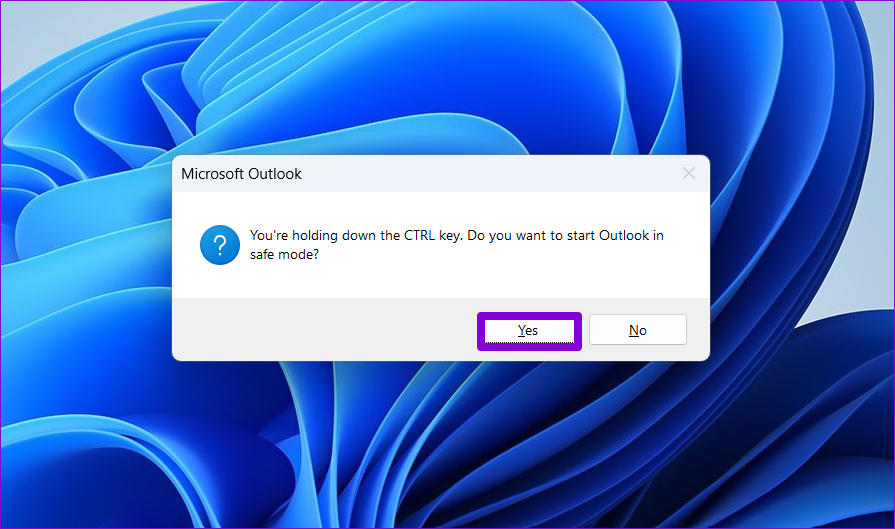
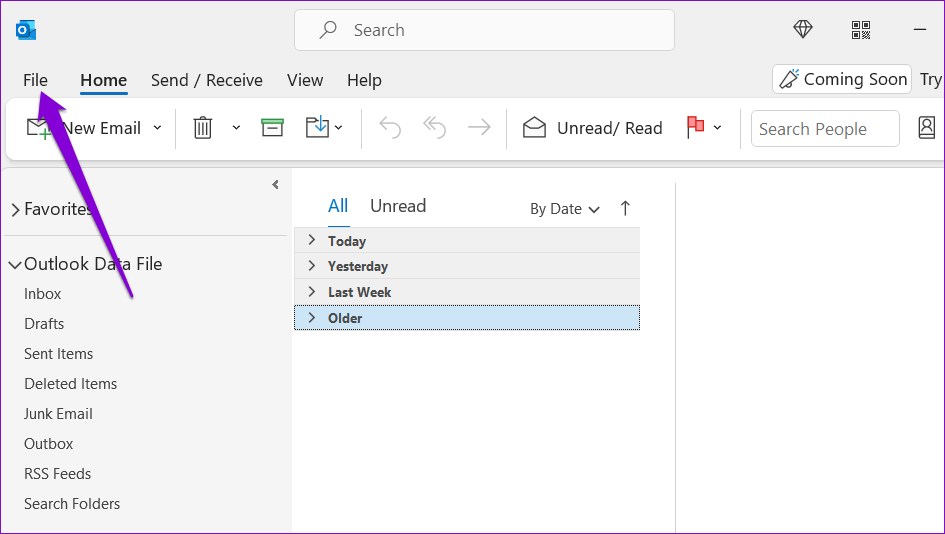
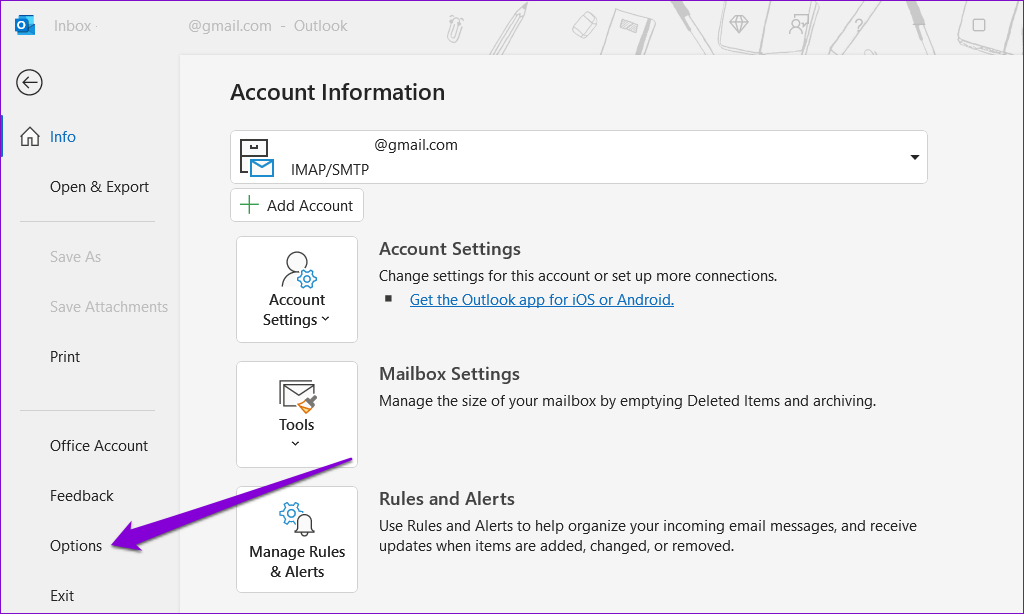
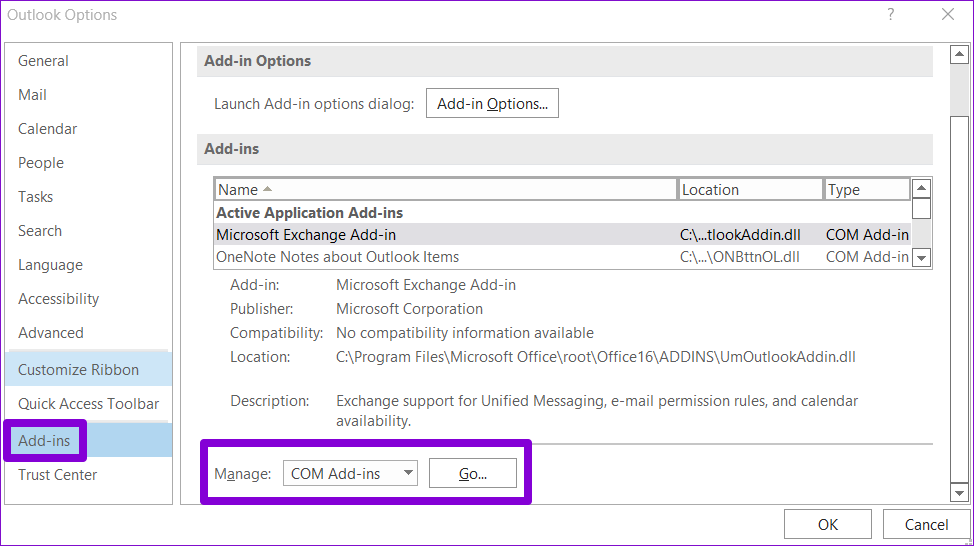
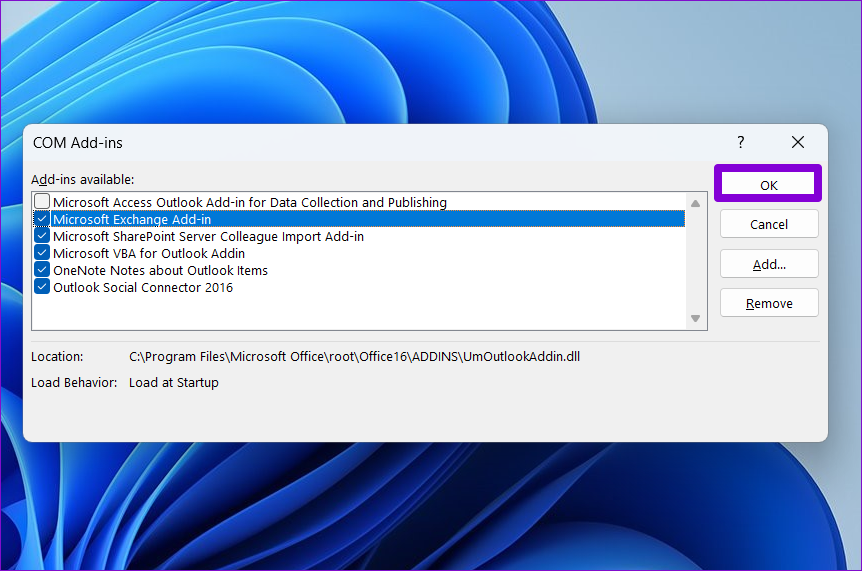

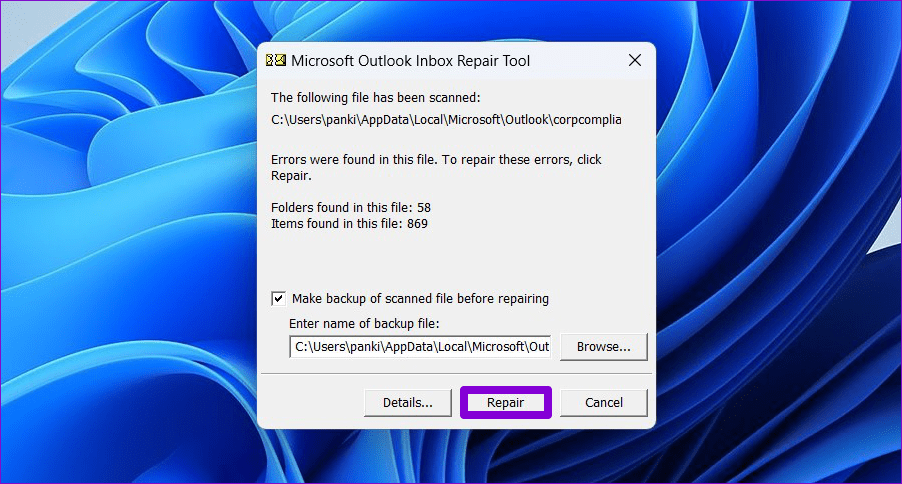
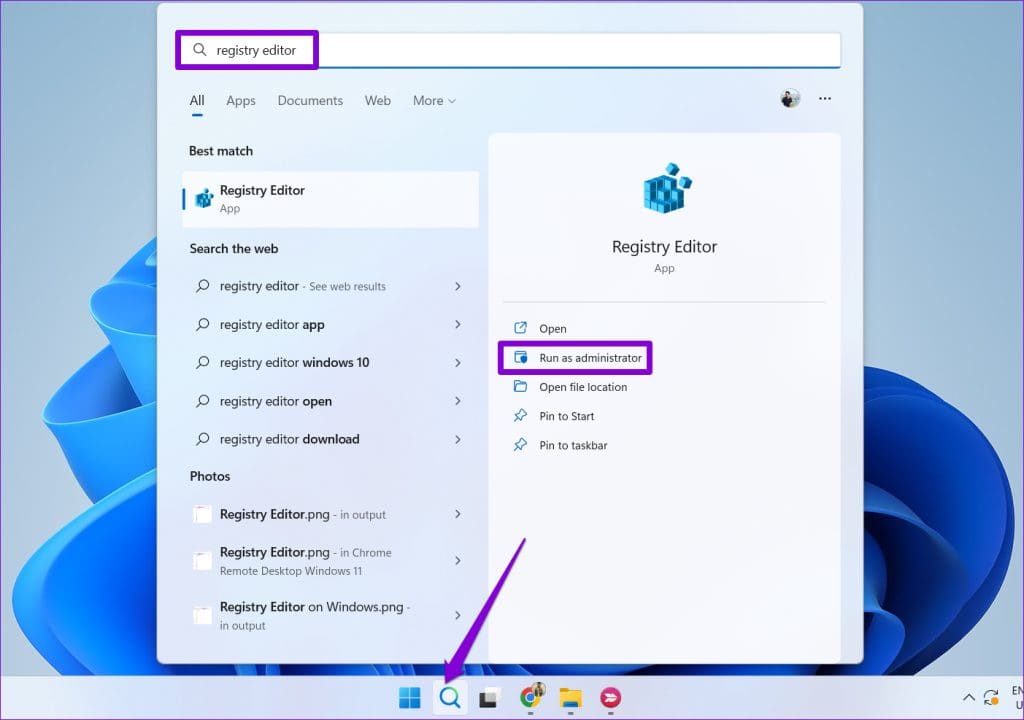


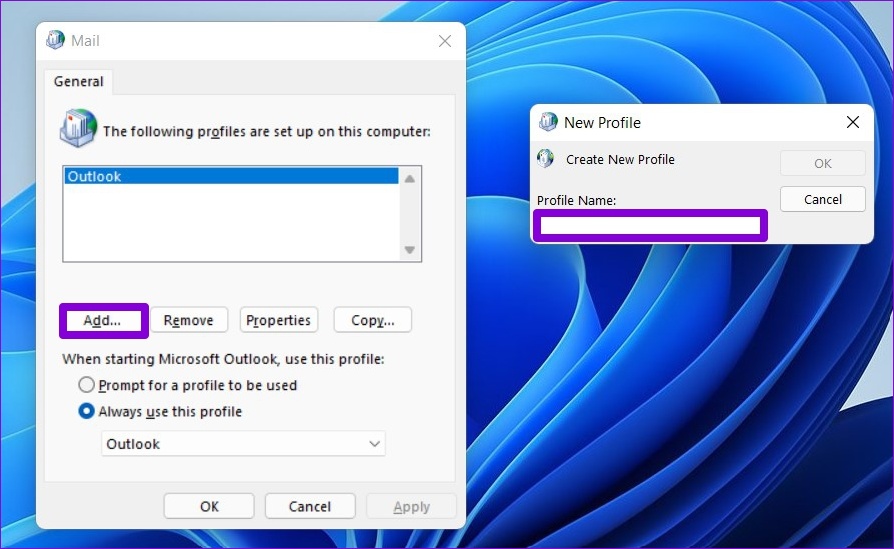

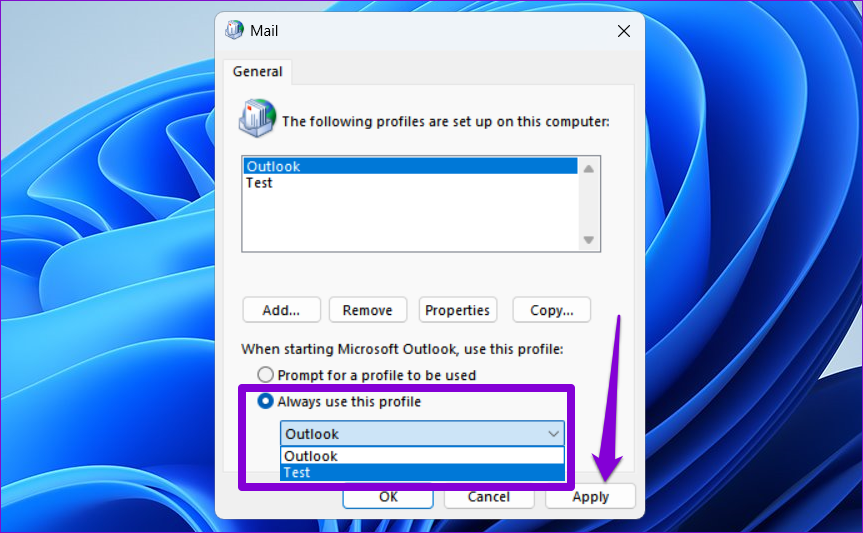


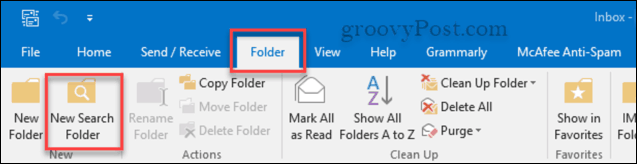

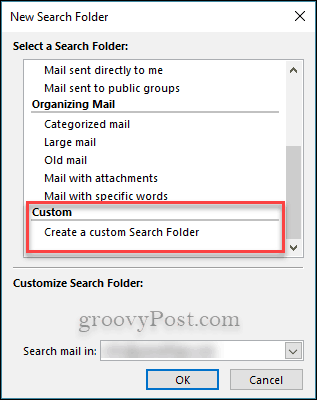
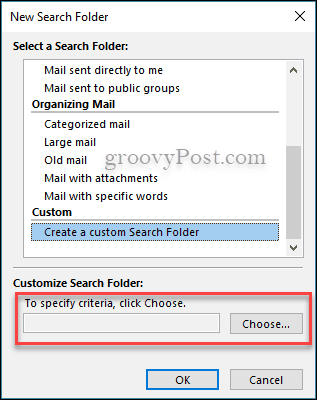
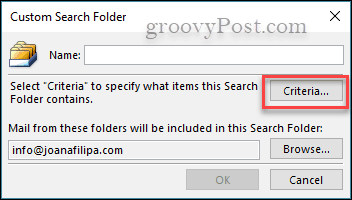 6. Now, you get to choose what Criteria you need your custom folder to have. You can create folders for specific people, subject titles, emails with attachments, and more options.
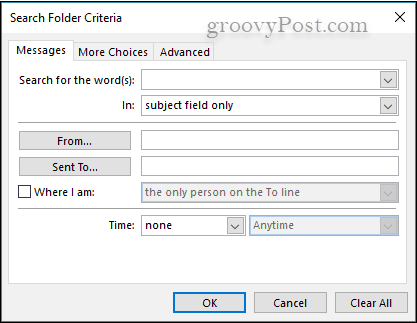


 To increase the maximum size of pst-files and ost-files in Outlook, you’ll need to create and set 2 values in the following location in the
 If you are a corporate administrator and want to adjust the maximum allowed sizes of pst-files and ost-files, then you can use Group Policies as well. For detailed instructions on how to use and deploy Group Policies see


