If an error message prevents you from signing in to your Windows 10 user account, your profile may have become corrupted. We're going to show you how to fix it to recover your user profile or, alternatively, make a new account.
Your user account contains your personal settings, like desktop wallpaper, taskbar preferences, and some program settings like browser history. It can be very frustrating to lose this.
Without further ado, here's how to restore a user profile in Windows 10.
Why You Shouldn't Use the Temporary Windows Profile
If you try to sign in to your normal user account when it's broken, you'll be taken into a temporary account. This usually occurs if a critical Windows update has been forcibly ceased midway through the process.
You'll see one of two errors (or sometimes both):
- You've been signed in with a temporary profile. You can't access your files, and files created in this profile will be deleted when you sign out. To fix this, sign out and try signing in later. Please see the event log for details or contact your system administrator.
- We can't sign in to your account. This problem can often be fixed by signing out of your account, then signing back in. If you don't sign out now, any files you create or changes will be lost.
Obviously, the first thing to do here is to sign out and then back in. Chances are it won't work, but it's worth a shot.
Being signed in to a temporary profile is unsuitable because any changes you make will be reset every time you log out. As such, let's look at how to recover your usual Windows profile.
Step 1: Find Your Security Identifier
First, you need to know the security identifier (SID) of the temporary user account you're being signed in to. This unique string is what Windows uses to control permissions and group your interactions.
- Do a system search for cmd and open the Command Prompt.
- Type whoami /user and press Enter. This command queries the system to tell you the SID of the current account.
- Make a note of your SID. You can press Ctrl + M to enable highlighting, left-click and drag over the SID, and then press Ctrl + C to copy it.
Step 2: Recover Your Windows Profile With the Registry
You now need to edit the registry to recover the original profile. Editing the registry can be dangerous if you mess with the wrong thing, so please follow the instructions below carefully.
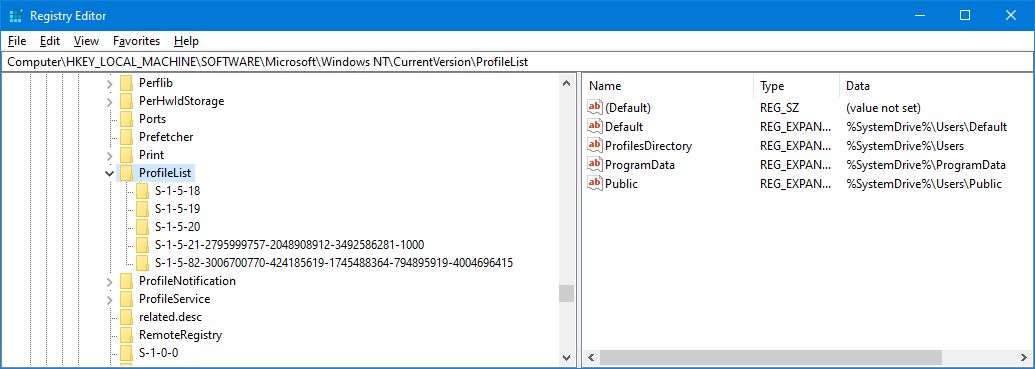
Do a system search for regedit and select the Registry Editor. Paste the following path into the address bar (go to View > Address Bar if you don't see it) and press Enter:
Computer\HKEY_LOCAL_MACHINE\SOFTWARE\Microsoft\Windows NT\CurrentVersion\ProfileListYou will see several sub-folders within the ProfileList folder on the left-hand pane, some containing SIDs.
One of three options should apply:
- Your SID is listed twice, with and without a BAK extension.
- Your SID is listed only once with a BAK extension (e.g., S-1-5-21-2795999757-2048908912-3492586281-1000.bak).
- Your SID is listed only once without a BAK extension (e.g., S-1-5-21-2795999757-2048908912-3492586281-1000).
The process is mostly the same for all three options but with some slight differences. Follow all the steps below in order, but only those which contain your option number.
Option 1: Delete the Duplicate Folder
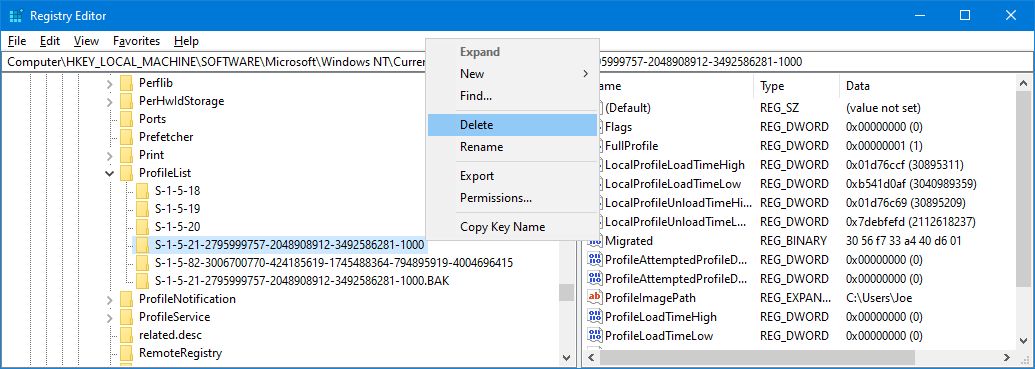
If your SID is listed twice—and only in this case—you need to delete the folder without the BAK extension.
- On the left-hand pane, right-click the folder that matches your SID and doesn't have the BAK extension.
- Click Delete.
- Click Yes to confirm.
Option 1 and 2: Rename the BAK Folder
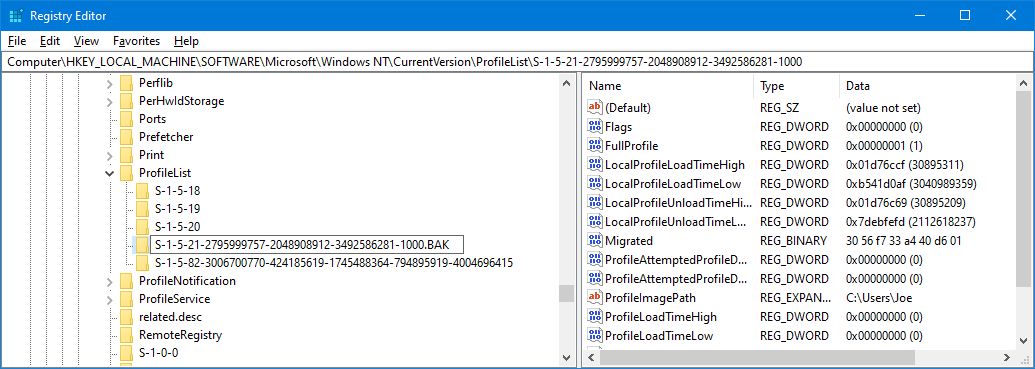
- On the left-hand pane, right-click the folder that matches your SID and has the BAK extension.
- Click Rename.
- Remove .BAK from the end.
- Press Enter to save the changes.
Option 1, 2, and 3: Adjust the Folder Path and State
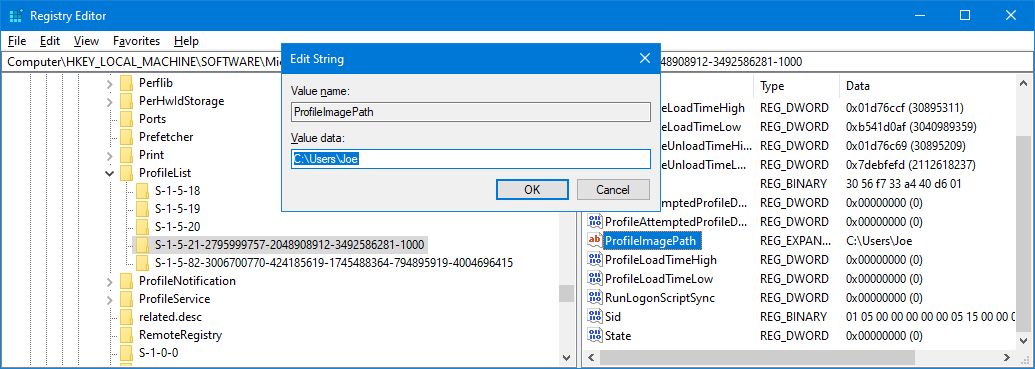
- On the left-hand pane, click the folder that matches your SID.
- On the right-hand pane, double-click ProfileImagePath.
- In the Value data field, input the correct path for your user profile (for example, C:\Users\Joe).
- Click OK.
If you're unsure what the Value data should be, press Windows key + R to open Run, input C:\Users, and press Enter. This will bring up a list of all your user profiles. You can enter the right profile and copy the path from the address bar.
Once you've done this, on the Registry Editor:
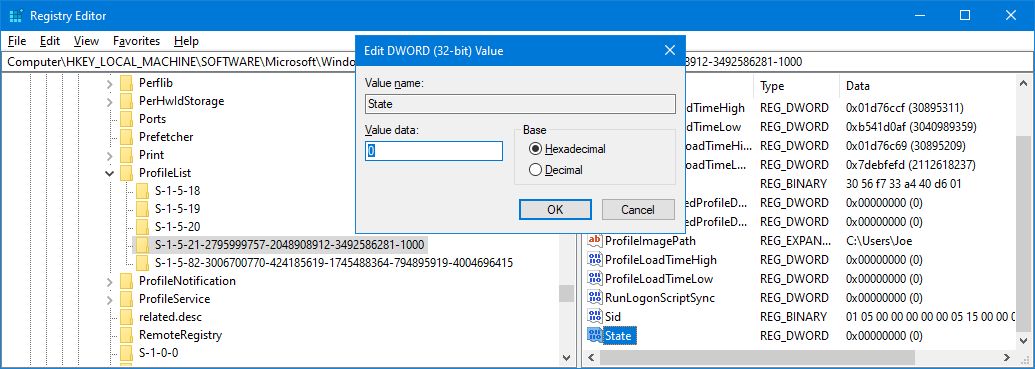
- On the right-hand pane, double-click State.
- Change the Value data to 0.
- Click OK.
Close the Registry Editor and restart your computer. Sign back into your user account, and you should find that everything is restored and back to normal.
If you're still encountering problems, read on to find out how to make a new permanent user account.
How to Create a New Windows Profile
If the instructions above didn't bring your profile back, it's time to make a new user profile. Note that this won't recover your desktop settings, like wallpaper or taskbar preferences, but it will mean you'll have a permanent user account again.
Step 1: Boot in Safe Mode
To begin, you'll need to boot your PC into Safe Mode. To do this:
- Restart your computer.
- On the sign-in screen, hold Shift and click Power > Restart.
- When this has completed, you'll be on the Choose an option screen. Go to Troubleshoot > Advanced options > Start-up Settings > Restart.
- Your computer will restart again. Press F4 to start it in Safe Mode.
Step 2: Enable the Administrator Account
Next, you need to enable the hidden administrator account.
- Once logged in, input cmd in the Start menu search bar
- Right-click Command Prompt and select Run as administrator. This opens Command Prompt in administrator mode.
- Input net user administrator /active:yes and press Enter.
Note that you can reverse this in the future by running the same command; just switch yes for no.
This will enable the hidden administrator account on your computer. Restart and then sign in to this new account.
Step 3: Create a New Account
Now that you're signed in to the administrator account, it's time to create a new permanent Windows account.
- Press Windows key + I to open Settings.
- Go to Accounts > Family & other users.
- Click Add someone else to this PC.
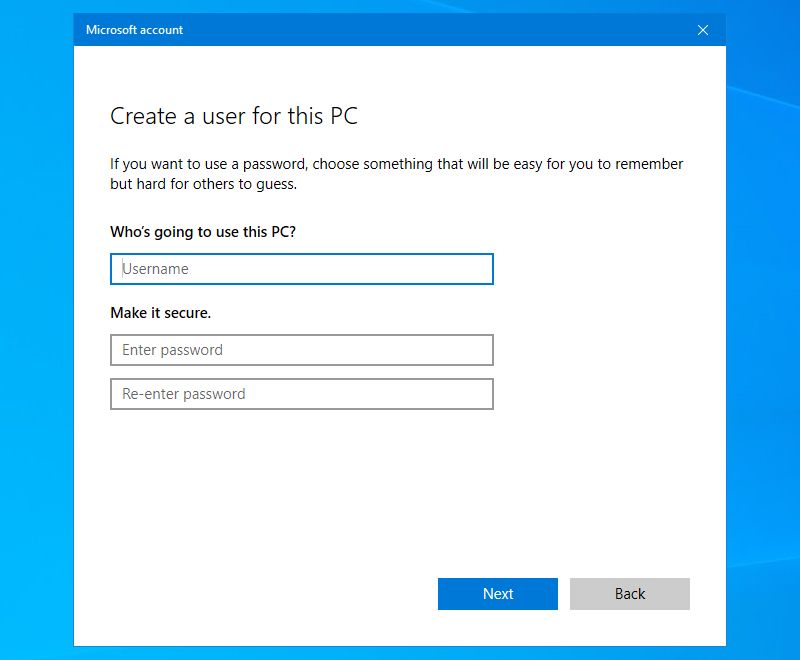
- At this point, you can just follow the wizard through. However, if you want to create a local account instead of a Microsoft one, click I don't have this person's sign-in information and then Add a user without a Microsoft account.
Step 4: Transfer Your Files
Finally, you need to transfer the files from your broken Windows profile to the new one.
To navigate to these files:
- Restart your PC and log back into the administrator account.
- Press Windows key + R to open Run.
- Input C:\Users and press Enter.
- Navigate to your old and broken user account.
Once here, copy and paste all your user files from this old account to the new one. You'll want to do this individually for each folder; otherwise, you might accidentally bring across some hidden and problematic system files.
To highlight all files in a folder, press Ctrl + A. To select specific ones in bulk, hold down Ctrl as you left-click. Alternatively, hold left-click and drag around the files.
Then press Ctrl + C to copy them. Navigate back to the Users folder, enter the new account, and press Ctrl + V to paste your files.
Once done, sign out of the administrator account and into your new account. All the files you transferred will be there.
Remember to Keep Your Data Backed Up
Now your Windows profile has been restored, and you have a permanent user account again. To try and stop this from happening in the future, don't shut your computer down while it's installing an update.
Luckily, in this scenario of profile corruption, it doesn't result in much lost data. Regardless, you should regularly back up your files to protect against all eventualities.


